Friday, June 29, 2012

April MS Journal


I finally found the time to finish working on my April Journal for Marion's Monthly challenge.  I used her April Digi Downloads that can be found at http://www.apieceofcraft.com.


I decided to Coptic stitch the journal and I love how primiative it made this book look.  I used some of Marion's vintage trinkets on the cover and distressed them with patina rub-n-buff  and Picket Fence Distress Ink  to pop a little color on the cover.   The Tim Holtz word plate says "Live in the Moment" which is perfect for a monthly journal.

It is so awesome to look back at each month and see all of the things that have gone on in my life.

here is a video page by page walk through of the journal:


Thanks for stopping in today,

Tonya Gibbs
http://www.psychomoms.com

Monday, June 25, 2012

Cottage Chic "Card Mini"

You are probably thinking "card mini" what's that. Well I took the card spots from Marion Smith's new digital download designs from "Cottage Chic" that you can find on her website www.apieceofcraft.com.
After I printed  out the digitals,  I fanned  them out onto the table and thought about the process of how I want to create with them...the page with the card spots caught my eye. Mini in a mini-so cute....
I took the two digital pages from the mini kit cut them out, distressed the edges and inked them using Distress Inks (pumice stone, vintage photo and walnut stain), added some splashes of white and pale green paint to the blank side of digital, used my fingers to spread the paint here and there...I didn't want an even coat. After all inked I used a wet paint brushed to smooth out the inked edges...gives it a soft look. (this tip was from watching one of Marion's videos).


For the covers-I took two chip board pieces ran them through my cuddle bug with the note page embossing folder. Added some white and pale green paint and walnut stain to all the edges...tip I rubbed most of the paint and ink off with my fingers to give a weathered look.
Stamped the word "Notes" on the cover with a feather, mother of pearl pink button, a stick pin and some Prima flowers for the finishing touches. I bound my book with my bind-it-all machine-which is a great tool.
All this to encourage you to think out side the box, Marion's downloads are super fun to create and play with...look back at some of the card/journal spots and dream of what you could create with them.
"mini in a mini"
"great for a grandparent brag book"
"your child's school pictures"
"mother's or father's day gift"
so many ideas
I can't wait to see what you create with them.

supplies: cottage chic downloads, distress inks, paint, prima flowers, rangers stick pin, feather, vintage buttons, bind it all.
happy creating-Peggy Lee

Friday, June 22, 2012

Fairy Belle - Meet Emily

Last week I shared with you my journal entries using my Sister In Law's maternity pictures. Well, Ms. Emily was due on July 11 and she decided on June 15 that she wanted to meet us all. 

Today - I am going to introduce you to the newest member of the Gibbs Clan -  Ms. Emily Jean Cunningham she arrived very healthy at 5lbs and 6oz and 17.5 inches long.  Our little Princess needed a layout fitting of royalty and Prima's Fairy Belle seemed to do the trick.


I took 2 sheets of the Fairy Belle 12x12 Paper -  Le Toulle is the top paper, and La Spa is the back paper.  Now this gets a bit tricky --on the La Spa paper I fussy cut around the top portion of the fairy at the top and used her as a pop out.   On the Le Toulle paper I cut out the center section, and used it as a frame over the La Spa.  Then added some dimensional tape between the two layers. Here are some close up pictures of those sections for a better idea.


Then I took the 6x6 paper and cut the fairies and flowers from it to use as layers around the photos.  I added a few of the Eline daisies from Prima and Pearl Centers. I used a Martha Stewart Punch with some Scrap Prima paper to make the daisy leaves for a little more layer.  Then sprinkled a little fairy dust with my Starlight - Clear Glitter Pin over all the stars and on the Eline flowers.  I know the sparkles don't show well in the photos but the layout has a subtle glimmer sprinkled here and there.

This is a Top view so you can see the dimensions. 


Thanks for stopping in today,

Tonya Gibbs

Resources:
  • Prima:
    • 12x12 Fairy Belle:  Le Toulle and La Spa
    • 6x6 Fairy Belle Paper:  Firefly, Dream, Summer Dream
    • Eline Small Daisies
    • Flat back Pearls
    • Scraps from the Annalee Paper Collection for the leaves.
  • Martha Stewart Crafts
    • Trio Butterfly Punch - used scraps from Fairy Belle paper.
    • Branch Punch - scraps from Annalee Prima Paper Collection
  •  Gelly Roll
    • Black Pen (outlined punched butterflies)
    • Starlight Pen (glitter accents on flowers and printed stars)
  • Lace
  • House of 3  - Digibrush  Precious Moments - Gratitude Brush Set

Thursday, June 21, 2012

Primrose Card Share

When all else fails make a card. That's my mantra for this project. I kept staring at the Primrose papers thinking these are so beautiful. I started out making a mini that I didn't like the end result so.....We won't speak of that again. 

Then I tried making a layout and I liked it but.....it just didn't end up like I pictured it in my mind. 

And finally I said, Ok, Angela. Go for what you know! Make a card and I'm a happy girl again. Sometimes everything you try doesn't end up a masterpiece or worst it looks a hot mess, but hey, the fun was in the journey and my journey ended up with this card using Marion's gorgeous Primrose Mini book kit


I went through all the papers and picked out a few of my favorites. I loved these specifically because they reminded me of Paris and I just completed an engagement scrapbook for a friend who got engaged in Paris on top of the Eiffel Tower....(jealous!)

Next I had to decide on a background. I wanted to go with a floral background to match the papers then I thought of Stacey and Clinton from "What Not to Wear" and how they always say clothing and prints should go and not match. Well I decided to "go" with a geometric background using colors that "matched." I used PapertreyInk's Rosie Posie stamp set. Love those hexes. I used Hero Arts shadow inks to stamp the background. 

After that I just cut out the gorgeous images, distressed the edges, and arranged them on the front of the card. I added a little tab punched piece on the side because I'm obsessed with it. (That's the only reason it's there...Ha!) 

Lastly I added some flowers I received in a RAK and stapled them in place. The card isn't bulky except for the flowers. I did use pop dots but very thin ones. And this card was done and done. And I love it. I couldn't even add a sentiment because I loved the papers so much. I printed them out on some Matte Photo Paper that I found a Sam's a few months ago and the papers printed gorgeously. The colors were very saturated and so lush. Simply gorgeous papers. <---Did I say that enough?! They are gorgeous, I tell ya. 


Monday, June 18, 2012

"Be Free" Mixed Media Canvas

Where do I begin, June is a busy month with school ending events, graduations, parties, father's day, birthdays. Wow busy is an understatement-so with all that said I did squeeze some time in to create my first "She Art" mixed media canvas inspired by Christy Campbell Tomlinson.

When I mean inspired I mean this girl knocks my socks off with her creative spirit and beautiful heart. If you haven't checked out her blog I would highly recommend it. With what I have learned by watching Christy and Marion Smith my mind is exploding with creative ideas. I am new to mixed media, and let me tell you I love it...it's so freeing. I was having a down day and decided to try splatting paint, stamping with inks, rub- ons here and there...gluing scraps of paper-you can get so lost in the creative process.
Texture is the key in mixed media and a real joy to create, love the splashes of paints, script stamps and pen scratches.... see the picture below of the close up of the gesso and blue-green texture well that is a mistake turned into a WOW moment...see on the dress after I painted over the brown paper, it needed more textured so I glued on glitter then scrapped it off-wasn't going to waste it so I started scratching it on here and there...really cool effect!


To get started:
-canvas
-paints of your choice
-paint brushes (your fingers)
-gesso, glue
-stencils
-stamps, inks, pens
-just have fun

It's all about creating from your heart.
Peggy Lee
/http:pegbaker.blogspot.com/
Supplies:
6x6 canvas
gesso
decoupage
scraps of paper
paints (folk art, Claudine Hellmuth studio, Ranger Adirondack paint)
inks (archival black in by Ranger)
stamps (script-Close To My Heart)
flower- Tim Holtz Tattered Floral die cut
stencils
vintage lace and buttons
Rub-Ons
glitter
Print out of butterfly (transfered)
just had fun......


Friday, June 15, 2012

New Arrival - Smash Entry

My Sister in Law is expecting her 3rd child, and Aunt Tonya is so excited.  Babies just have a way of making me all gooshie inside.  Ms. Emily will be niece number 8 for me.  I always joke around and say that I'm a grandmother "In Training".  My goal is to be  "Everything" to all of them.  I want them to beg to come see me.  You just can't spoil them too much.

I noticed a trend that is different from when I was having babies 16 years ago, and that is Pregnancy photos.  When I was pregnant with my kids - I never thought to do these photos, and I wish I had.  Kelly's friend Liberty Nobles photographed her pregnancy photos, and I wanted to make a simple little *Smash Spread.   I recently made Kelly a mini album to store these pictures using Prima's new Sunkiss line.  So I had all these scraps that needed to be used.


Except the flowers - everything on this page was a scrap.  The Rub On, on the left page was a scrap from Daisy Dee and has been in my stash for YEARS!  I took the scraps of the Sunkiss paper and pieced them together to create a lovely background.  Then the tiny little scraps I punched a bunch of butterflies to scatter all over the top of the page.   The New Arrival is an old title transparency that I've had for YEARS from Heidi Swapp. The flowers are Prima's small Eline flowers again - they have been around for a couple of years - and I added buttons in the centers of them.  I used an MFT die to cut small doilies from scrap white paper. Then I cut the doilies in half to border the pictures.  Emily is the new baby's name, and I used an old set of chipboard letters.


On this page, I kept with the same theme, but I used some scraps of lace for the picture border on here. 


I just love how these two pages turned out.  I really loved working with the Prima Sunkiss line, and the fact that they took these pictures in a field of yellow flowers - made it perfect.

Do you *Smash?  I find it rewarding to use my scraps and left over embellishments in my *Smash journals.  It feels so good to being able to purge so much at one time.

Thanks for stopping in today,

Tonya Gibbs

Monday, June 11, 2012

What sparks my "CREATIVITY".

 Today I want to share what moves me to be "creative". It's the simple things that surround me everyday, or catches my eye for a quick moment. Nature is one of my good olde source of inspiration and beauty, while visiting my mom up in Northern Maine a few summers back. I grabbed my camera to explore the gardens, take a walk back on memory lane. Love this old tracker and yes I use to drive this beauty and I spent hours pretending I was the farmer harvesting the fields.
First what draws me is the memory, but just look at all that weathered marks the faded red paint, the rusted elements (like the chains around the tires-rusted). "it starts the spark within me"
Taking a photo of a burnt red/yellow sunflower being kissed by a bee takes my breath away. That little guy didn't care one bit about me being so close admiring his little job of collecting nectar. Instant inspiration while typing this post, this photo of the sunflower has sparked my creativity for a canvas piece...

Loved by the elements is this dried up sunflower that will be winter food for the birds.
 Backyards can be a wonderful place to draw from, here are some trees in my yard.
The beautiful mushrooms I believe are growing on tree barks, just look at all that texture and depths of color.  Call me crazy but the thing that thrills me the most in all these photos and in life are "weathered worn-natural distressed-feel and look.  
 The freak moments that cause me to starch my head and say I wonder how that grew on there, where did that come from....nature is full of inspiration. I encourage you to grab your camera and explore your
backyards, parks and even your towns (most towns have railroad tracks or olde forgotten barns).

I love the little flowers (or weeds) that have attached themselves to the old tree that lives at the edge of my flower garden.
Look at the tree bark all that texture and color. My mind is exploding with possibilities to make art.
What moves you?
What touches your heart?
What takes your breath away?
What speaks to you?
Create from it!

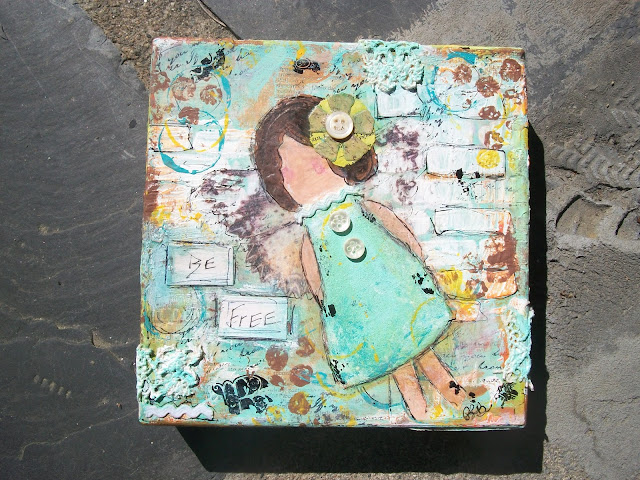
And here it is my creative piece that was inspired by the photos. I even love the stone steps that I took the photo on, do you see the leaf that is placed at the top of the photo totally by accident-laid where it fell-a thing of beauty.

"sometimes it's the simple things"
enjoy,
Peggy Lee

Friday, June 8, 2012

Overcoming A Creative Rut

I've been in a scrappy rut lately. Seems like everything is starting to look the same.  So I decided to create a self challenge to snap me out of it. 

My Mission - Use supplies that are new, use something old, try new techniques, and Don't CLUTTER IT UP!  That last one was a real challenge cause I like LOTS of stuff!  I want to play with a product that I've never used. The Prima Resist pieces, and Prima Canvas Tape were my new products. I've used the resist pieces before in other layouts - but I've never colored them. I also pulled out my Timmy Distress Markers, and decided to use them (they are like new - rarely use them).
I made this layout with photos of my two lovely nieces Averie and Addie.  (You will see lots of posts with the pics from this photo shoot.)


I outlined the resist pieces with the Timmy Distress Markers then used Glimmer Mists instead of water to activate the ink. I just love how these two products work together.


I love all the textures, and colors in this layout. The two small photos compliment the layout well, and become larger with the layered embellishments. The Hymnal that was used was titled Good Morning, and talks about giving thanks to God for a beautiful morning.


Here is a start to finish video of me making the layout


I believe this layout will be treasured as one of my favorites.

Do you ever get in a creative rut? How do you kick start your brain into thinking differently?

Thanks for stopping in today,

Tonya Gibbs
http://www.psychomoms.com

Resources:

  • Prima: Printery Canvas Resists, Flowers - Vivian Eliza, Cotton Tape (I made this into a tags), Paper - Fairy Flora Collection "Sunny Day", Brick Stencil
  • Tattered Angels:  Glimmer Mist - Wheatfields, Pink Taffy, Honey Dew Melon.
  • Ranger Ink: Distress Refill - Peacock Feathers, Walnut Distress Stain, Distress Markers - Worn Lipstick, Brushed Corduroy, Peeled Paint.
  • Gesso
  • Lace Remnant
  • Hymnal Page
  • Eyelets
  • Ashlynn Vines

Monday, June 4, 2012

Made from the "HEART"

My oldest daughter was leaving this weekend for a summer job to raise money for her college tuition for this fall. This event was so emotional for us, she would be flying for the first time, living in a hotel for two weeks traveling with people she doesn't know. This momma had a mini meltdown. So I decided I wanted to make something for her to write down her thoughts and experiences while she is away.
Here is what I created a handmade journal using Marion Smith's digital designs.
 I know when she looks at it, she will think of home. Maybe this will give her comfort on her trip.

 "a dream is a WISH your HEART makes."
Handmade digital journal 4x7 in size tutorial.
Step one:
Take a 8 1/2 x 11 piece of card stock
cut a piece of muslin to fit
spray card stock with spray adhesive
press muslin and card stock together for a good seal
place in printer and run it through.
Step two:
cut chipboard and burlap down to 4 1/2 x 7 1/2 for the covers
use spray adhesive and trim off edges.
Step three:
trim down the digital print out
peal off of card stock

Step four:
Glue down digital print on the covers
using multi-medium matte


Step five:
cut inner pages for taking notes
distress edges

Step six:
punch and set eyelet holes
ink edges if desired.

use twine, jute or ribbon
to use for binding
or binder rings.


It's that simple and easy, I created this journal in about 4 hours (due to drying time). Here is a look at the inside of the journal and back cover. I love this digital page with journal lines and roses, on this page is where I wrote a little love note to my daughter.
Look outside the box when using Marion Smith's designs. I encourage you to give the digital pages a try, you will love them.

Happy creating,
Peggy Lee
/http://pegbaker.blogspot.com/

Supplies:
Marion Smith's April digitals
Chipboard
Muslin
Burlap
Claudine Hellmuth Multi-medium matte
Craft Bond Spray Adhesive
Tim Holtz: Distress ink (brushed corduroy) Stamp (odds and ends CMS100)
StazOn ink (black)
Twine, eyelets
Prima (flowers and gems)
Recollections (felt image)
Tattered Angels glimmer mist (coffee shop and juneberry)
Helmar 450 glue

Friday, June 1, 2012

Featured Artist | Sandra Bletzer

Hello,


My name is Sandra Bletzer and I have been scrapbooking for the last 15 years.


My passion for the art is a direct result for my desire to preserve memories for my family. Over the years I have evolved my style and process of putting layouts, cards, or altered projects together. I first came across Artsy Addicts after following Marion Smiths on YouTube and Live With Prima, her style has inspired me to create freely... 'There are no rules to making something pretty. '


I wanted to share with you my process for a layout I created for my godson. One thing I love to do is gather all my paper / embellishments together and challenge myself to use them freely. Once I have chosen everything I may or may not use, I place them in a bowl until I'm ready for them.


Next, I begin to lay everything out and keep adding; I believe you can never have enough layers ... more is best!


The end result is a very layered and collaged layout which I will later frame in a shadow box; remember there are no rules in making something pretty. Create freely and do what you love.


www.mrsjjb1999.blogspot.com


Art Journal Share

The Artsy Addicts Facebook page has been filled with mixed media and art journal projects for the past few weeks. I just love seeing the things that are being created.

Art journals are nice because they provide you with a creative outlet with no agenda. It is a place to play with techniques or mediums.  No rhyme, reason, or objective - JUST CREATIVE PLAY. It is nice  to  have a space to sit and play.

Today, I was inspired to share with you my favorite pages in my art journal. This page was a collage of things that were on my desk. LOTS of scraps, things I fussy cut, and never used.


This is a closer look at the top.  The paper on this page is my favorite Prima paper of all time - Flights of Fancy.  All I had left of it were the tiny scraps, so I decided to use them as my base.


Here is a glimpse at the bottom of the page...


Unintentional at the time, but I decided to write down all the things that I love. Like Fried Chicken, Butterflies, TH Film strip - I hope he never stops making this, Clocks,  Keys, and vintage images. Then as I began doodling I started writing in things that came to mind - like Psalms 23, I shall never fear, I'm alive, and Time is now to give thanks. There are so many textures, colors and elements to this page, I can literally sit and stare at it for hours.

This is a much simpler layout but just loved the theme.  "You & Me" was inspired by the Daisy rhyme "He Loves Me - He Loves Me Not".


I used the stem of the daisy as a time line - and the broken petals represent the loves me loves me not game that young girls often play when they grab a daisy.  Daisies are one of my all time favorite flowers.  I just love them, they always looks so fresh. 

Keep sharing your art journal pages, I love seeing the creative play.

Thanks for stopping in today,

Tonya Gibbs
Related Posts Plugin for WordPress, Blogger...
 
Pin It button on image hover