Monday, May 28, 2012
Friday, May 25, 2012
Father's Day Frame
Thursday, May 24, 2012
Marion is on Live with Prima tonight!
Thursday, May 24th at 6:30pm PT/ 9:30pm ET/ 1:30am GMT
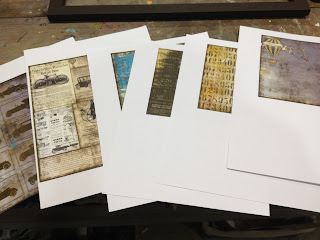
You will love the color scheme and the vintage look of this project.
...
Prima Products:
552091-Meredith-Merlin
843557-Printery-Folio
843526-Printery-Page 4
843489-Printery-Emperor
843496-Printery-Pressman
843502-Printery-Negative
843519-Printery-Signature
552671-Breton Vines Chronicle
930059-Vintage Trinkets
930028-Vintage Trinkets
539139-Calcutta Leaves
534158-Sprites No. 3
551414-Say It In Crystals
Tuesday, May 22, 2012
Featured Artist | Sharalee Lee
Hi, I’m Sharalee Lee.
I am an equal opportunity crafter, voracious reader, love nature, cooking, baking, and garden as much as I have time for and basically keep my munchkins life as normal as possible through our ever changing lives. Routine, even the mundane ones, are what keep the kids from freaking out every time Daddy has to leave, either for the day, a week or the year. I try to keep them as involved in everything that I can as much as possible and have found that crafting is a great way to interact with them but at the same time give them enough space to be themselves. Military life can be crazy hectic but it’s the little things like family, friends and being creative that make everything easier to deal with.
I stumbled across Artsy Addicts one day while I was watching various craft videos on YouTube. One such video was of Marion Smith demonstrating something, I do not even recall what now, but she mentioned her new Facebook page and of course I was instantly interested in a group of craft minded individuals sharing ideas, products, and projects. What better way to get inspired than by other inspiring crafty folks.
I find inspiration in all sorts of things.
Some of my favorite projects are my least likely ones, like my gel pen drawing of a lone tree that I did years ago while in high school, or my Raggedy Ann cover on my sewing machine, and the family stockings that I crocheted. Those took a while because I had to create a pattern from scratch because at the time there were no similar ones crocheted like them. I also have a paper bird house I made that I really love and haven’t as yet gotten around to creating any more but I do want and plan to.
I am really loving my latest project. I am creating another album using cereal boxes. I recycled two cereal boxes to create the cover…honestly, making album covers is my favorite use of cereal boxes yet. J I don’t generally keep my scrapbook projects unless they are 12x12 pages, they almost always get gifted and a few I have even sold, but this latest album may actually prove to be difficult to part with. I am not sure if it’s the paper I am so in love with or the style of album itself but I figure I can just recreate the style of album in a different paper and find out right? J
There is just something about creating from scratch, whether it be sewing, crochet, scrapbooking, paper crafting, woodworking, random DIY projects, baking, cooking or gardening, if I can make something from practically nothing or reinvent something I am quite happy doing it.
It does help though that my amazing husband is so happily supportive of the things I choose to do. *Big Cheesy Grin*
To see some of my creations in more detail or just good old curiosity bites, you can go to my blog http://uniqueleeme.blogspot.com/ . I try to post at least once a month and occasionally run into some time where I can actually do more but no worries when I get the time I will post more in-depth photos of my latest album and some basic info on how I did it.
Country Chic Mini Book Sneak Peek!
I've been working hard again and just wanted to give you a sneak peek at my latest printable mini book coming out this weekend! I'm really loving all the grays, whites, and taupes. I think this book would be perfect for a wedding mini or anything really. Anywho here is the peek, I hope you like it and make sure to check back at the site for this kit this weekend. It has a lot of awesome goodies to go with it and it includes an awesome binding tutorial that is one of my favorite binding methods! The video tutorial only comes with the kit it will not be public on youtube, so enjoy!
xoxo
Marion Smith
Monday, May 21, 2012
ATC sized Primrose Mini
On the cover I used ATC sized sticky backed canvas and painted it with Santa Baby and Creme de Chocolate Glimmer Mist. I used Marion's Vintage Trinkets for decorations and one of the new Tim Holtz phrase plates.
REDUCING YOUR IMAGES
To print the image in ATC size - in the Printer Dialog box change the Page Sizing to: Multiple pages and Pages per sheet to 1x2. Make sure the orientation is also set to Portrait. This will reduce the size of the images to half the size and give you the ATC size.
Make sure you do this with all of your add-ons, covers, and embellishments in order for them to print to scale.
Here are the two box side by side to show the difference in sizes.
I think I want to make one of these each time I do a monthly journal. Then at the end of the year, I can share them with my scrappy friends for Christmas presents.
Thanks for stopping in today.
Tonya Gibbs
http://www.psychomoms.com
Sunday, May 20, 2012
Danielle Mack-Guest Designer
My name is Danielle Mack and I enjoy everything creative. I started scrapbooking two years ago and haven't stopped since. I had no idea how addicting it is! I am a card-maker but I also love to create mini-albums, tags, jewelry, and altered projects. I paint and draw as well. The best thing about scrapbooking is sharing my projects with others. Making a card or altered gift for a friend or loved one is what I love about crafting the most.
I heard about Artsy Addicts through Facebook. I think the Facebook group is a fun way to chat and share with other artists. Sharing and supporting one another keeps us all going in a positive direction.
I have an altered project to share with you. I haven't played with jewelry in a while so I decided to create a simple piece to share. I used Tim Holtz pocket watch as well as papers from his Lost & Found paper stack. The chipboard sticker I used is from Melody Ross. I then added bling and seam binding to finish my necklace.
Saturday, May 19, 2012
Prim Rose Journal
I printed my covers on grunge paper and they have a really nice suede feel to them. They were mounted onto black chipboard for additional stability. Then I decorated the cover with a Tim Holtz key hole, and one of Marion's Vintage trinkets.

Here is a step by step video of the completed book.
Thanks for stopping in today,
Tonya Gibbs
http://www.psychomoms.com
REFERENCES:
- videos for the binding technique: Binding Technique 1
- videos for the binding technique: Binding Technique 2
- Purchase the Journey kit
- Purchase the Prim Rose Kit
Wednesday, May 16, 2012
5 Step mini Idea Board!
 |
Step 1. Start with a blank wooden frame from your local Micheals craft store. |
 |
Step 2. Paint the wooden frame inside and out with an acrylic paint such as Deco Art. |
 |
Here is the board that I glued the paper down on. I used Helmar glue. |
 |
All the paper is glued down. Now I just glued all of my newspaper clipping from the paper collection I downloaded. |
Tuesday, May 15, 2012
Great American Scrapbook Convention in Arlington Texas!
So excited about teaching at the Great American Scrapbook Convention, I'm teaching 3 mixed media classes all three days and they are loaded with awesome techniques you are sure to use over and over again! I hope some of you will be able to join me, one of my very favorite classes is the paintables layout because we'll playing with watercolor paints, acrylic paints, and some of my favorite texture mediums. Not to mention Utee flowers!!!! Oh yeah we're busting out the melting pots! Here is a itty bitty sneak peek enjoy!
Register for my classes here
My classes are:
100+ Blooms and techniques
Paintable Layouts
Mini Art Journal
xoxo
Marion Smith
Monday, May 14, 2012
All Babies are Little Darlings

Close ups of the pennants.
Baby Shower decorations can be simple but adorable to make.
Invites can fit into a scrapbook layout, the banner can hang on the wall in the babies room.
What party creations have you made?
Peggy Lee
/http://pegbaker.blogspot.com/
Supplies:
Graphic 45- Little Darlings paper line
Bazzil card stock
Distress Ink-Vintage Photo
Helmar- 450 Glue
pop dots 3-D
Punches
Ribbon, crepe paper, flowers, buttons
Sunday, May 13, 2012
Happy Mother's Day!!
Friday, May 11, 2012
Featured Artist | Juliana Montoya
My name is Juliana Montoya,
I’ve been scrapbooking for almost two years but I’ve been playing with paper from a very young age. About two years ago I fell in love with papers, flowers, trims and anything that I could use to create layouts, cards, tags, mini albums and altered items. My passion grew stronger the more I learned about scrapbooking. I have a strong passion for scrapbooking and I love to share my ideas and creations with everyone. I love the vintage and shabby chic style and I have found a lot of inspiration from many wonderful and talented artists.
I like to share my work and creations on my YouTube Channel, Facebook, Blog and now Pinterest…… I am in love with Pinterest too hehe ;) I found Artsy Addicts through a few people on Facebook and I am so thankful because I have met many wonderful people. This is one of my favorite things about my hobby. I love meeting new people so please don’t be shy to stop by and say Hi.
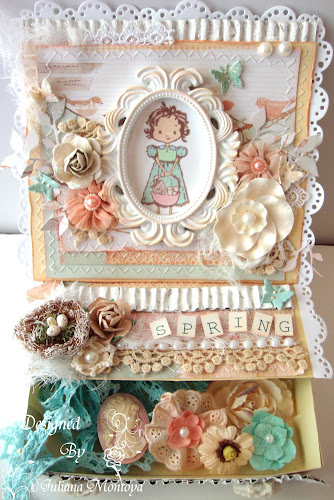
One of my favorite paper lines is the Prima Songbird Collection. I was so excited when I first purchased the papers and a few embellishments. I think it screams Spring and Shabby Chic… one of my favorite combinations. I created this Drawer Easel card using this collection. I also used the Prima Stamp she is super adorable! I colored her with my copic markers and put her inside this white frame. I love to stitch on paper and on my cards. I challenged myself to embellish this card with as many Prima embellishments as I could. Inside the drawer I store of Prima flowers and a few other embellishments.
I hope that you like this card and thank you so much for stopping by! Thank you Angee for giving me the wonderful opportunity to be a guest designer for Artsy Addicts Blog.
Hugz
Juliana Montoya
ILuvVintageScrap
Prom 2012
When we were taking photos, she did this flirty pose. After all the photos were printed, this one ended up on my favs. list. It was so playful, and captured her personality. I decided it would be the first to scrap.
I have a youtube video of me making the layout from start to finish...
Thanks for stopping in today,
Tonya Gibbs
http://www.psychomoms.com/
Resources:
- Prima: Printery paper "Negative", Printery 6x6 ledger paper, Printery Chipboard Pieces, Lilac Roses, Sequin Trim
- Lace, Seam Binding, Bloomers,
- Doily
- Tattered Angels: Glitter Glam - Stilletto, Glimmer Mist: Dried Hydrangea
- White Staz-On
- Tim Holtz Distress Ink - Black Soot, Distress Tool
- Music Stamp
- Cricut Cartridge "Summer In Paris"
- Confetti "2012"
- Black Chipboard
Thursday, May 10, 2012
My Scrap Space | The After...
Here it is..My messy craft table.
This table was a great find at my local big lots. It was designed to be a bar height dining table but it makes the perfect scrapbook table. It gives me lots of space to spread out and work on multiple projects at once....or just push one project to the side and start working on another one.
In the top left of the picture you can see all my white cubes that I so love. I found these with the drawers recently at Michaels and they are fabulous. I love catching those on sale.
I created 3 projects before snapping this picture so this is the aftermath of a layout, a card, and an altered project.
The one thing I really love about my messy desk is all the color inspiration I get from it. I sometimes will take a picture of my messy desk and look at it for color inspiration. What colors are side by side or on top if each other that I would never normally put there. It always works me out of a creative block.
Link me up to a picture of your scrap desk. I'd love to see how you all work.
Want to see the outcome of all this mess....Click here.
We have another Artsy Addicts featured artist on Saturday.
Sweet hugs.
Monday, May 7, 2012
ATC cards: for my Journals
I have a challenge for you Artsy Addicts followers: Pick out your favorite Marion Smith digital pages and create a ATC card, post it on our facebook page...We would love to see what you come up with.
Thank you for reading and leaving comments.
Peggy Lee
/http://pegbaker.blogspot.com//
Saturday, May 5, 2012
AA Featured Artist | Carrie Taylor

Hi my name is Carrie Taylor.
I have been scrapbooking for about 8 yrs now and i fell in love with it the moment I started. My sister tried talking me into starting this hobby for almost a yr, finally i bit and gave it a try and i was hooked instantly. I love to learn and there are so many talented people in this craft, i just soak it all up.
I am addicted to youtube for inspiration and it amazes me everyday of the talent that is in the world. About two weeks ago i was talking with my best friend and she told me about Christy Tomlinson videos on youtube and how she would love to try mixed media. It was really funny because i was watching other mixed media videos at the same time. We both got the mixed media bug at the same moment. I watched christy Tomlinsons video on scarlet lime and immediately i had to try. I am hooked. i love having paint all over my hands and shirt and sometimes it hits my face. Makes me so happy it seems to bring out the kid joy in me. I am forever going to keep learning about art, i wanna know all there is to know and try all that there is to try...
For this piece here i was inspired from Christy Tomlinson SHE ART.. I was so nervous to try and cut out a girl but it really is true, it does not need to b perfect and it seems to work out.. I used Prima Madeline papers for this, acrylic paints from the dollar store, modge podge in matte, i used UNITY Stamps designed by ANGIE BLOOM which i love. they are perfect for she art. i just used background stamps on this as well and odds and ends to give texture from my house. I used a stensil for the triangles on here with gesso and tan colored paint to give more texture to the canvas, which is a 12x16. I want to thank Angee for giving me this opportunity for being a guest on the artsy attic blog.
Friday, May 4, 2012
My Baby is Graduating
This month has been super emotional for me. Brittany my oldest is graduating from high school on June 1, and there are so many emotions running around inside me. I am so happy with the woman that she has become. She has been taught everything she needs to know to soar, but sad that she will stretch those wings and leave the nest.
Last week I took her Cap & Gown pictures and I believe that was when it hit me. She's growing up she will soon embark on a new beginning. I know she will be around, but she takes that step into adulthood and a step closer to her independence. She's super talented, smart, fun, and dependable so I know the world will embrace her.
Through all of these emotions, I started thinking about creating a layout for the "posed" photos that are often not so fun to play with. I didn't want to use the typical "graduation" theme paper, so I settled on Prima's Printery Collection. It has a lot of elements that you will find in your daily high school life: clocks, keys, script/text, and words like "memories". The neutral colors lend themselves to any direction or theme.
To spruce up the background, I decided to use some stencils and texture paste, I used the brick stencil in the left corner, and a number stencil in the upper right and bottom left, and a Prima Rose stencil to frame the center of the layout. Then I spritzed the layout with Jack Frost Glimmer Mist to add the blue to compliment her cap and gown.
The bridge is symbolic of her cross over into another phase of her life. I found a dictionary page with the word "jazz" and used the Printery chipboard pieces for Song and Chorus - since those words seem to define her high school interests. The clock symbolizes her time of passage. The 2012 is a piece of confetti I got from a party store, and it represents her class year. The Prima sprays offer the softness and purity. The Key is to her future, and I hope she has the faith to unlock her dreams. Her photo was framed in this beautiful ornate frame from Melissa Frances.
The hidden journaling includes a quote from a Mark Harris song - "Find Your Wings" the quote is....
"I'll have tears as you take off, but I'll cheer as you fly."
Thanks for stoppping in today,
Tonya Gibbs
http://www.psychomoms.com
Sources:
- Prima: Printery Paper, Valentine Vine White, Printery Masks, Printery Chipboard, Say It In Pearls & Lace boarder, wooden clock, wooden banner, Printery canvas key, Shabby Chic resin piece - bridge.
- Tattered Angels: Glimmer Mist - Jack Frost
- My Favorite Things: doily die
- Melissa Frances: ornate frame
- Golden: Texture Paste
- Maya Road: wooden ruler
- Misc. Lace, script vellum envelope, 2012 confetti, twine, dictionary page.
Thursday, May 3, 2012
Scrap Tag.......You're It!!
I've been working on a huge project for the past few weeks (A custom 20 page scrapbook) and I'm accumulating lots of scraps. To save my sanity I decided to make a few tags using all my leftovers. I'm going to try to link up as many of the supplies as I can but I'm sure that I won't remember everything.
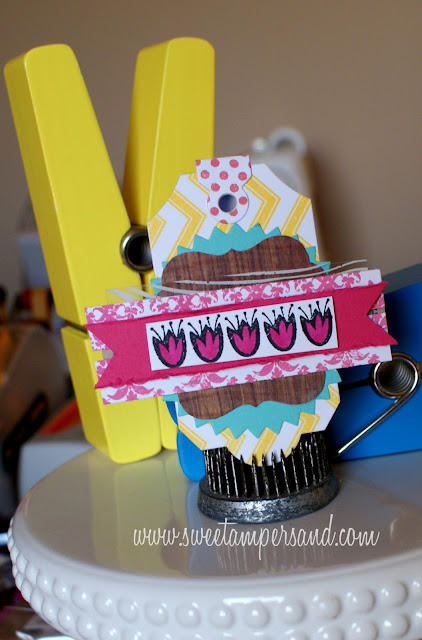
My first tag is mostly stamped. The tag base is PTI Tag Sale # 6 and it's stamped with Background Basics: Chevron stamp set in Yellow Yo-Yo ink. The tag topper (is that even what you call it?) is stamped with Polka Dot Basics II stamp set in Melon Berry ink.
Our next layer is a layered embellishment of a Limitless Layers Die cut from Hawaiian Shores card stock. Then a die cut piece of wood grain patterned paper. Next is a small strip of Hambly Transparency with a Cream wood-grain pattern, Then two strips of white card stock stamped with Damask Designs stamp set in Raspberry Fizz card stock that I trimmed each end in a banner then a stamped (It's a My Mind's Eye Stamp, I think) piece of white card stock that I colored with Copics.
My second tag is mostly patterned paper scraps. The tag holder is a die cut from the Silhouette store that I die cut using a green and white chevron paper scrap.
Next I added a layered embellishment. I started with the same limitless layer die from PTI and die cut that from a kraft and white grid PP, next a punched a circle from a floral and text piece of pp. I then die cut a label from PTI Angled Labels die and stamped it with the coordinating Label Basics stamp set using PTI's Fine Linen ink.
After that I added a die cut a butterfly using PTI Beautiful Butterflies Die that I die cut from the paper that I used to die the tag topper from the first tag. Then I punched a piece of Summer Sunrise card stock using a Martha Stewart large butterfly punch.
The tag insert is hand cut from a piece of patterned paper layered on a piece of melon berry cardstock. The tab at the top is the mini oval tab die from My Favorite Things and it's die cut from the same piece of kraft and white grid patterned paper attached with a few staples using my tiny attacher. The sentiment stamp is from PTI.
These tags were so much fun to make and I felt great that my scraps weren't being stuffed into an overfilled drawer never to be seen again or even worse thrown out. I have a few of these tags framed up in my scrapbook room. They make great decorations. (I got that idea from Keisha Campbell).
See you all Sunday for another Simple Sunday card and we have another Artsy Addicts Featured Artist being showcased on Saturday.
And don't forget this Saturday is National Scrapbooking Day. What are you doing to celebrate?
Lastly, you've been scrap tagged? What's a scrap tag?
Have a great weekend.


