Showing posts with label CTMH. Show all posts

Monday, May 19, 2014

My Hero "Father's Day Card" by Peggy Lee

Good morning everyone, with Father's Day upon us soon in just a few
short weeks...I wanted to share with you all one of my cards.
I used a stamp set called "My Hero"!
Started with a white card base.
Stamped the airplane in chocolate ink (second generations stamping).
I also fussy cut out the images from the Skylark paper packet...
Inked all the edges with chocolate ink.
I popped up the images with tucking the banners to give
depth to the card...like the banners are flying.
As I type this blog post I remember my father who has been gone 
for  many years...I so miss him, love him more deeply!!
I try to share memories of him with my daughters, telling them stories
that he would share, songs he would sing....
I believe even though he is not with us, He Is!
Thanks for stopping in today,
hugs
Peggy Lee


Supplies:
Close To My Heart
Stamps, paper, embellishments


Monday, April 28, 2014

Insta-Frame Magnet by Peggy Lee


Howdy peeps, it's Peggy Lee here,
to share with you all my
"Insta-Frame Magnets"
I created these for a workshop I hosted last weekend...
Inspired by Heidi Swapp, 
which I just LOVE her style!!
This first one is an ART in a frame magnet!!!
You could stamp anything inside the frame...holiday themes...or pretty art!
The second insta-frame magnet...is a Photo holder one...
We left one side open to slide a photo in!!
This is the one the ladies created and they sure did love it...
What's really awesome you could use this in a layout, in a frame to hang on wall...or 
as is a magnet to adorn your fridge!!!
Just love making these...I have a few more to create some
scrapbook layouts!!! I will share when I have them finished...
Thanks so much to stopping by today,
hugs

Supplies:
All Supplies are CTMH
Skylark Paper Packet
Stamps-True to Life & Believe in Yourself
Inks-Sweet Leaf, Lagoon, Desert Sand
Seam Binding
Magnets
3-D Pop dots


Monday, April 21, 2014

Balloon Ride Thank You Card by Peggy Lee


Good morning, hope everyone had a Happy Easter!!
Over this weekend I had a paper crafting retreat where my 
crafty gals got to create this 
adorable balloon ride thank you card...
I wanted to share with  you all it too!!
"Balloon Ride Thank You Card"
We started with a standard base card.
Blue embossed paper is 1/4 smaller than card base...
Stamped the balloon onto a colonial white card stock-colored
with water colored pencils with a blending pen...
Layered with pattern paper and popped up off the blue embossed paper layer.
Last touch is distressing the edges...and add a crystal gem.
Everyone needs a thank you card....
I had so much fun with all the crafty ladies creating this weekend, then spending
a wonderful Easter Holiday with my church family & family....
Hope you all enjoyed your Holiday!!
Thanks for stopping by today,
hugs,


All supplies are CTMH

Give a Lift Stamp Set #D1581
Balloon Ride Paper Packet #X7180B
Embossing Folder-Quatrefoil #Z1926


Monday, April 7, 2014

Best Wishes Card and Sketch using Washi Tape by Peggy Lee

Morning peeps, it's Peggy Lee here 
sharing my take on Tonya's Card Sketch....
You all can play along for more details-you can find them here.
Challenge is to use (washi tape) on your project!!
Here is my take on Tonya's Sketch..
"Best Wishes" Card
Card base is 4 1/4 x 5 1/2
I grabbed a few of my washi tape collections (which I have discovered
that I need more, yes more washi tape...)
I had a paper doily sitting on my table which I colored it 
with Distress Ink in spun sugar and a little water!!
For texture I splatted some ink watered down onto the card.
I took my center washi tape and covered a piece of paper then die cut out
a tag shape....cut out another piece of white paper to stamp 
"Best Wishes" onto popped them both up and glued a twine bow on!!
Oh embellished with a button and sequins...
There you have it my finished card...so cute!!
Thanks for stopping by and won't you play along with our 
Sketch Challenge, here.
We would love to see what you create!
hugs,
Peggy Lee

Supplies:
Card base
Washi tape-CTMH and Dollar Store
Prima-Ink Teal Damask
Ranger-Distress ink-Spun Sugar
My Minds Eye-Lost & Found Madison Ave-Sister Buttons
CTMH-Stamp Banner Wishes
Sequins
Doily
Twine


Monday, February 24, 2014

Baby Shower Card

Good morning peeps!!
Here is a little pretty baby card....
I went to a baby shower over the weekend.
I grabbed my CTMH Babycakes paper-layered the pattern paper...
Cut the zip strips off the edge of the paper....adorable saying 
baby, baby, baby!!
Stamp the little sentiment in slate ink.
Baker's twine double bow with button!
I also love to fussy cut out images from my pattern papers.
This little guy was so adorable couldn't resist!!


Thanks for stopping in today!
hugs,
Peggy Lee

Supplies:
All Close To My Heart

Monday, December 16, 2013

Last Minute Christmas Cards

Happy Monday everyone!
With Christmas just around the corner, do you ever find yourself needing a card at the last minute? I do so here are a couple of last minute cards I whipped up using my scraps and washi tape...
These cards are going to be hand delivery so the size is much bigger and bulky embellishments.
Who doesn't love a tree card...this homespun feel is my favorite.

Tree Card:
Measures 4 x 9 1/4 tall
Randomly stamped the music note for background.
Stamped tree image in green ink cut out.
Glittered up the star along with brushed white paint on in places.
Added a glitter trunk 
and 
Stamped a little tag of 25 Merry Christmas!


Another quick card I created using card stock and washi tape!
That simple!!

Washi Tape Card:
Measures 4 1/4 x 5 1/2
I just layered red and white card stock for the base of the card.
Ripped strips of different washi tape
to create banners.
Stamped Merry Christmas and added a little metal flower!
Easy as that...simply but so pretty!

Hope this little inspiration of last minute Christmas Cards peeks your creative
side to give an handmade card, they really do put a smile on someones face.
Light up someones world with a handmade card done by you!!
Happy Holidays
and
Merry Christmas

hugs, Peggy Lee
http://pegbaker.blogspot.com

Supplies: all CTMH


Monday, December 2, 2013

Nirvana Christmas Card!!

Good morning and welcome to December!!!
It's Christmas Time...
To start our celebration here in our home, I have started to collect the
Holiday decorations, and also create some one of a kind 
home decor...
Who doesn't make Christmas Cards? 
I do make special ones for my special family and friends...
But I also love to make a few and leave them around my home in my decorations!
Here is one I've created using 
Marion Smith's new paper collections "Nirvana"!!
I love the vintage feel...earth tones...and of course touches
of trims and lace!
I just love this image of the little girl that is on 
one of the embellishment pages.
This little image could be my youngest daughter..so I knew
I wanted to use this image in my decor displays with pics 
of my girls...love it
Vintage sheet music I used to create the Rosette...
Used a Tim Holtz stencil with gesso to create the 
background.
wooden tree
dollar store snowflake
I just love the color tones in the "Nirvana" paper collection!
now to create some more holiday decor!!
Happy December!
Everyone..
and
Merry Christmas,
Peggy Lee
http://pegbaker.blogspot.com

Supplies
Marion Smith Designs-Nirvana Paper Collection
Tim Holtz-stencil Dot Fade  
Ranger-Distress ink-Vintage Photo and
Liquid Pearls white opal
Tattered Angels-glimmer mist Graphite
CTMH-Glitz silver glitter gel
trims and lace


Monday, November 18, 2013

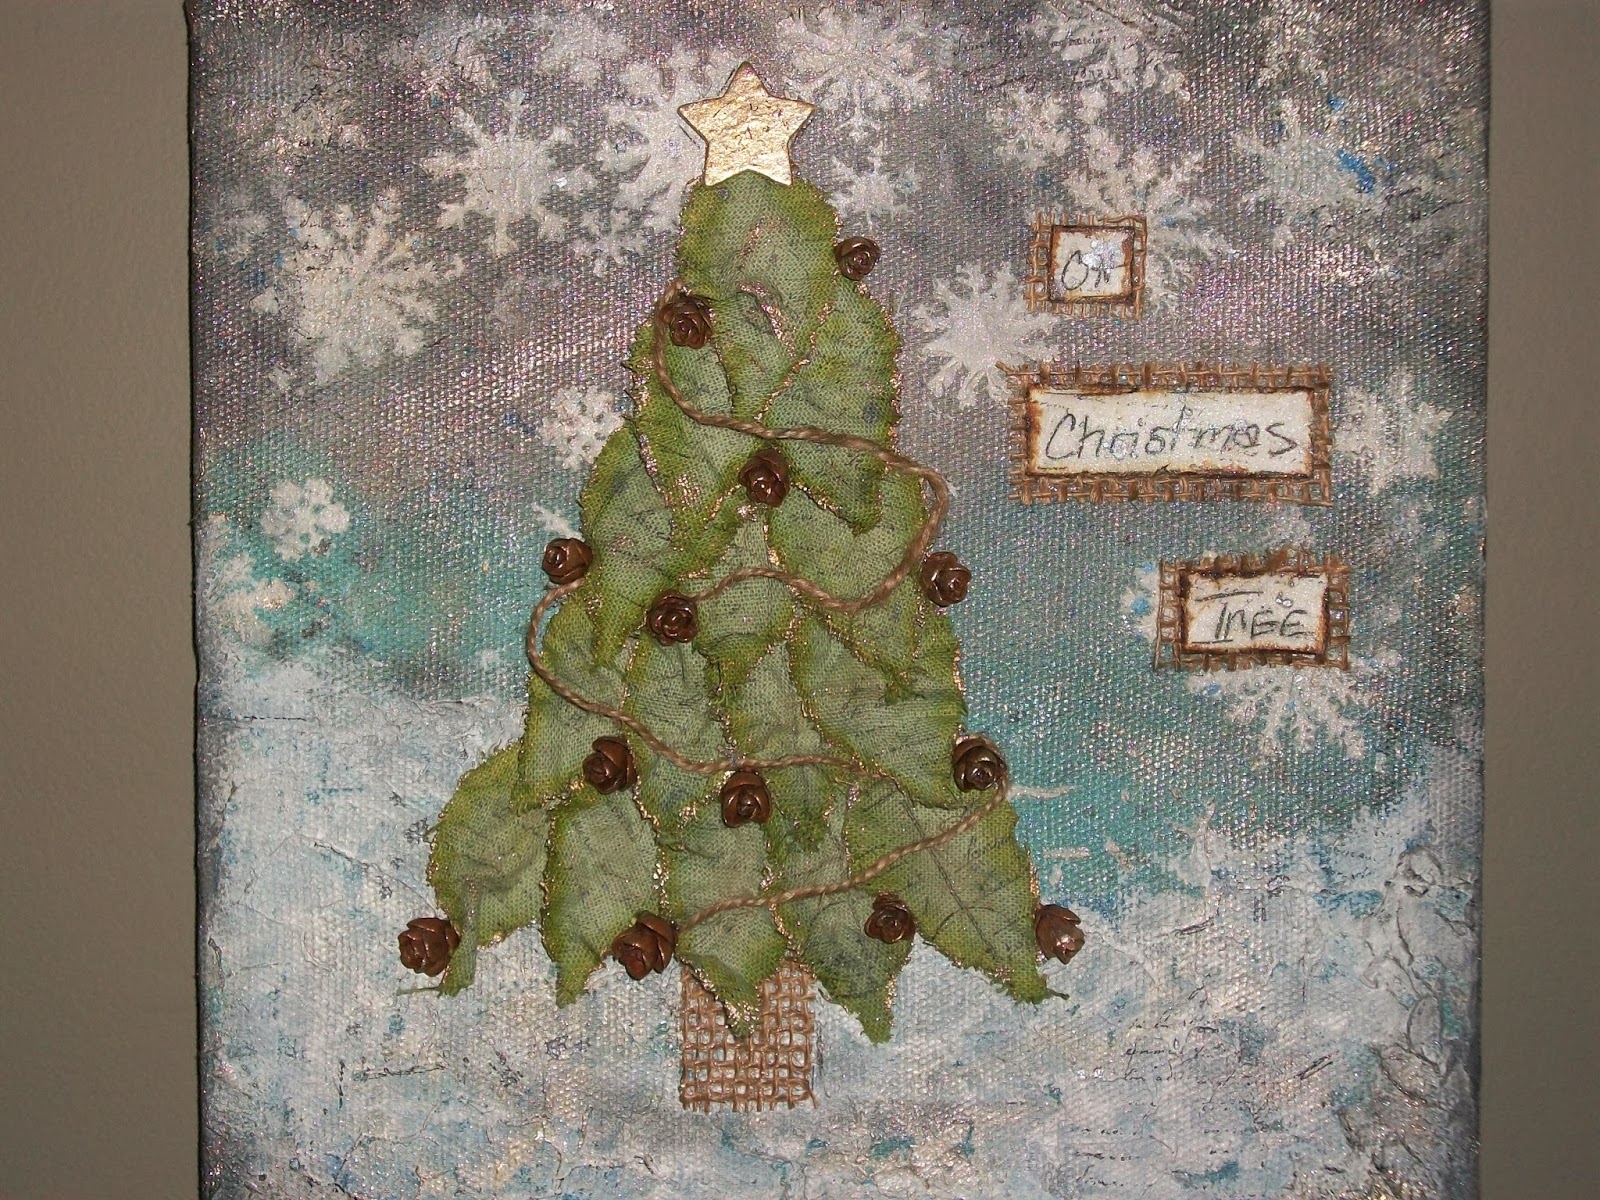
OH CHRISTMAS TREE

Hi Artsy Addicts fans!
Peggy Lee here to share with you 
a little mixed media canvas.
Even though it's still November and Thanksgiving is next week.
I have already started listening to Christmas music...one of my favorites is...
Oh Christmas Tree, Oh Christmas Tree
How lovely are Thy Branches
Love that song!!!
So with that I have been playing and creating tree theme artwork.

"OH CHRISTMAS TREE"
mixed media canvas
Using a Canvas Corp's canvas
I started by spraying some Heidi Swapp Color Shine
in Tinsel and Teal  and  Perfect Pearls Mists in many colors.
to create the background...adding texture 
with Crafters Workshop stencils 
and stucco/gesso mixture.
To create even more texture-randomly stamp all over canvas
also splatters of Color Shine and Perfect Pearls Mists!!
Cut out Tattered Leaves (Tim Holtz die) out of linen fabric...
colored with Distressed Stains in Bundled Sage and Forest moss.
Edged with Viva Precious Metal Effects Paint in Gold!
Covered the colored, stamps leaves with gel medium to give strength.
which helps shape the leaves in place.
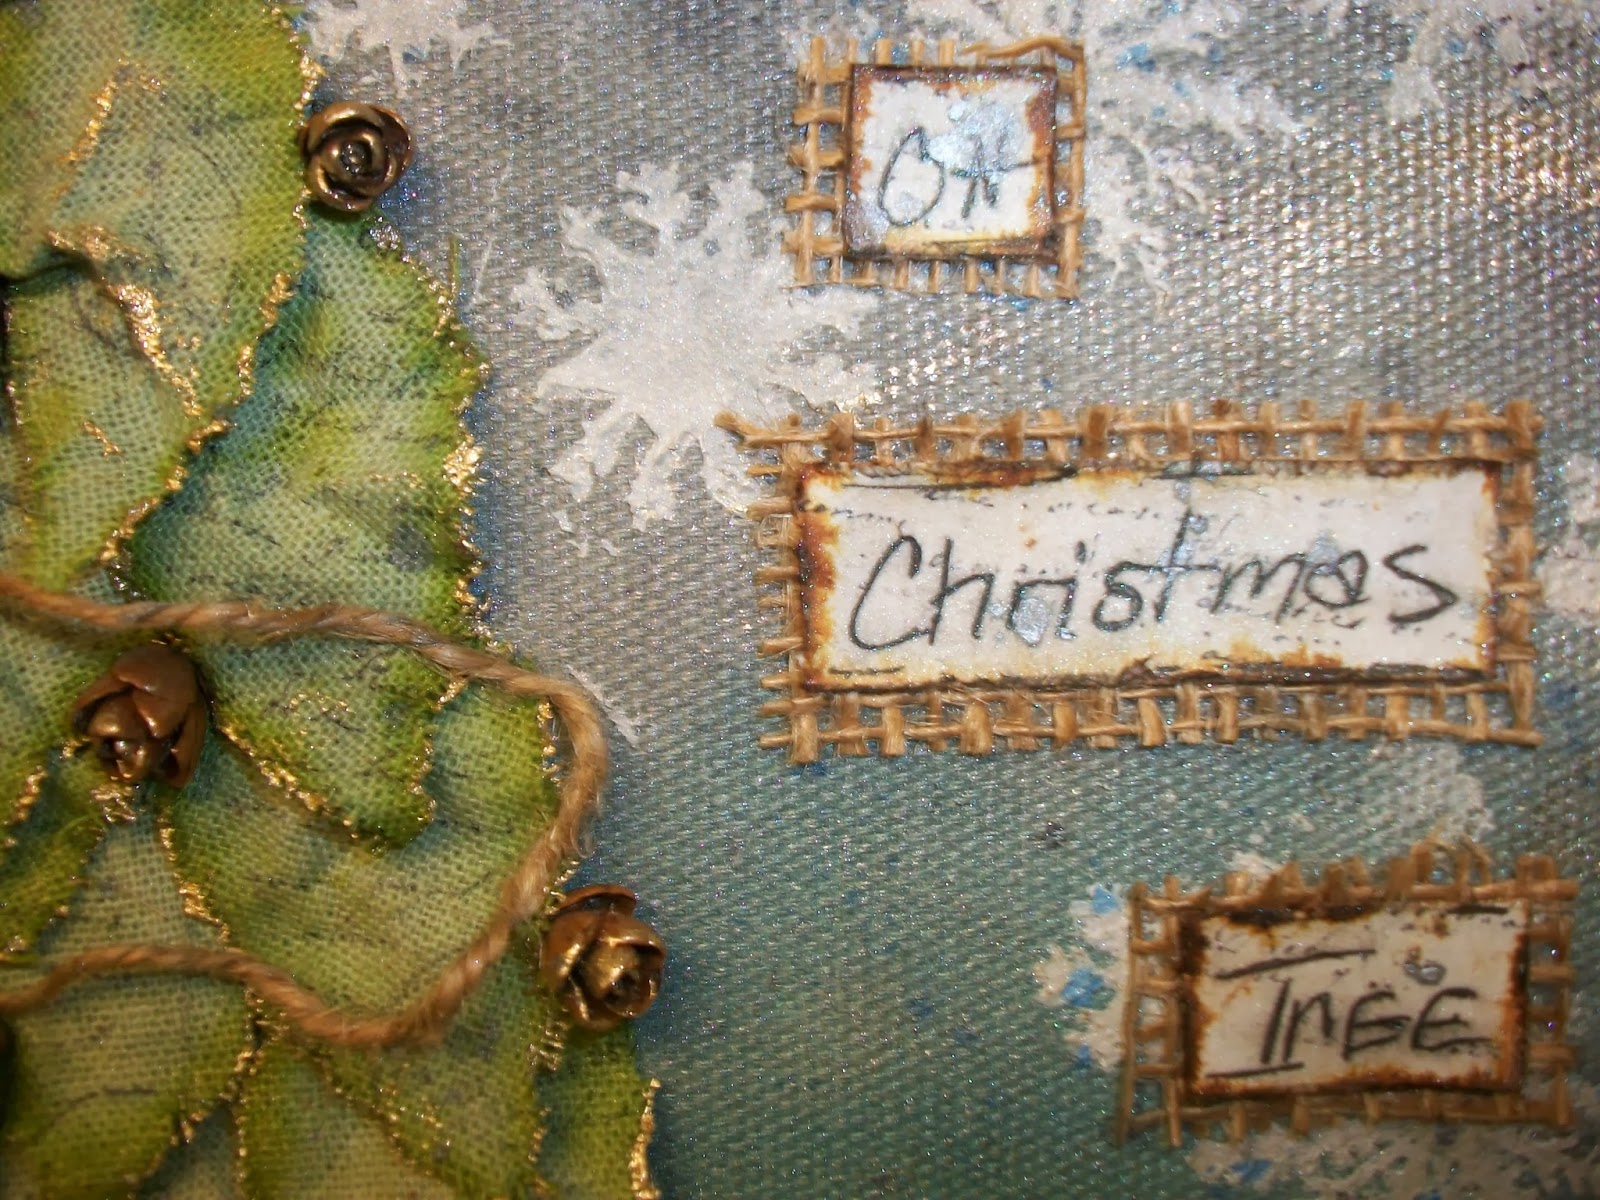
Title "Oh Christmas Tree" hand written and backed in burlap mesh...
same burlap mesh became a tree trunk.
Tree leaves adorn with tiny real pine cones glittered with
Precious Metal Effects Paint in Gold
Garland is Canvas Corps jute rope...I love the woodies feel it gives the tree.


Thanks for stopping in today,
Please leave comments for us with what's your favorite Christmas song!!
Like what music do you listen to while creating?

Happy Holidays,
Peggy Lee
http://pegbaker.blogspot.com

Supplies
Canvas Corp: canvas, jute rope
Heidi Swapp: color shine in tinsel, teal
Ranger: Distress ink in black soot
Distress stain in bundled sage, forest moss
Perfect Pearls Mists in blue patina, heirloom gold, biscotti
Tim Holtz tattered leaves die
CTMH: chipboard star
Creative Imaginations: viva precious metal effect paint in gold
Silks acrylic glaze in ice
Beacon: 3 in 1 glue
Stampendous: stamp carte postale
Linen fabric
Crafters Workshops: stencils
Stucco/gesso
Tiny real Pine Cones


Monday, October 21, 2013

Boo Pumpkin Sign

Happy Monday morning to everyone, it's a cool brisk morning we are waiting for snow to show up any day...so with that said I wanted to create a little boo pumpkin sign for Halloween! Which it usually snows on Halloween night and the kids are adorable walking in a snow flurries!!!
Boo Pumpkin Sign
I grabbed a drink coaster and covered it with pattern paper pack I picked up a few weeks ago.
By Crate Paper 6x6 in pad DIY Shop
I so loved it for the wood grain paper that was in the pad.
I went through the pad picking out papers for the pumpkin that I cut out on my Cricut.
Then cut one of the pumpkins in quarters to create a two tone pattern paper.
Inked the edges in Distressed ink-walnut ink.
Popped them up from bottom layer to give depth.
Created some rolled paper roses out of the papers...and leaves..
Cut out tiny little banners out and used Prima alphabet Romance Novel line.
Splattered the whole sign with Perfect Pearls Mists in Heirloom Gold.
and 
Added some touches of CTMH Glitter Gel in Bronze
added some twine...done...adorable!
Thanks for stopping by today,
Peggy Lee
http://pegbaker.blogspot.com

supplies
Crate Paper 6x6 paper pad
Prima-Romance Novel Alphabet letters
Ranger-Distress ink in walnut ink, Perfect Pearls Mist in Heirloom Gold
CTMH-glitter gel in bronze
coaster
3-n-1 glue from Beacon
Twine


Monday, September 30, 2013

Paper Pumpkin Time!!!

That's right it's that time of the year...for paper pumpkins...inspired by Miranda and her G45 pumpkin projects on her blog.


I had to create one, which I have created this paper pumpkin years ago..
it was so fun to create this little beauty.
I used some fall scrapbooking papers cut at 3/4 inch by 6
which you need 19-20 strips of paper.
I inked the edges of the papers.
Punched a hole on both ends of the strips.
Hook one edge with a big brad.
Spread out (fan out)
Using another big brad, pull up each strip
and place onto the brad
repeat.
After all the strips are hooked on the brad
fold down the brad pronges.
Form the pumpkin to how you like it.
Now the FUN part
EMBELLISHING your pumpkin
which is all up to your own style...
I cut out leaves, inked and stamped them...
cut out vines and honeycombs.
I used paper flowers I stamed and inked added some gems.
Ribbon for the stem. 
Last I cut out a doily and used a fringed burlap string
to tucked under the paper pumpkin.
whoola!!!

Hope you enjoyed!
thanks for stopping by today,
Peggy Lee

Supplies
CTMH-all products.

Monday, September 23, 2013

Poster Tidings "JOY" Card

Here as promised I am sharing the other image of the Poster Tidings Stamp image that I shared last Monday using the fall stamp image.
The "joy" stamp image makes a beautiful and classic card...with using some holiday themed papers, stamps and glitter paper!!!
I took the Poster Tidings "joy" stamp dabbed into the slate ink...
over and over to give depth and texture
when stamped!
I love how the stamp image looks like real stone.
Cut out little glitter banners
out of silver glitter paper.

I just love the SPARKLE!!!!
Thanks for stopping by today,
hugs
Peggy Lee

Supplies:
CTMH: Frosted Papers,
September SOTM Stamp-Poster Tidings
Slate Ink
Glitter paper
Sparkles

Related Posts Plugin for WordPress, Blogger...
 
Pin It button on image hover