Friday, November 29, 2013

December Daily - by Tonya Gibbs

I hope everyone had a fantastic Thanksgiving!  Today starts BLACK FRIDAY and the beginning of the Holiday Season.  Every year, I try to do a December Daily, and it seems that I get started then BOOM life gets crazy, and I totally drop the ball.  This year I want to try a different approach.  I'm going to share my weekly progress here, with you guys.  Each Friday, I will share with you my pages from the week! Hopefully, this will hold me accountable, and encourage me to finish mine, while  inspiring  you to finish yours!

This year I'm using Basic Grey's 25th & Pine.  I love the vintage feel of this collection, and thought the simple patterns allowed for a lot of layering options.  As you can see the collection has lots of Yummy embellies to bring the book to life.


I created the covers during my November Ustream. My December Ustream will be Monday, Dec. 2 at 8:30 pm est,  and I will created the first few days and couple of tags.  If you have time, I hope you join us!  My channel name is:  http://www.ustream.tv/channel/gibbst


I love the ornaments in this collection, so I wanted to use them on the covers. 

 
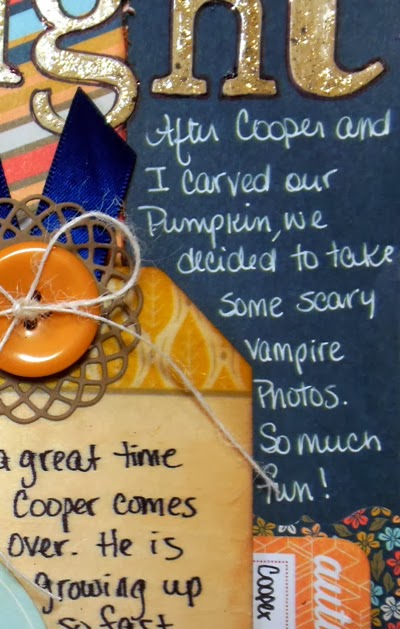
Chalkboards are very popular this year, so I thought it would be fun to include some in my book. 
 
 
Aren't these ADORABLE and fun? I thought this would be a cute embellishment cluster for a few of the number sets.   I have a video in the playlist showing you how to make them. 
 
 
This was an "Uh Oh" from another project that ended up being an awesome addition to this project. (Never throw away the mistakes - you just never know when they will work for something else.  Basically this is a 6 inch x 9.5 inch  sheet of red cardstock.  With an on the edge die cut from the top and the bottom.  Then I folded the bottom up to form a 6x6 square sewed the edges to make the flap into a pocket.  Then trimmed the edge with washi tape.  Now this mistake will make a great pocket for one of my days.  I may trim it out with paper, when I decided to use it. 
 
 
Follow on YouTube as well as here.
There will be weekly videos with additional tutorials and helpful hints along the way.  I've created a YouTube Play list that includes all of my Ustreams, and individual tutorials that you need to create this project with me.    There are already 8 videos in the list for you to enjoy. 
  1.  November Ustream (this was recorded in 3 parts for some strange reason). Part 1
  2.  November Ustream. Part 2
  3.  November Ustream. Part 3
  4. Coffee Staining Small tags for the books
  5. Organizing yourself, FAQ, and Page 1
  6. Library Pockets
  7. Poinsettia tutorial
  8. Polaroid Shaker frame for a few of the number sets.  
I know several who have already started sharing photos of their projects.  If you create a project inspired by this one, please be sure to share it on the Artsy Addicts Facebook page and be sure to tag me in the post, so I can admire your work. 
 
Now - I must go see if I can find some good Black Friday deals. 
 
Thanks for stopping in today,
 
Tonya Gibbs


Monday, November 25, 2013

Holiday Sunshine Tags!!!

Good morning everyone..
Peggy Lee here bringing you a little "Holiday Sunshine" cheer in tags!
With the holidays right around the corner from us, I knew creating my own holiday tags was a must!!
It warms the heart of someone special to receive a beautiful 
handmade tag on a gift, or as a gift to adorn their gifts, trees etc.
"Holiday Sunshine Tags"
using the Sunshine My Mind's Eye paper collection.
With no direction I just sat down and started creating...covering shipping tags.
Adding texture with drywall tape, gesso and stucco...
Sprays and splatters of different mists
chipboard pieces, twines, burlap, flowers and buttons...
**do you see the fresh fallen snow**
that's right I went outside this morning in 10 degrees bitter cold temps
to capture the photos in the beautiful sunshine. :)
every tag needs a little glimmer of gold...
Viva-Precious Metal Effect Paints in Gold!
I just love taking a color flower and adding different 
sprays of glimmer mists, color shine, perfect pearls
plus precious metal effect paints...
make your own flowers
to match your projects.....love them!

Happy Holidays
hugs,
Peggy Lee

Supplies:
My Mind's Eye-Sunshine Lost & Found two
Viva-Precious Metal Effects Paint in gold
Ranger-Perfect Pearls Mists in blue patina, heirloom gold and biscotti
Distress ink-walnut stain
Distress stain-forest moss and bundled sage
Tattered Angels-glimmer mist raven 
plain jane glimmer mist in blue bird baseboard
Heidi Swapp-color shine in teal and tinsel
Prima-flowers
stucco/gesso
gems, twine, burlap, buttons
chipboard pieces
drywall tape


Friday, November 22, 2013

This Makes Me Happy - Layout by Tonya Gibbs

Hi everyone, today I wanted to share with you a layout that I created of my newest niece and I.  I finally got to meet her this past weekend, and couldn't wait to add her sweet photo to my album.
 
 
My only photo was a small Instagram photo. To keep from over powering the small photos,  I wanted to keep the design simple, yet girly and elegant.    I reached deep into my stash for a few scraps, and some odd and ends products. 
 
 
Since the label on the right mentions "...moment with you"   I decided to frame a Prima Romance Novel Clock inside a Prima Resin Frame. Then flanked it with soft Prima Roses.  It still needed a little something so I went DEEP into the hoard vault and pulled out a Say It in Pearls spray and framed it around the flower cluster.   I wanted my journaling to blend into the layout, so I wrote it along the boarder with a pink pen from Zig.
 
Sometimes the simplest projects are really the most powerful.  I challenge you this week to make a layout with a small photo, and keep it simple.  Share your samples with me on Artsy Addicts Facebook page.
 
Thanks for stopping in today,
 
Tonya Gibbs
 
 
Resources:    
  • Bazzill - Smooth white cardstock
  • Teresa Collins - Family Stories Collection - 12 x 12 Double Sided Paper - Numbers
  • Teresa Collins - Family Stories Collection - 12 x 12 Die Cut Paper
  • Teresa Collins - Family Stories Collection - Border Strips with Glitter Accents
  • Teresa Collins - Family Stories Collection - Sequins
  • Prima - Say It In Pearls Collection - Self Adhesive Jewel Art - Bling - Mini Flourish with Roses - Cream
  • Prima - Flower Embellishments - Conventry Serene
  • Prima - Romance Novel Collection - Wood Embellishments - Clocks and Tickets
  • Prima - Resin Collection - Ingvild Bolme - Resin Embellishments - Marvelle
  • Prima - Junk Yard Findings Collection - Ingvild Bolme - Trinkets - Metal Embellishments - Rusty Typo Zippers
  • American Crafts - Studio Calico - Snippets Collection - Wood Veneer Pieces - Chevron
  • American Crafts - Studio Calico - State Fair Collection - Wood Veneer Pieces - Hearts
  • Tattered Angels - Chalkboard Collection - Glimmer Mist Spray - 2 Ounce Bottle - Tutti Fruity


Monday, November 18, 2013

OH CHRISTMAS TREE

Hi Artsy Addicts fans!
Peggy Lee here to share with you 
a little mixed media canvas.
Even though it's still November and Thanksgiving is next week.
I have already started listening to Christmas music...one of my favorites is...
Oh Christmas Tree, Oh Christmas Tree
How lovely are Thy Branches
Love that song!!!
So with that I have been playing and creating tree theme artwork.

"OH CHRISTMAS TREE"
mixed media canvas
Using a Canvas Corp's canvas
I started by spraying some Heidi Swapp Color Shine
in Tinsel and Teal  and  Perfect Pearls Mists in many colors.
to create the background...adding texture 
with Crafters Workshop stencils 
and stucco/gesso mixture.
To create even more texture-randomly stamp all over canvas
also splatters of Color Shine and Perfect Pearls Mists!!
Cut out Tattered Leaves (Tim Holtz die) out of linen fabric...
colored with Distressed Stains in Bundled Sage and Forest moss.
Edged with Viva Precious Metal Effects Paint in Gold!
Covered the colored, stamps leaves with gel medium to give strength.
which helps shape the leaves in place.
Title "Oh Christmas Tree" hand written and backed in burlap mesh...
same burlap mesh became a tree trunk.
Tree leaves adorn with tiny real pine cones glittered with
Precious Metal Effects Paint in Gold
Garland is Canvas Corps jute rope...I love the woodies feel it gives the tree.


Thanks for stopping in today,
Please leave comments for us with what's your favorite Christmas song!!
Like what music do you listen to while creating?

Happy Holidays,
Peggy Lee
http://pegbaker.blogspot.com

Supplies
Canvas Corp: canvas, jute rope
Heidi Swapp: color shine in tinsel, teal
Ranger: Distress ink in black soot
Distress stain in bundled sage, forest moss
Perfect Pearls Mists in blue patina, heirloom gold, biscotti
Tim Holtz tattered leaves die
CTMH: chipboard star
Creative Imaginations: viva precious metal effect paint in gold
Silks acrylic glaze in ice
Beacon: 3 in 1 glue
Stampendous: stamp carte postale
Linen fabric
Crafters Workshops: stencils
Stucco/gesso
Tiny real Pine Cones


Friday, November 15, 2013

Christmas Cards

We are quickly approaching the hustle of the Holiday Season. I don't know about you, but my world is a whirl wind of constant motion this time of year.  I barely have time to sleep, let alone knock out STACKS of Christmas cards.  I'm sure I'm not alone!  Although I don't "mail" out stacks of Christmas Cards, I do like to have a few handy just in case.  This is a great opportunity to pull out last year's paper collections, and use those holiday scraps from this year's projects.

Today, I would like to share with you a few "simple" designs that will encourage you to simplify without compromising elegance. Both of these cards can be made by ANYONE in a matter of seconds.


I just finished a major project, that I will share with you later, and I took this opportunity to quickly knock out  these cards with scraps.  As you know, my philosophy is always USE those scraps immediately, and cards are the perfect way.

For elegance my advice is keep it simple.  A monochromatic color selection will maintain sophistication without a lot of fuss. 


For this card, I decided to use a simple clean white label to break up the busy pattern in the background.   A few simple touches like the punched border, fancy label shape and script stamp make this simple design elegant and fun.
 
Supplies needed for above card:
  • Card base - White Card stock 11 x 4.25inches folded in half to yield a 4.25inches x 5.5 inches.
  • A scrap of paper to use as a base.  I used Teresa Collins' Santa's List - Red Flakes.
  • Border Punch (I used Martha Stewart Crafts Pinking Scallop Edge Punch)
  • Labels Punch (I used Spellbinders Nestabilities Dies, Labels 4)
  • Sentiment Stamp (I used Inkadinkado Merry Christmas)
  • Ranger Archival Ink Vermilion
  • Baker's Twine
  • Gelly Roll pen -  stardust  (I traced around the label with this pen, you could also trace the snowflakes with it).
 
 
The pop of glitter, and one iconic simple image, makes this card pack a powerful statement.  I love that it looks complicated, without much effort! My advice is find a simple iconic image that conveys your message, and remember less is sometimes more!
 
Supplies needed for the above card:
  • Card base - White Card stock 11 x 4.25inches folded in half to yield a 4.25inches x 5.5 inches.
  • 1/2 Inch  Corner Punch (I used the We R Memory Keepers)
  • Cosmo Cricket Glitter Sheets in Starlet (THESE GLITTER SHEETS DO NOT SHED - AMAZING!)
  • Sentiment Stamp (I used Inkadinkado Merry Christmas)
  • Ranger Archival Ink Vermilion
  • Sizzix Tim Holtz Alterations - Embossing Diffuser.
  • Provo Craft - Cuttlebug Swiss Dots Embossing Folder
  • Silver Ribbon
  • Silhouette Cameo (Ornament) from Echo Park

I encourage you to go through Christmas past paper collections and see if you can duplicate a few of these simple designs.   Don't have a Silhouette?  Never fear, lots of companies have similar images available in dies, go through your stash and see if you can substitute another design. Just remember simplicity is key, especially if you want to mail these cards.

I just love that  both card designs can easily be modified to work with any occasion.

Hope I have inspired you to use up your scraps and make some great simple Holiday cards.  Remember to keep it simple, so you have time to make the memories that matter!

Thanks for stopping in today,

Tonya Gibbs
http://www.psychomomscrapbooks.blogspot.com


Monday, November 11, 2013

Let's Remember-Tag Embellishment

                           Let's remember those who have served and who are serving us today!!! 
                                                                Happy Veteran's Day!!!
Today is our small town we love to show our love
with a ceremony....
the laying of the wreaths...

Here is a tag that I created to go onto a 
scrapbook layout
that I will share after I get these
wonderful remembering photos 
developed.
"Tag embellishment"
glued the Nirvana paper onto a shipping tag...
laid down some stucco
with a brick mask
white washed over the whole tag
sprayed some mists 
over the whole piece
using a baby wipe 
clean off to give a washed look.
before the splatters of mists...
The Remember This:
11-11-11
is
11th hour of the 11th day of the 11th Month
remembering those who have served 
and who are serving....


Thanks for stopping by,
I will be sharing soon the complete layout...
Peggy Lee

Let's remember!

Stucco/Gesso
Heidi Swapp: color shine in teal, tinsel
Tattered Angels: glimmer mist in raven
Ranger: Distress ink in black soot


Friday, November 8, 2013

Persimmon Cards by Tonya Gibbs

Well, last week I told you that my objective was to finish off the Persimmon line from Basic Grey that I have in my stash.  Well this post will be the end of the line.

I decided to work on some simple card designs. 


This card is one of the crisscross cards where the tag pulls out of the top to add your sentiment.  The card is about 5.5 x 5.5 so it will fit into an envelope nicely.  The burlap was a piece of scrap left over from my ustream, and I just added a few buttons and clothespin from Canvas Corp.  Then a few strips of glitter paper from Cosmo Cricket to make it sparkle.


On this one, I punched the leaves from a Fiskar's punch and added some peeled paint distress ink to the leaves.  The flowers are from Prima, and I colored rhinestones with my Copics for the centers.  The birds are wood veneers from Studio Calico and the sentiment is from a Fiskar's stamp set.


I thought this little bird saying from the collection would make a great baby boy birth announcement or baby shower card.  love the simple elegance of this.
 
 
Thanks for stopping in today. I have officially finished this collection up. It feels so good to have the products and the scraps completely gone.   I hope I've inspired you these past few weeks to use your supplies.   I have completed a mini album, two layouts, and three cards with these papers.
 
Thanks for stopping in today. 
 
Tonya Gibbs


Monday, November 4, 2013

Grateful for Handmade Home Decor

Happy November to all!!
I am making this month a month filled with 
Grateful, Thankful and Blessings
To start I have decided to create handmade 
home decor
to make our holidays special...
I would love to share with you this adorable
pumpkin candlestick!
Which will be placed on our Thanksgiving table center piece,
I am going for a white decor this year...
(don't get me wrong I love the beautiful bright rusty colors)
I am trying something new and keeping it all
creams, naturals and white color!!
I used a dollar store candle stick, paper doily
and 
a paper mache' pumpkin
gesso for painting it white
Create a junk bow with a rolled muslin flower,
for the topper
is a Christmas ball (tiny) that I pushed down
through the stem of the pumpkin.
Last I sprayed some beautiful glimmer 
with  
Ranger's Perfect Pearls Mists in Biscotti

Thanks for stopping by,
Have a Blessed Day!
Peggy Lee
http://pegbaker.blogspot.com

Supplies:
candle stick
doily
paper mache' pumpkin
gesso
trims and lace
Christmas tiny balls
Ranger's Perfect Pearls Mists in Biscotti
hot glue

Friday, November 1, 2013

Fright Night Layout by Tonya Gibbs

Ok, how many of you are now on a sugar overload?  Go ahead raise your hands. I know you were hoarding all the good chocolates for yourself!   Come on confess....
Just kidding.....

My nephew, Cooper, came over a few hours last weekend and we carved a pumpkin. Then had a scary vampire photo shoot.  

For today's project, I decided to use the paper and embellishment packs that were left over from my Sept. Ustream class.  In that class we used Basic Grey's Persimmon line. My objective was to use as much of the left overs as possible and kill off this kit.

To make this process fun, I decided to give myself a few prompts.


PROMPT 1:  Use Burlap and Jute. I love the look of burlap and jute twine on a fall layout.  I think the natural tones really help to enforce the theme of fall, and give your layouts an organic element.


PROMPT 2:  Use chunky glitter nail polish and dark pens to help your title pop!  The nail polish gives a glossy texture to the lettering, and the glitter looks like bubbly potion (haaa) or night time stars.  The dark outline around the letters gives them depth and weight, making your spooky title pop!
 
 
PROMPT 3:  Use navy blue instead of black on your Halloween layouts!  One thing I liked about the Persimmon line, is its use of navy blue instead of black.  Love the unexpected color shift from the traditional black. Since chalkboards are super trendy right now, I used the solid navy blue from the 6x6 paper pad, and a white gel pen for my journaling.   
 
 
PROMPT 4:  Die cut your scraps from the collection and use them immediately. Gather up the scraps from this collection, pull those punches out of hiding, and eliminate the scrap pile! Great layers have multiple items of different sizes and textures. I used a Fiskar's Leaf punch and a small scrap of the patterned paper for my leaves.  Then another EK Success labels punch for another accent.  I challenge you to free your punches/dies and start making elements to use for layers.

My favorite neutral punches/die shapes are:  hexagons, banners, tickets, birds, butterflies, branches, leaves, flowers, cameras, labels, frames, hearts, arrows, chevrons, doilies, tabs, and tags.   All of these can be used anytime, and any place.  Your objective is to USE THOSE SCRAPS.
 
Here is a process video on me completing this layout. 


I hope you have enjoyed this layout share.

Thanks for stopping in today,

Tonya A. Gibbs
http://www.psychomomscrapbooks.blogspot.com

Resources for this layout:
  • BasicGrey - Persimmon Collection - 6 x 6 Paper Pad
  • BasicGrey - Persimmon Collection - Chipboard Stickers - Shapes
  • BasicGrey - Persimmon Collection - Die Cut Cardstock and Transparency Pieces
  • BasicGrey - Persimmon Collection - Mixed Brads
  • BasicGrey - Persimmon Collection - Printed Wood Veneer Cards
  • Fiskars - Limited Edition - Squeeze Punch - Large - Leaf it to Me,
  • Maya Road - Chipboard Set - Shot Through the Heart
  • Spellbinders - Shapeabilities Collection - Die Cutting and Embossing Templates - Snapshot
  • Sizzix  - Tim Holtz - Bigz Die - Extra Long Die Cutting Template - Word Play
  • EK Success - Punch - Large - Flourish Square
  • My Favorite Things Stamps - Dizzy Doily Die
  • Ranger - Archival Ink - Coffee
  • Prima - Distress tool
  • May Arts - Jute
  • Canvas Corp - burlap
  • Gold Glitter Nail Polish
  • Ribbon
  • Do Art Ticket Die
Related Posts Plugin for WordPress, Blogger...
 
Pin It button on image hover