Showing posts with label Grunge. Show all posts

Thursday, May 29, 2014

Memorial Day Inspiration "Flying Flags" by Peggy Lee

This past Monday was our Memorial Day Holiday, our family
always celebrate with watching the Memorial Day Parade.
My hubby marches every year...
My heart is always full of joy, grace and grateful to all who are and have served.
Thank You to them all, even the ones who are left behind will they serve.
I love to take a photo of the flags flying every year!
I wanted a way to gaze upon it's beauty and be reminded everyday...so I created this 
Mixed Media Scrapbook Layout of the Flying Flags!
Love the USA!
I used drywall tape as a stencil, I laid it down and scrapped 
stucco over it, then pulled it up...it leaves great texture!!
I also used some other stencils as well.
I did some random stamping, sprayed and splattered
my favorite mists, color washes...and gesso watered down.
I found some metal letters in my stash...perfect for this layout....I am going to frame this
layout and hang it on our wall to honor my hubby and our family members who have served.
Thanks for stopping in today,
hugs
Peggy Lee


Friday, May 9, 2014

Varsity Layout by Tonya Gibbs - May Challenge


Hi everyone, wow can you believe that school is almost out?  Where did the time go? Seriously It was just fall in my mind.   My son, Brighton, is a Jr. this year and I'm going to spend some time in the next year crying - no seriously - documenting his high school story!   I know it is hard to sometimes create Masculine Layouts so I have a few tips to kick start your creative process.

 
First of all GRUNGE makes masculine layouts come together so easily.  And what better way to get grunge then Mixed Media.  Just like little boys - the messier the better! Texture is my next hint!  I think you can't have too much texture on a boy layout!  


Second - stick to masculine colors.  Like Blues, Greens, black, browns.  Since my son's high school colors are Blue, White & Red, I decided to use them for my focal color pallet.


I typically avoid flower clusters and stick to masculine paper elements.  7Gypsies Vintage Varsity line was perfect for this layout - since it offered so many 'sports' themed elements that could be fussy cut and used for layers. 
 
Here is a process video of me making this layout.


I challenge you to post some masculine projects this month in the AA Facebook page.  From little boys, to grown me, it is a challenge sometimes to work with their photos, but they deserve to be documented too!    With Father's Day in a few short weeks, this will kick start your brain into thinking masculine!  
 
 
Thanks for stopping in today,
 
Tonya Gibbs
 
 
Layout Supplies:  
  • Canvas Corp - White smooth Cardstock
  • 7Gypsies - Vintage Varsity 8x8 pad
  • Stamper's Anonymous & Tim Holtz - The Ultimate Grunge
  • Tattered Angels - Silver Glimmer Mist
  • Faber Castell - Design Memory Craft   PITT Big Brush Artist Pens in the following Colors:
    • Black,
    • White,
    • Cold Grey I 230,
    • Cold Grey IV 233,
    • Phthalo Blue 110,
    • Dark Sepia 175,
    • Deep Scarlet Red 219
  • Faber - Castell Design Memory Craft Gelatos in the following colors:
    • Dark Blue
    • Silver
  • Faber-Castell Design Memory Craft Glaze
  • The Crafter's Workshop 6x6 stencils in the following Patterns:
    • Mini Numbers
    • Mini Well Rounded (this is the grunge stencil)
    • Mini Wonky Circles
  • Liquitex - Full Body Gesso
  • Prima - Distress Tool
  • Pearl Ex -  Interference Red
  • Score Tape
  • Scotch - ATG
  • Scotch - Mounting Foam
  • Idea-ology - Tim Holtz - Grunge Board Numbers
  • Idea-ology - Tim Holtz - Sanding Block
  • Cosmo Cricket  - Silver Glitter Adhesive Sheets
  • Studio Calico - Wood Veneer Speech Bubbles
  • Studio Calico - Wood Veneer Abroad Cameras
  • Clear Glitter Nail Polish
  • EK Success - Square Binding Edge Punch
  • Stars - Rhinestone buttons
  • Index Card

Monday, November 11, 2013

Let's Remember-Tag Embellishment

                           Let's remember those who have served and who are serving us today!!! 
                                                                Happy Veteran's Day!!!
Today is our small town we love to show our love
with a ceremony....
the laying of the wreaths...

Here is a tag that I created to go onto a 
scrapbook layout
that I will share after I get these
wonderful remembering photos 
developed.
"Tag embellishment"
glued the Nirvana paper onto a shipping tag...
laid down some stucco
with a brick mask
white washed over the whole tag
sprayed some mists 
over the whole piece
using a baby wipe 
clean off to give a washed look.
before the splatters of mists...
The Remember This:
11-11-11
is
11th hour of the 11th day of the 11th Month
remembering those who have served 
and who are serving....


Thanks for stopping by,
I will be sharing soon the complete layout...
Peggy Lee

Let's remember!

Stucco/Gesso
Heidi Swapp: color shine in teal, tinsel
Tattered Angels: glimmer mist in raven
Ranger: Distress ink in black soot


Monday, September 2, 2013

"Time To Smell The Roses" Tag

I was sitting at my craft table and looking at my creative mess...and realized how many gears I had cut up and didn't used on my Altered Book project that I created last week.
Oversized tag came to mind!
I decided to cut 2 oversize chipboard tags out and glued them together.
Glued down tissue paper (wrinkled) with gel med.
Sprayed with Raven Glimmer Mist.
Using some stucco/gesso mixture and a brick mask from CraftersWorkshop.
Started laying down texture here and there on the tag.
also ran the texture along the sides of the tag.
white washed over the layers once dried.
Tore up some cheese cloth...
glued down some of my gear scraps...
Looking around my crafty table I started to find
little bits & pieces...
the roses where pink but just by spraying some
raven glimmer mist-love the black color with glimmer.
tucked in some chicken wire and pearls.
Creating this oversized tag reminded me...
it's a time to relax and smell the beauty around me.
"time to
smell
the roses"
Thanks for stopping in today,
Peggy Lee

supplies:
chipboard
gear die cuts-leftovers
cheeseclothe
chicken wire/pearls
roses, tiny roses
say it in crystals gems
stucco/gesso
glimmer mist
perfect pearl mists


Monday, July 29, 2013

Tattered Dress Form Canvas Art

I have been adding texture to this canvas piece for awhile now...every time I used some stucco and gesso with stencil mask I would use up the extra onto this canvas.
I created the dress form for another project that I haven't finished so the inspiration for the background colors came from the dress form.
Dress form I white washed with gesso, grunge it up with Distress Ink Brushed Corduroy with water.
Then started dripping Tattered Angels glimmer mist down the sides of the dress form
and letting it run down and around the body.
Stamped the dress form with a few 7gpysies stamps with archival black ink.
 You can just keep adding layers of mist, ink!!
Oh don't forget to do glimmer splats...
I learned this techqinue from Marion Smith a few years back on grunging a dress form.
I knew I wanted to create some paper cone wing shape wreath..
Cut up an olde scrabble game pages into 2x2 squares
and began to roll into a cone shape, glued down
and tucked behind the dress form.
White washed the cones with a few little sprays of glimmer mist to match the background
and more splats!!
Oh adding a chain with dangles with a Petaloo Color Me Flower..
with glimmer mist and stamping
creates adorable touch.
close up of the stamping
Oh I love how the stamping shows up on the Petaloo flower!!!
Finial touch was adding a Art-i-Cake headpin to the top of
dress form...
Love the texture of the canvas background! I encourage you to grab some Tattered Angels Glimmer mist, paints and start playing....you never know where the art piece will lead you.

Thanks for stopping by today,
Peggy Lee

Supplies:
Tattered Angels: Simply Sheer-Baby Blue
Glimmer Mist-Aquamarine, Graphite, Tattered Leather, Raven and Slate
7gypsies: stamps
Petaloo: Color Me flowers
Canvas Corp: Mixed Media Glue
Prima: Mask-crackle and demask
Tim Holtz-wing/heart die
Ranger: Distress Ink-Brushed Corduroy, Archival ink black
Embossing Folder
Scrabble book pages
Stucco/Gesso
Art-i-Cake: Head Pin
Paper Mache' Dress Form
Chain, gems, buttons, jewelry bits.


Monday, June 24, 2013

Canvas Pocket Home Decor

I am really enjoying creating little home decor projects to adorn my home for the 4th of July celebration that is just around the corner...and I love grunge primitive wall pockets!
I had to create a little flag wall pocket using Canvas Corp's mini canvas shape pocket (which are great for creating mini banners). But a light turned on and I said ohhh a mini wall pocket with a glimmer mist painted flag would be adorable.

Here it is....
Mini Canvas Flag Wall Pocket!
The mini canvas pocket comes sewed up.
I carefully inserted my sharp scissors into the back of the pocket.
Being sure to only cut through one layer of the canvas.
Punched two tiny wholes on the corners to add wire through.
Tore a 1/4 inch canvas sheet strip.
 Sprayed with tattered leather glimmer mist to grunge it up.
Hot glued to wire wrap, then wrapped canvas strip around the wire hanger.
Flag:
I freehand a flag in pencil.
Started to paint with Tattered Angels mist.
Blue: Imperial Blue Simply Sheer
Red: Chilli Pepper Red Simply Sheer
Grunge: Tattered Leather Glimmer Mist
Splats: Graphite Glimmer Mist
White: gesso
Star:
I traced on the back of E-Flute in White, cut out the star.
Grunged it up with Distress Ink-Brushed Corduroy.
Button from my stash.
Burlap twine to finish it off.
To finish this little prim wall pocket I added some cranberry pipe berries.
I love all the canvas strings hanging!

Thanks for stopping in,
Peggy Lee

Supplies:
Canvas Corp:
Canvas Minis-canvas shape pockets
E-Flute in White
Burlap strings from Canvas Corp burlap sheet
Canvas Sheet
Tattered Angels:
Imperial Blue Simply Sheer
Chilli Pepper Red Simply Sheer
Tattered Leather Glimmer Mist
Graphite Glimmer Mist
Ranger:
Distress Ink-brushed corduroy
Gesso
Wire
Button
Cranberry pipe berries.

Saturday, June 15, 2013

Featured artist - Kimberly

I'm so honored to be asked to be a Featured Artist.  I've been a member of the Artsy Addicts group for almost a year and have been inspired by so many wonderfully talented people. 

Where to start?   I'm married to my jr high school sweetheart for 29 yrs. We have three amazing boys,  two beautiful daughters in-laws, a grandson and a granddaughter.  My family is my world! 


I've been crafting for six years.  I started out with a cricut then expanded myself from there.
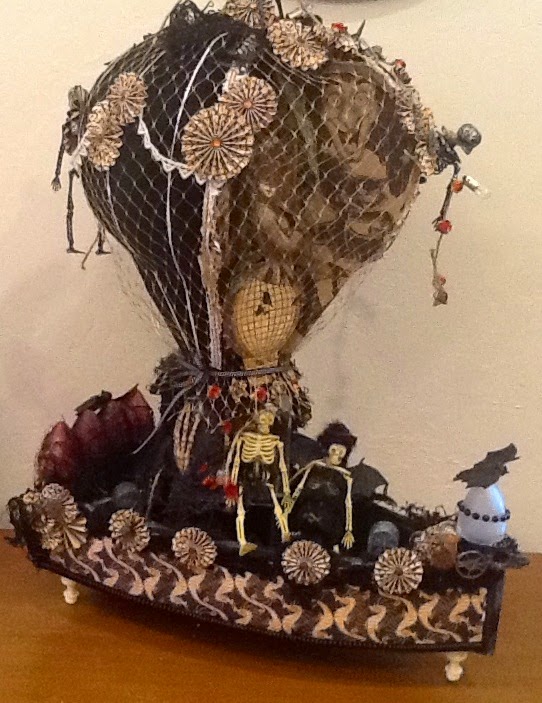
I love to alter the unexpected. The things that people toss, I see as art!  Example is the Turkey Mesh bag used on the hot air balloon below.  One man's trash is definately my treasure!


I would consider myself a Grungy girl.   I love the vintage, and steampunk.  The dirtier the better!

If I had to pick one color out of the crayon box and say it was me,  I'd pick red, because I have a firecracker personality. I love to make others happy and engergized. If I were a scrappy embellishment I'd be a paper clip, because I tend to hold everything together for the people in my world.
 
Here are a few of my other projects I wanted to share with you today.


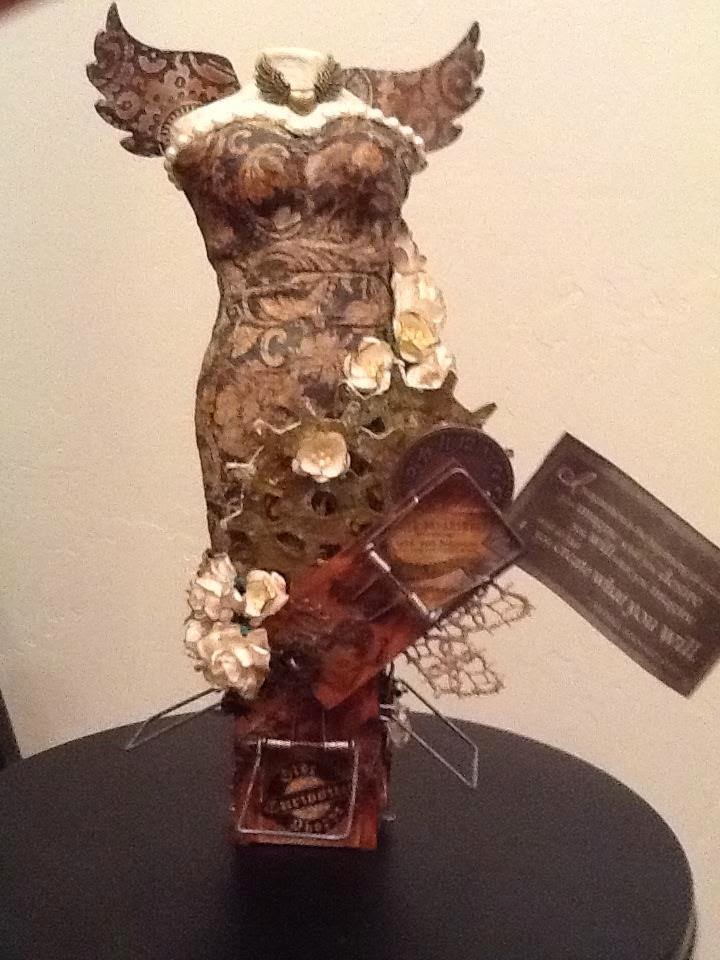
Talk about the unexpected.  The base of this steampunk dressform was created using mouse traps.


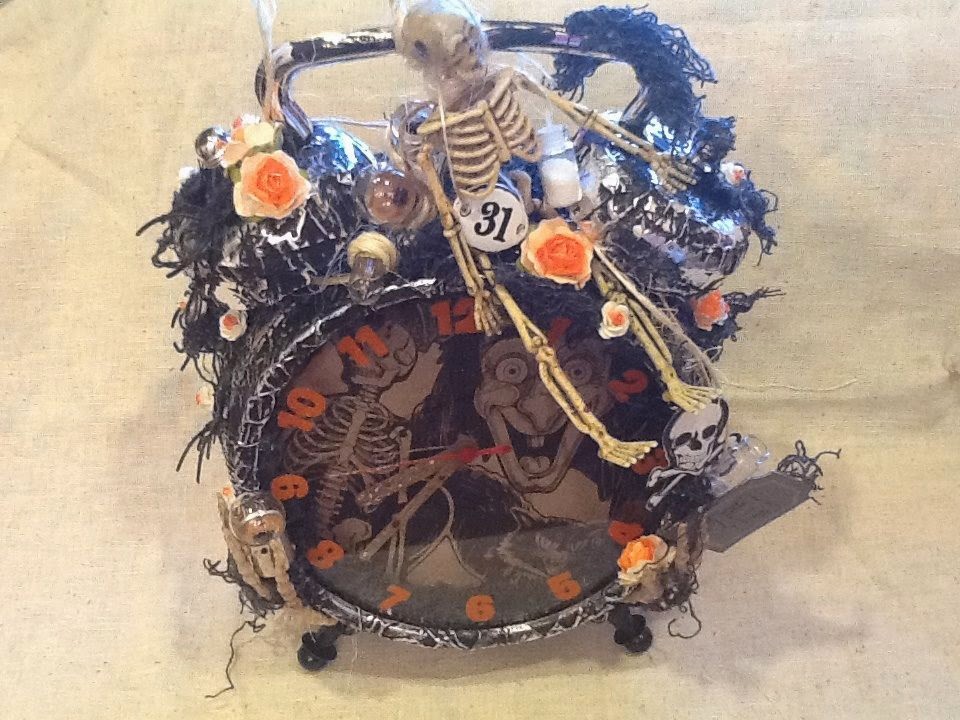
As you can see Halloween is one of my favorite holidays.  I think it is an excellent opportunity for me to show off my grungy techniques.


Thank you for asking me to be a featured artist. 
 

Monday, June 10, 2013

Father's Day Card

 With "Father's Day" coming upon us soon, I decided to share with you one of my cards I created to celebrate this special day for the men in our lives. I knew I wanted a grunge feel with warm colors, I started with kraft card stock 6x12 folded in half. Distressed all the paper edges and used Distress ink-walnut stain to give the worn and weather look..one of my favs!  So love the tiny clothespin from Canvas Corp (which comes in a rainbow of colors perfect for your projects).
Here is a look at the papers I used from 7gypsies two paper collections.
"Travel and Epicurean"
it's great to mix and match
I know every man needs some gears on their cards, so I used Tim Holtz Gears Die cut from chip board and papers, glued together and embossed with a embossing folder, inked all edges.
The gears needed something more
 so I grabbed my 7gypsies
 awesome Time Steampunk Rubons!
I was thirlled with the way it came out....
I've been playing with this adorable
CTMH stamp-Perfect Fit Dad-Holiday set.

To finish off the card I couldn't create a project without "glimmer mist"!
Grabbed my Graphite glimmer mist from Tattered Angels and started
to splatter the whole card.
"super cool effect"
What are you creating for your special men in your life?

Thanks for stopping by,
 Peggy Lee

Supplies:
Canvas Corp: kraft cardstock, mixed media glue, clothespins in black
Tattered Angels: graphite glimmer mist
7Gypsies: Hampton Art Script stamp, 6x6 paper pad in Travel and Epicurean, Time Steampunk Rubons
Colorbok: black and red cardstock
Tim Holtz: gears die, distress ink in walnut stain, archival ink black
CTMH: Perfect Fit Day-Holiday stamp, black and vineyard berry ink
and Cricut Artiste and Art Philosophy Cartridges.

Related Posts Plugin for WordPress, Blogger...
 
Pin It button on image hover