Friday, May 31, 2013

Tattered Angels - Red Brick

It is no secret that I'm in LOVE with these new Tattered Angels Naturally Aged Paint Systems. The minute I saw them, I had to have them all!  Today I would like to feature the Red Brick from the Architecture line. 
 
When I finished my samples, I thought they would perfect for book covers. So I created this cute little notebook from pieces of scrap manila card stock. The final book size is 2 1/4 inches x 3 7/8 inches.   I used Tim Holtz' grunge board hinges and a 7 Gypsies drawer pull for the handle.  Perfect size to jot down quotes or little notes. 


In the kits you will get a 4 - 1oz bottles of mediums from the Tattered Angel's family, and a full color step by step guide on how to complete the project.  As always, if you like the look and want to do it on a larger project, you can certainly buy larger bottles of the mediums.


Here is a step by step video on how this kits works.


If you use these paint systems, please tag me in your poject and let me see what you create. They are so much fun!
 
Thanks for stopping in today.


Monday, May 27, 2013

Happy Memorial Day

We all want to wish you all a Happy Memorial Day! Let's not forget the men and women who have served and is serving us on this special day of rememberance.
Here is a card I created for Memorial Day! This card was made to fit into a regular letter size envelope. Card stock base is cut 7x6 - folded in half, script stamp image in black ink. (you could also use a music note stamp too).
The pinwheel image was stamped in pacifica and ruby ink, cut the image out and popped up to give depth of movement.
"Let's Celebrate" was stamped twice and cut the middle out of one to pop up and give depth to the seniment. Quick and easy card to share with your friends and family in rememberance of those who serve and served.
Below is a photo of the wreath laid at the Memorial Day Parade that took place this morning in my small town.
Alone simply beautiful!
Happy Memorial Day,
from all of the Artsy Addicts Team.

supplies: card all CTMH


Friday, May 24, 2013

Emblishments from Scraps

Last weekend I was in my studio and really not feeling like starting a new project. Can you say brain dead?  Well, when I get like that I always clean.  I just made a mini album, that I will share with you in a future post, and I had a lot of little pieces left on my desk, floor, and scrap box.  I set out to make cards (as I usually do with these little pieces), but I really wasn't in a 'card' making mood. I recently made a large stack of them so I didn't need any at the moment.  Well,  I was hanging out with a friend and piddling around  (pid·dling  To spend time aimlessly; diddle.).   Yes not giving much thought into what I was doing.  The next thing I knew I had stapled a few scraps to a tag, stamped a few images and fussy cut them out, and first scrap embellishment was born.   By the end of the day, I had made 8 of these from various scraps, stamped images, die cuts, and extra ephemera pieces. 


I have a bucket on my desk that includes what I call One Hit Wonders.  These are small pieces that were left overs from recent projects (not worth keeping the packaging) so I toss them in the bucket.  A single flower, a stamped image that wasn't used, an inch of ribbon/lace, a button, a die cut etc... they seem like pieces that you would just toss, but clustered together, they are cute!  


On YouTube a few weeks back I shared a video on making small banners that were sewed together.  One of them is being used in the tag that says fun times above.  Clustered together these itty bitty pieces of nothing form a cute layered embellishment to be included on your scrapbook pages, cards, or in your mini albums.
 
 
I had a variety pack of small papers from 7Gypsies laying on my desk.  I clustered those around this 5x7 photograph on my desk,  placed a few photo reels that I cut from a 6x6 paper pad from Echo Park, a few paper doilies die cut from an MFT doily die out of scrap paper and this layout was born.  Since the photograph had so much negative space in the upper left hand corner, I decided to use one of my embellishment pieces for the journaling to hide the wall.  Then I sprinkled a few sequences to mimic a flash.  I love how this  "Scrap" layout turned out. 
 
Oh btw those are my beautiful children all grown up!
 
I would love to see your scrap embellies - please post them on the Facebook page and make sure you tag me in them.
 
Thanks for stopping in today,
 
Tonya Gibbs

Monday, May 20, 2013

Tips with Glimmer Mist


"Sisters Layout"
I wanted to share with you all a layout I created awhile back for challenge you can see more about this here on my blog.
Today I wanted to focus on background texture I created using Tattered Angels glimmer mist, everyone needs some glimmer mist products they make your projects pop and come alive.
After I created the stucco and mask with a little stamping then came the coloring with glimmer mist!!
Tip #1
"Drippage"
 Spray your glimmer mist close to your project and lift up your project to allow the glimmer is run in different direction heat set to keep the drips where you want them to flow.
Tip #2
"Splats"
Taking your glimmer mist and unscrewing the nozzle and splatting the nozzle over your project creates great little splats of color.
Here are my two beautiful daughters "sisters" to heart, it's been a bittersweet year for them, since my oldest daughter on the left has gone to college leaving her sister, friend and home. It's been hard for her sister on the right, always having her sis at home to chat with, fight with, sing with has been heartache without her sis around, but  they were united this weekend has college year came to a close.
Tip #3
Texture chipboard
Die cut image with chipboard, add your favorite medium (I used VersaMark and Utee to create the tarnish look-roughed it up by using sandpaper to scrap some groves into the chipboard).
Spraying alot of glimmer mist over the chipboard pieces let it set up for a bit, heat set which creates a great worn look.
Love the way the mist create such different texture depending on what they are sprayed on..like the chipboard gears vs. paper...awesome!!
I encourage you to dig out your glimmer mist and play!
Thanks, Peggy Lee

supplies:
Tattered Angels: glimmer mist-riptide, graphite, and sunflower
other supplies list you can see here.

Friday, May 17, 2013

Patriotic Party Invitations

The 4th of  July, Independence Day here in the USA,  is one of my favorite holidays. The little town that I live in really goes all out on "Our Country Day".  Festivities start on the 3rd and don't end until the Fireworks on the 4th.  My sister and I have always joked about it being class reunion weekend - cause EVERYONE comes home for the 4th. 
 
Earlier this week, Canvas Corp. posted their super awesome papers that are themed for patriotic projects, and I got inspired.  With Memorial Day around the corner and the 4th of July fast approaching, I decided to give you guys a simple card idea that could easily be used for both holidays. 


Canvas Corp:  Royal Blue Stars Reversed Paper, Red-White-Ribbon-Stripe paper, Hemp Rope Red, and Tags and Ties - Corner  White, Ranger: Stickles, Tim Holtz - Cargo Numbers, MFT - Flags Dinamics, Ink-a-dink-a-doo - Stamp, Bazzel Card Stock; Sizzix Basic Stars Die, Fiskars Banner Punch.


I kept the design simple, and flat for mailing.  If I start now, I should have them ready for mailing in mid June - Maybe!

I hope everyone has a great weekend.  Thanks for stopping in today.

Tonya Gibbs
http://www.psychomomscrapbooks.blogspot.com


Thursday, May 16, 2013

Altered Photo Tray | My favorite things....

Happy Thursday everyone.

We're over the hump and the week is almost at the close. The weekend so close you can taste it. Just like the end of the school year for all us teachers out here. The kids are feeling a little squirly with anticipation, but school is still in full swing.

Also in full swing is the Texas weather. It's been crazy down here ya'll <---bonified TEXAS vernacular!! There's been rain storms, cold weather, and humity in the same week. Not a good feeling for allergy sufferers like me. Thank goodness for Xyrtec.

Anywhoo, in hopes of bringing the wonderful summer feeling into my craft room I decided to alter this cute 7 Gypsies photo tray this week. It's been eyeing me from under my sewing table for the past few weeks, and while I was rearranging craft supplies the other day things just seemed to fall into place. I found a bunch of Vintage Trinkets that Marion designed,  my collection of feathers caught my eye, and everything just came together in a beautiful blur.

 photo SmallAlteredCubeCC52013_zpse2e219cf.jpg


I also used Marion's Rolled Roses printable as well. It took me a few tries to get it just right, and even then I still wasn't 100% satisfied. Tucking that rose in the corner of this photo tray with a bit of hot glue made me very unfrustrated happy. That's were I started this entire project.


 photo AlteredFrameCloseWeb_zpse43f57ed.jpg


Everything else seemed to fit just right in the nooks of the frame and I'm so happy with the outcome. I don't "do" many altered projects but I'm definitely pleased with the outcome of this one. Plus is showcases some of my favorite things: Feathers, Flowers, Bling, and charms.

Have a great weekend everyone.

Angela Carter
www.alwaysangella.com

Friday, May 10, 2013

Birthday Card

Hi everyone, I know this month is turning into quite a busy month for lots of you with school winding up, Mother's Day this weekend and travel plans for summer.  My house is NO different.  I can't seem to figure out if I'm coming or going.

Today I wanted to share with you a simple card that I made a while back as a birthday card.  I used some scrap paper cut into banners and hexagons to create an interesting background.  This card design is a perfect way to eleminate scraps in your stash. I also took advantage of a Girl's Paperie ephemera frame that has been around for a while. 


While writing this post, I realized that this design could be re-purposed as a many different themes by just changing the sentiment and the paper collection. 
 
I hope all the Mothers out there have a great Mother's Day. 
 
Thanks for stopping in today,
Tonya Gibbs


Monday, May 6, 2013

Spread Your Wings Tag

That's exactly how I felt this past weekend, I could have spread my wings and flown away! If I had wings well I could have created some. What a busy time it was you see my youngest daughter had Prom this past weekend and you all know how getting ready for Prom is so busy and sometimes crazy and a little stressful but in the end it's one of the most beautiful times in your teenagers life.
Along with busy weekend with Prom my oldest daughter who is away to college turned 20 years old on Sunday and since her college is only 3 hours away we decided to drive down and surprise her on her special day lets just say she cried and bear hugged us to death...what a blessed weekend.
Let's get to the tag before I start to cry!
"Spread Your Wings" fits so well with this tag it all started with the butterfly stamp from 7gypsies.
I had stamped the butterfly onto Canvas Corps Ivory Chipboard Handmade Paper oh my this paper is amazing and thick! I just randomly ripped a piece off  then stamped the butterfly. Also stamped another butterfly on a separate piece of the same paper to cut out and pop up to give the butterfly some movement and depth.
 Colored with a couple of markers, added some splatters of Tattered Angels Graphite glimmer mist.
And this is the end result-Love It!
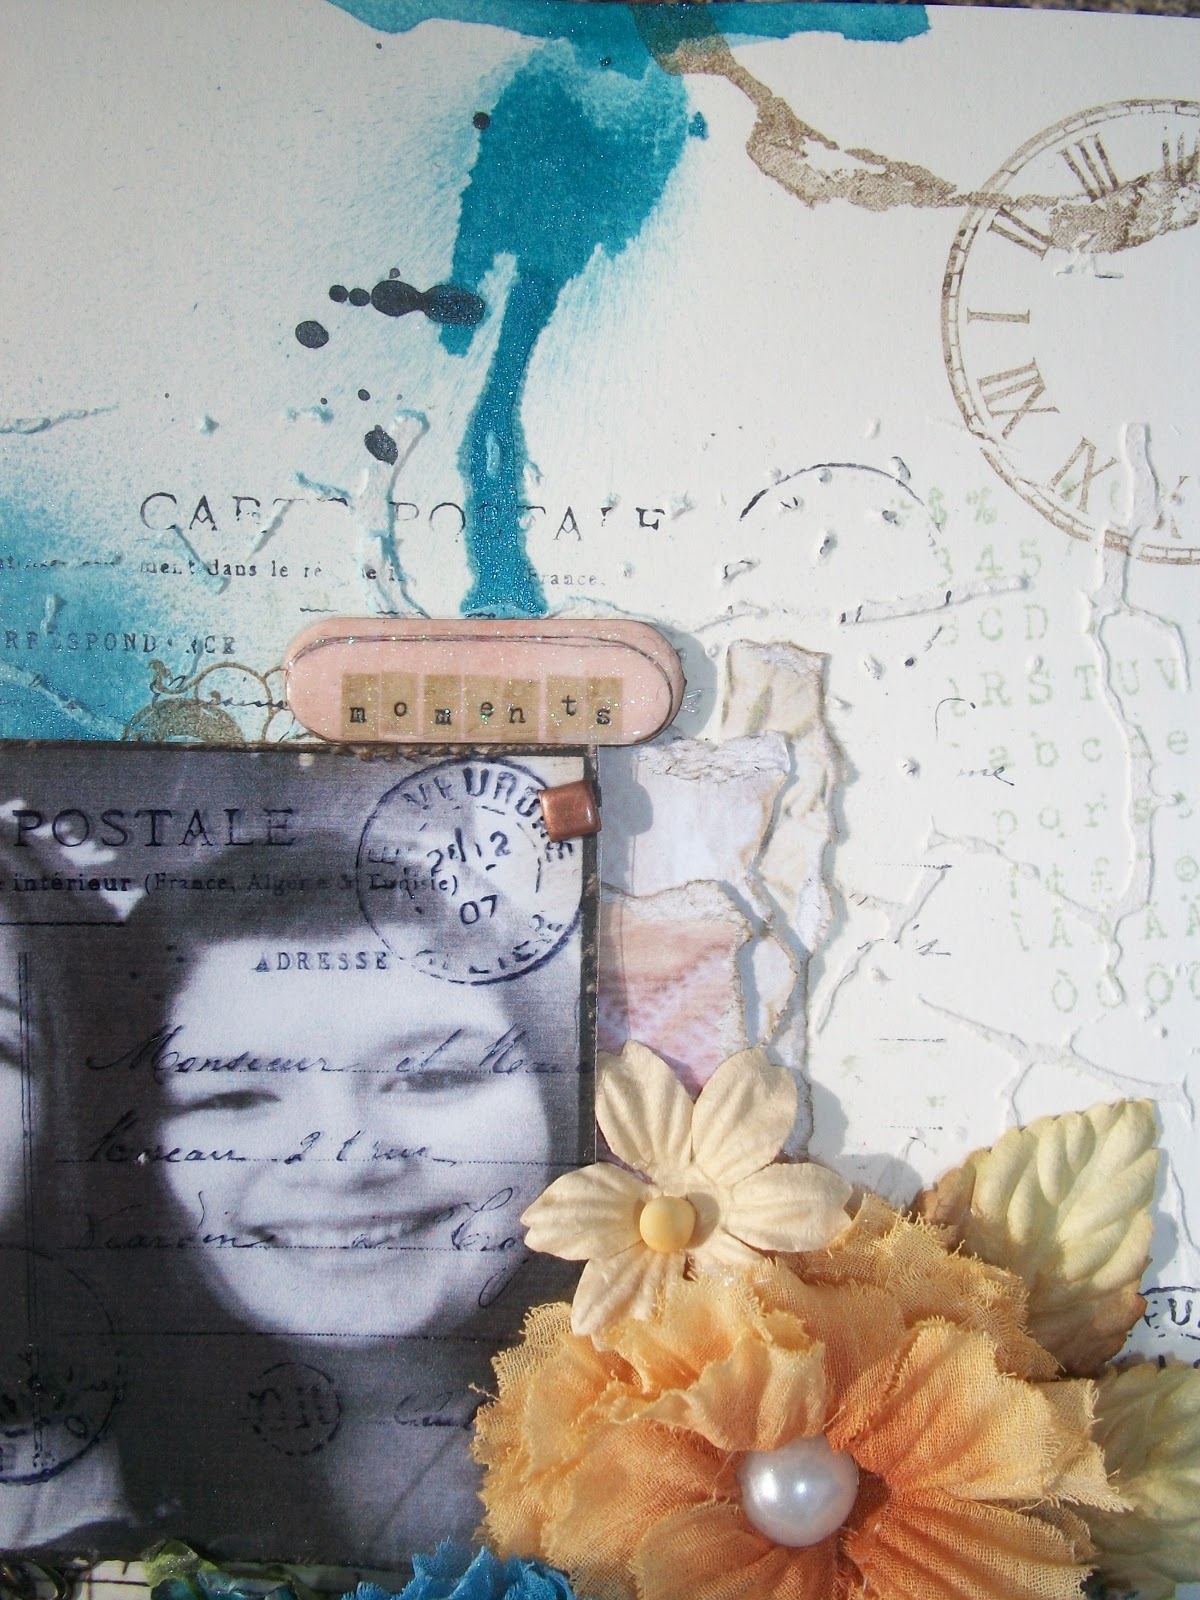
Tag Tutorial
Step 1: I stamped randomly on some tissue paper to create my own background.
Step 2: On my craft sheet sprayed different colors of blue mist from Tattered Angels, then dipped the tag repeatedly into mist to give color depths. (this part is really cool because it's always different every time).
also used Graphite glimmer mist in areas for shading...same as above.
Step 3: Using gel medium glued the tissue paper to both sides of tag.
Step 4: This part is one of my faves I laid down a Prima crackle mask and using stucco and gesso smoothed over the mask to give the tag some peaks and depth...let it dry.
Step 5: Burlap Flower and Leaves-using Canvas Corps colored burlap in slate grey and smokey blue perfect colors to match the tag...I cut the burlap to fit over the Tattered Floral die by Tim Holtz. I also used the Tattered Leaves die by Tim Holtz in the natural burlap for the leaves.
Since I used natural burlap I used Army Green Simply Sheer mist.
Amazing color!
Step 6: In order to keep the burlap flower from falling apart I used a nice layer of gel medium over the flowers and leaves to hold it's shape, plus you can mold your flower into shape. Let it dry then glue together.
And there you have your tag!
Also I did color seam binding and cheese cloth to match the blues with the same mist. Did some random stamping on the tag added some splatters with some glimmer mist. Then on Kraft card stock wrote in sharpie marker my title cut apart and outlined the words and adhered down.
I hope you enjoyed this tutorial, I know I did while creating this tag and funny thing is my daughters Prom dress was the same shades of blue. Which gives me inspiration for a scrapbook layout with her Prom pics.
See inspiration is all around us...

Thanks for starting your week with me.

Peggy Lee

Supplies:

Canvas Corp:
Colored Burlap and Natural Burlap
Kraft Card Stock
Ivory Chipboard Handmade paper
Black Cord hemp rope

7gypsies:
Butterfly stamp from Hampton Art

Tattered Angels:
Graphite glimmer mist
Blue Bird Plain Jane baseboard
Imperial Blue Simply Sheer
Army Green Simply Sheer

Prima:
Crackle Mask

Ranger:
Claudine Hellmuth Studio-multi-medium matte
Archival Ink-jet black
Distress Ink-black soot

Stamps:
Tim Holtz Collection-Mixed Media by Stampers Anonymous
Carte Postale by Stampamdous

CTMH Marker-brown bag
Stampin Up Marker-Brocade Blue
Martha Stewart-stucco
Gesso
Cheese Cloth
Seam Binding
Vintage Button
Natural Tissue paper


Saturday, May 4, 2013

Featured Artist | Jessica Feliciano

Hi, my name is Jessica Feliciano, my small business name is Expressions By JMF, and this is my first blog ever!!


I don't even know where to begin, but here goes! I am a full-time Paralegal, a mother of 3 with 2 step-children, I started crafting in August of 2012, I was inspired by a trip to New Orleans…my husband and I walked past an art gallery and the artwork inside caught my attention…told him, "if they can do that and get it displayed, then so can I"…so I went to Michael's(after my trip of course) to buy materials to get started, but before I could even get to the back of the store, a display table with some paintings caught my eye…they were signing people up for Art classes at 50% off, I couldn't resist, so I signed up! After I got my supplies I went back up and saw that there was a jewelry table and classes available as well, I signed up for that too…and the rest is history!


I started mixed media shortly thereafter, I looked up how-to videos on YouTube and even made a few videos of my own. Everything started off as a hobby but now have turned into a small business adventure. I would love to be able to teach classes on all three of my crafts some day in the future. I am a self-taught artist and If I can learn and do, anyone else can too!


I am happy to be given this opportunity with Artsy Addicts…to be able to share my talent with you all. I hope for many other opportunities in the near future!


Friday, May 3, 2013

Tarnished Silver Tag

Last week I shared with you a card I created using the Tattered Angels' Naturally Aged Paint System Bare Metal Tarnished Silver.  Today I would like to share a second project that I created using the other pieces created in my sample video.


The background of the tag was embossed with a Cuttlebug - Clockworks embossing jacket after the card stock was dry. As you can see the card stock looks like embossed metal. Below is a sample of the dry paper before it was embossed and die cut into a tag. I really wanted you to see how much texture and shine these mediums give your projects.  Bonus - it is just card stock, not metal. This means it is light weight enough to be mailed, making it perfect for cards.  Also, it can be easily die cut, punched, embossed, or cut with your electronic cutters.

 
 I used the 7Gypsies Paddington Stamp with Ranger Archival Jet Black Ink to give the appearance of dripping oil.  Then I covered over those splotches with Glimmer Mist, Almost Black, to give a little shine to the oil.  The sentiment was created in Photoshop CS6 using the Bookman Old Style Font, and attached to the tag with a 7 Gypsies Mini Paper Clip - SIDE NOTE:  LOVE THESE NEED CASES OF THEM - they come in several different colors, and are so tiny and cute. 
I also cut a Sizzix Primitive Heart from chipboard after covering it with 7 Gypsies Paper tape from the Lille Collection. I love the contrast of the red against the sea of metallic colors. The heart was edged with a silver pigment ink pad from Color Box to make it looked finished. The 7 Gypsies Hardware - Industrial Gears were the perfect touch to bring my clockworks background to the foreground. I found a scrap of DCWV Tattered Time paper and was able to cut the clock face to add to the bottom.

As a reference here is the video I shared last week on how I created the background effect with the Tattered Angels Paint System.


I love how the finished tag came out. It would be perfect on the face of a masculine card, or as an embellishment on a scrapbook page.  Have you tried any of the Paint Systems yet?  If so, please post them on Facebook and be sure to tag me in the post.   I would love to see your creations.
 
Thanks for stopping in today,
 
Tonya Gibbs
 
 
Resources: 
  •  Tattered Angels:
    • Naturally Aged Paint System Bare Metal Tarnished Silver
    • Almost Black Glimmer Mist
  • 7 Gypsies:
    • Hardware - Industrial Gears
    • Mini Paper Clip - Antique Brass
    • Paper Tape - Lille Collection
    • Paddington Stamp
  • Ranger/Tim Holtz:
    • Pumice Stone Distress Ink
    • Archival Ink Jet Black
    • Tiny Attacher
  • Sizzix
    • Primitive Heart Dies
    • Alterations - Tag & Tie  Die
  • Provo Craft: Clockworks  Embossing Jacket
  • DCWV: Tattered Time 4x6
  • Seam binding
  • Font:  Bookman Old Style Font
  • Photoshop CS6
  • Manila Card stock - Recycled File Folders


Related Posts Plugin for WordPress, Blogger...