Showing posts with label Stamps. Show all posts

Monday, May 12, 2014

Garden Rose Card by Peggy Lee "Tutorial"

Happy Monday Morning to you all, it's Peggy Lee here
sharing with you all my mixed media card "Garden Rose" Card!
Garden Rose Stamp and Textured Edges Stamp.
Tutorial
I started with watercolor paper.
Using Archival Ink in black stamped the Garden Rose image
several times.
Card Base 4 1/4 x 6 size
Did more stamping on the card base for background texture.
After I stamped the images...I grabbed a few Tattered Angels
Glimmer Mist colors...started water coloring painting..using a small brush.
I painted several parts of the other stamped images..to but cut apart.
To add to the center of rose to give depth.
See the depth of adding layers to your stamped images.
Also added some more texture with gesso and stencils.
LOVE THIS TEXTURE

There you have it a simple mixed media card...just using stamps, ink,
glimmer mist and gesso!!
Give it a try, I know you will love it!!!

Thanks for stopping in,
hugs
Peggy Lee

Supplies:
Marion Smith Designs-Garden Rose & Textured Edges Stamps
Tattered Angels-glimmer mist in Cranberry Zing, Olive Vine & English Ivy
Ranger-Archival ink and liquid pearls in bisque
Stampers Anonymous- Tim Holtz Dot Fade Stencil
water color paper
gesso

Monday, April 28, 2014

Insta-Frame Magnet by Peggy Lee


Howdy peeps, it's Peggy Lee here,
to share with you all my
"Insta-Frame Magnets"
I created these for a workshop I hosted last weekend...
Inspired by Heidi Swapp, 
which I just LOVE her style!!
This first one is an ART in a frame magnet!!!
You could stamp anything inside the frame...holiday themes...or pretty art!
The second insta-frame magnet...is a Photo holder one...
We left one side open to slide a photo in!!
This is the one the ladies created and they sure did love it...
What's really awesome you could use this in a layout, in a frame to hang on wall...or 
as is a magnet to adorn your fridge!!!
Just love making these...I have a few more to create some
scrapbook layouts!!! I will share when I have them finished...
Thanks so much to stopping by today,
hugs

Supplies:
All Supplies are CTMH
Skylark Paper Packet
Stamps-True to Life & Believe in Yourself
Inks-Sweet Leaf, Lagoon, Desert Sand
Seam Binding
Magnets
3-D Pop dots


Friday, January 10, 2014

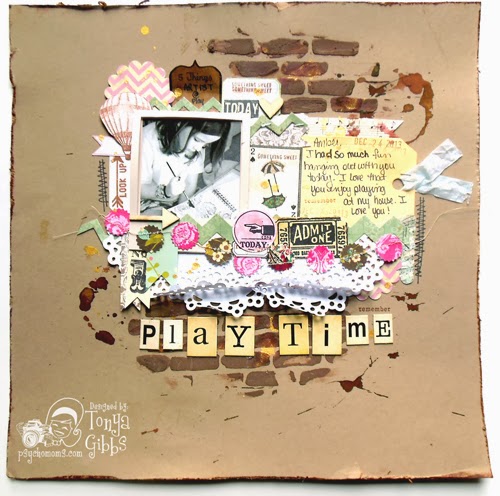
Play Time Layout by Tonya Gibbs

Hi everyone.  Over the holidays I was able to spend some time with my dies, punches, and Silhouette and clean out a lot of my scrap piles.
 

I cut everything down to what I call "layering pieces".  I love to use my stamps on these little pieces too.  So while I'm at it, I start stamping as well.    I find that when I do this I use the supplies I've invested in more. When I'm busy with a project, I don't want to drag out the dies, and stamps.  This way I'm sitting in front of the TV and completing a mindless task with no agenda and no deadline!

I store all these individual pieces in a container by Iris.  Ephemera from used up collections are also stored here.


I have found that when I leave scraps un-managed they seem to take over my space.  I try to use them the minute I'm done with a project, but sometimes this just doesn't work out.  So I have a small container next to my cutting station.  When the container starts over flowing it is time to start cutting.

Today I want to share with you a layout I decided to make last night, only pulling out the dies and pieces that I have created.  


When you take random objects and sort them by "color"  they all seem to work together.  I love the eclectic feel of this layout.  I love the grungy ADHD randomness of the entire thing. Because the day that I am capturing was just that type of day.   A little coloring, A little punching, A little stamping. 

 
My favorite part of projects, is that I'm not enslaved by a particular collection or set of supplies.  I have used my scraps and stamps to make something unique.    
 
I encourage you this year, to free yourself from all the left over collections and scraps around your studio, and see what you can make!  

Thanks for stopping in today,

Tonya Gibbs
http://www.psychomomscrapbooks.blogspot.com

Monday, May 20, 2013

Tips with Glimmer Mist


"Sisters Layout"
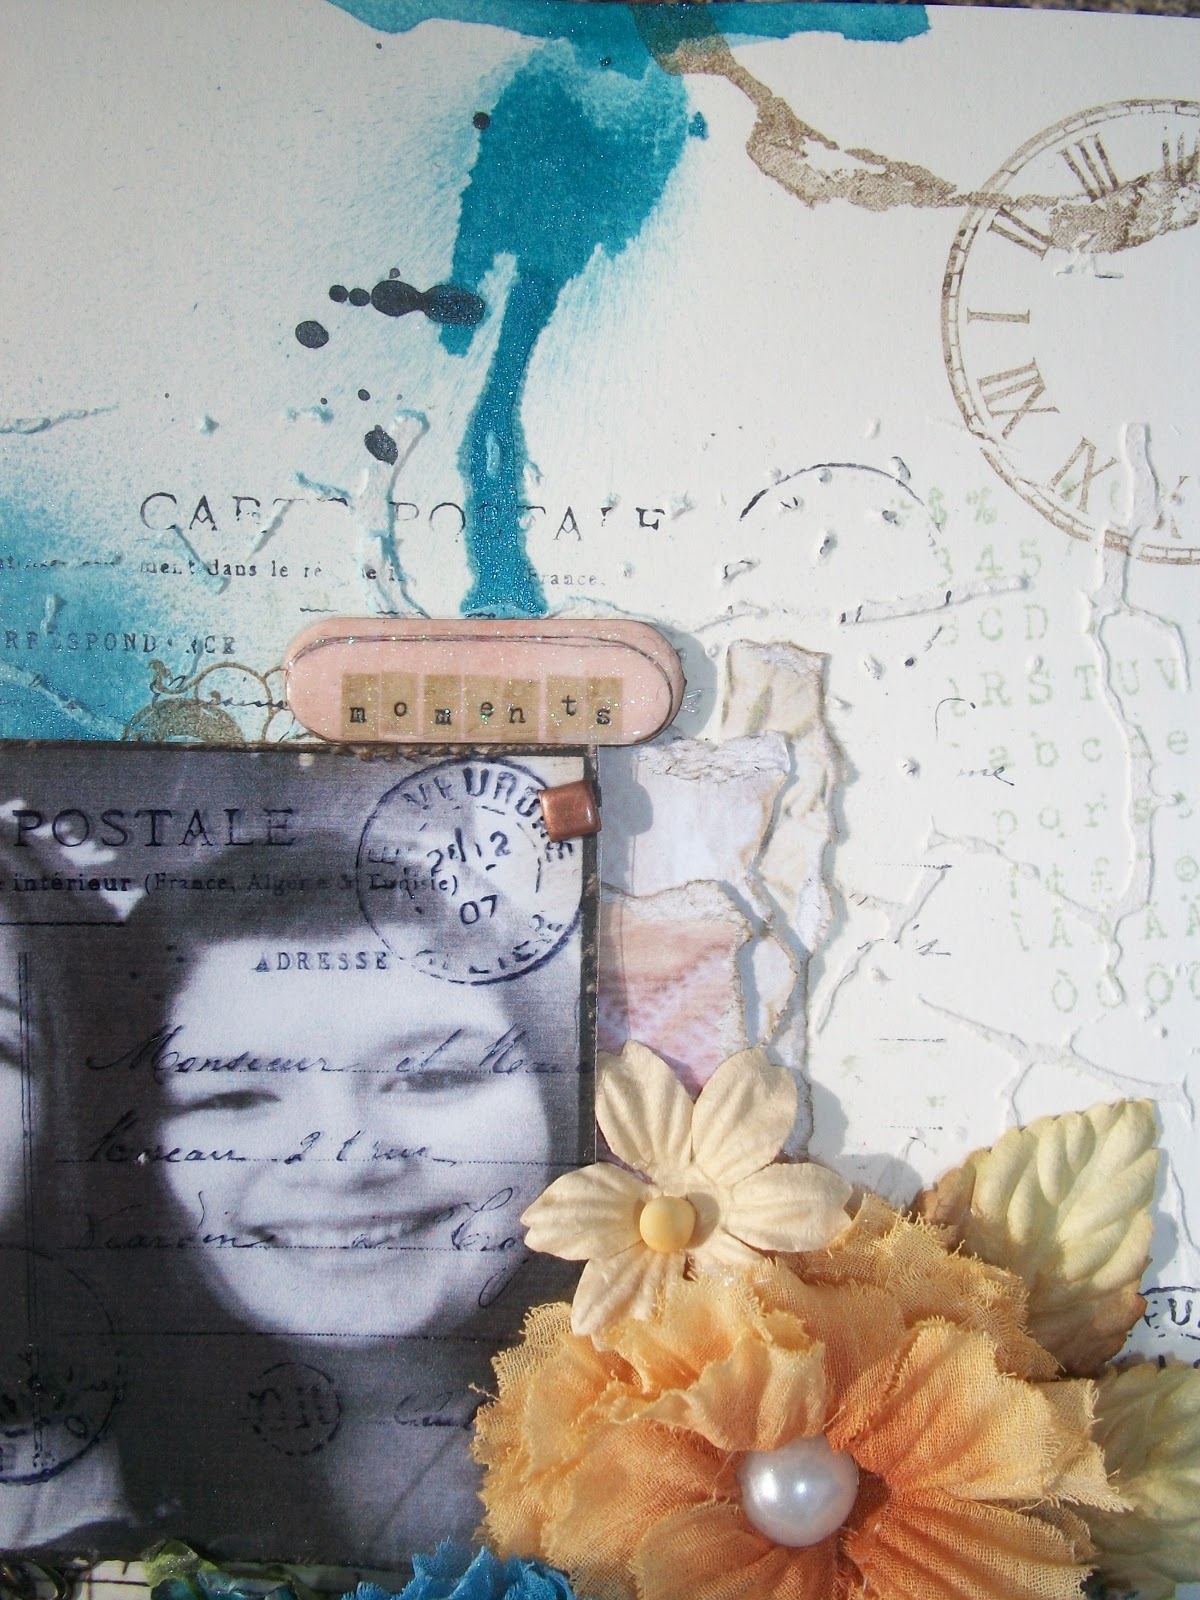
I wanted to share with you all a layout I created awhile back for challenge you can see more about this here on my blog.
Today I wanted to focus on background texture I created using Tattered Angels glimmer mist, everyone needs some glimmer mist products they make your projects pop and come alive.
After I created the stucco and mask with a little stamping then came the coloring with glimmer mist!!
Tip #1
"Drippage"
 Spray your glimmer mist close to your project and lift up your project to allow the glimmer is run in different direction heat set to keep the drips where you want them to flow.
Tip #2
"Splats"
Taking your glimmer mist and unscrewing the nozzle and splatting the nozzle over your project creates great little splats of color.
Here are my two beautiful daughters "sisters" to heart, it's been a bittersweet year for them, since my oldest daughter on the left has gone to college leaving her sister, friend and home. It's been hard for her sister on the right, always having her sis at home to chat with, fight with, sing with has been heartache without her sis around, but  they were united this weekend has college year came to a close.
Tip #3
Texture chipboard
Die cut image with chipboard, add your favorite medium (I used VersaMark and Utee to create the tarnish look-roughed it up by using sandpaper to scrap some groves into the chipboard).
Spraying alot of glimmer mist over the chipboard pieces let it set up for a bit, heat set which creates a great worn look.
Love the way the mist create such different texture depending on what they are sprayed on..like the chipboard gears vs. paper...awesome!!
I encourage you to dig out your glimmer mist and play!
Thanks, Peggy Lee

supplies:
Tattered Angels: glimmer mist-riptide, graphite, and sunflower
other supplies list you can see here.

Monday, May 6, 2013

Spread Your Wings Tag

That's exactly how I felt this past weekend, I could have spread my wings and flown away! If I had wings well I could have created some. What a busy time it was you see my youngest daughter had Prom this past weekend and you all know how getting ready for Prom is so busy and sometimes crazy and a little stressful but in the end it's one of the most beautiful times in your teenagers life.
Along with busy weekend with Prom my oldest daughter who is away to college turned 20 years old on Sunday and since her college is only 3 hours away we decided to drive down and surprise her on her special day lets just say she cried and bear hugged us to death...what a blessed weekend.
Let's get to the tag before I start to cry!
"Spread Your Wings" fits so well with this tag it all started with the butterfly stamp from 7gypsies.
I had stamped the butterfly onto Canvas Corps Ivory Chipboard Handmade Paper oh my this paper is amazing and thick! I just randomly ripped a piece off  then stamped the butterfly. Also stamped another butterfly on a separate piece of the same paper to cut out and pop up to give the butterfly some movement and depth.
 Colored with a couple of markers, added some splatters of Tattered Angels Graphite glimmer mist.
And this is the end result-Love It!
Tag Tutorial
Step 1: I stamped randomly on some tissue paper to create my own background.
Step 2: On my craft sheet sprayed different colors of blue mist from Tattered Angels, then dipped the tag repeatedly into mist to give color depths. (this part is really cool because it's always different every time).
also used Graphite glimmer mist in areas for shading...same as above.
Step 3: Using gel medium glued the tissue paper to both sides of tag.
Step 4: This part is one of my faves I laid down a Prima crackle mask and using stucco and gesso smoothed over the mask to give the tag some peaks and depth...let it dry.
Step 5: Burlap Flower and Leaves-using Canvas Corps colored burlap in slate grey and smokey blue perfect colors to match the tag...I cut the burlap to fit over the Tattered Floral die by Tim Holtz. I also used the Tattered Leaves die by Tim Holtz in the natural burlap for the leaves.
Since I used natural burlap I used Army Green Simply Sheer mist.
Amazing color!
Step 6: In order to keep the burlap flower from falling apart I used a nice layer of gel medium over the flowers and leaves to hold it's shape, plus you can mold your flower into shape. Let it dry then glue together.
And there you have your tag!
Also I did color seam binding and cheese cloth to match the blues with the same mist. Did some random stamping on the tag added some splatters with some glimmer mist. Then on Kraft card stock wrote in sharpie marker my title cut apart and outlined the words and adhered down.
I hope you enjoyed this tutorial, I know I did while creating this tag and funny thing is my daughters Prom dress was the same shades of blue. Which gives me inspiration for a scrapbook layout with her Prom pics.
See inspiration is all around us...

Thanks for starting your week with me.

Peggy Lee

Supplies:

Canvas Corp:
Colored Burlap and Natural Burlap
Kraft Card Stock
Ivory Chipboard Handmade paper
Black Cord hemp rope

7gypsies:
Butterfly stamp from Hampton Art

Tattered Angels:
Graphite glimmer mist
Blue Bird Plain Jane baseboard
Imperial Blue Simply Sheer
Army Green Simply Sheer

Prima:
Crackle Mask

Ranger:
Claudine Hellmuth Studio-multi-medium matte
Archival Ink-jet black
Distress Ink-black soot

Stamps:
Tim Holtz Collection-Mixed Media by Stampers Anonymous
Carte Postale by Stampamdous

CTMH Marker-brown bag
Stampin Up Marker-Brocade Blue
Martha Stewart-stucco
Gesso
Cheese Cloth
Seam Binding
Vintage Button
Natural Tissue paper


Friday, January 18, 2013

CHA 2013 - Tonya's Favs

I just got back from CHA and it was so overwhelming.  Below I'm listing my top 5 Favs for this show, all of which are on the MUST have list! 
WARNING: There are so many awesome products about to hit the market you may want a second job!


Tattered Angels Glimmer Mist Naturally Aged Paint Systems come in several kit themes from Bare Minerals, Stones and Fine Woods.  This is a paint system with four distinctive mediums that perfectly complement each other. You can use each color individually or layer together for a truly unique, custom look that is different each time. The paints are rich in color and texture as you can see from my test sample of the Bare Minerals - Rusty Metal kit below. You can apply these systems to metals, wood, fabrics, and paper - so many endless possibilities.  Many of these kits have started shipping and are now available.  Suggested retail is $19.99, and complete full color step by step instructions are included in the packaging. 


WeR Memory Keepers Envelope Punch Board.  This product won 2nd place in innovative products at CHA.  Anyone who knows me, knows that I'm addicted to envelopes of all shapes and sizes.  This board makes it super simple to whip out an envelope in no time! Everything you need to create the envelope is included and attaches to the board. The board has the measurements for 66 envelope sizes printed on the board for easy reference. This product is scheduled to ship to retailers in January 2013, and retails for $19.99.


Ranger Distress Paints - Calling all mixed media artists - this is a must have!  Distress Paints are very fluid water-based acrylic paints for multiple surfaces. Tim and Ranger developed these special paints to be reactive with water just like Distress Inks and Distress Stains—perfect to accomplish a wide variety of artistic techniques. Distress Paints have a convenient dabber system for easy and mess-free application. Use with stamps, paper, wood, metal, glass, plastic and more for a timeless matte finish on craft projects.
  • 24 colors that coordinate with the Distress palette
  • Very fluid water-based, multi-surface acrylic paint
  • Timeless matte finish paint in 1 oz. bottles
  • Reactive with water like Distress Inks and Stains
  • Convenient dabber system application
For a complete product demo and color charts, please visit Ranger's Website.
 
Hampton Arts -  Licensed Stamps & Die Systems.  Hampton Arts introduced over 24 different new licensed stamp sets this year with companies like Graphic 45, 7Gypsies, JiliBean Soup, Authentique, Doodlebug, Ki, Bella Boulavard and Eco Park.  There were so many gorgeous stamps in their booth that it is difficult to list them all here. These partnerships insure that you have all your favorite designs  to match your favorite new paper collections of 2013. Hampton Arts also partnered with Sizzix to bring you many of these stamps as combo sets of stamps and wafer dies that make fussy cutting a thing of the past.   Among my favorites were the set from 7 Gypsies with its nostalgic frames, sports, and food themes.   Look for these releases in Mid March.


Plaid - ModMelts  These are faux resin glue sticks that you melt into silicone molds with your high temp glue gun. They have two styles available that were specially formulated for creating durable embellishments. Sea Glass is the clear stick and this creates a beach glass look. Milk Glass is the white stick and it creates a look of vintage milk glass. Cooled Mod Melts can be altered with a variety of finishes. You can use acrylic paints, shimmer mists, alcohol inks, glitter, nail polish, metallic paints, pearl paint and even embossing powders on either stick.


Of course I could keep going and going, but I wanted to bring you the top 5 products that are going to enhance your beautiful paper crafting projects, and really maximize your dollar.  Did you have a favorite CHA release that I didn't list?  If so, share it on the Artsy Addicts Facebook Page.
 

Thanks for stopping in today,
 
Tonya Gibbs


Tuesday, January 3, 2012

Artsy Addicts Kit Project: Heavens to Betsy

Hi there.

Angee Lee Carter here with a quick card for you. I was chatting with Marion yesterday and she totally inspired me to get out one of my old Artsy Addicts kits and get crafty. Here's what I came up with.


I happen to love this card just because I used so many of my supplies that I'd purchased over the past few months but hadn't even opened. Call me a stamp collector. I buy lots of stamps because they appeal to me in some way but many of them have never seen any ink. Sigh. Yes I'm that crafter. I tend to go back to the same couple of stamp sets that I've fallen in love with.

So my resolution intention for 2012 is to ink up those un-inked stamps. Are you a collector or a crafter, or a little of both? Let me know in the comments and I might just have a little something to send one of you!

Card Composition:
Card Composition:
1. Trim patterned paper to a standard card size and adhere to card base.
2. Stamp tag with PTI - Damask Design Stamp using PTI - Canyon Clay ink
3. Color a strip of PTI - Vintage Cream card stock using SU! Cherry Cobbler Ink
4. Die cut strip of card stock from step 3 using PTI - Filigree Border Die, Adhere to stamped tag and adhere to cardbase
5. Trim strip of Vintage Cream card stock and stamp with Glory Be - "Heavens to Betsy" stamp using SU! Cherry Cobbler ink
6. Stamp "You are such a dear" stamp using SU! Mellow Moss Ink
8. Stamp Double line using stamp from PTI - Label Basics stamp set using PTI - Canyon Clay ink
9. Trim strip of PTI - Canyon Clay cardstock and add a strip of 1/8" score tape along bottom edge.
10. Pour glitter onto score-tape, and adhere Canyon Clay strip to Heaven's to Betsy Cardstock Strip, use dimensional adhesive and adhere to cardbase.
11. Fussy cut butterfly image from patterned paper and adhere to sentiment strip using dimensional adhesive.

Done and Done!


Sweet Hugs.

ABC
Related Posts Plugin for WordPress, Blogger...
 
Pin It button on image hover