Showing posts with label sizzix. Show all posts

Monday, November 18, 2013

OH CHRISTMAS TREE

Hi Artsy Addicts fans!
Peggy Lee here to share with you 
a little mixed media canvas.
Even though it's still November and Thanksgiving is next week.
I have already started listening to Christmas music...one of my favorites is...
Oh Christmas Tree, Oh Christmas Tree
How lovely are Thy Branches
Love that song!!!
So with that I have been playing and creating tree theme artwork.

"OH CHRISTMAS TREE"
mixed media canvas
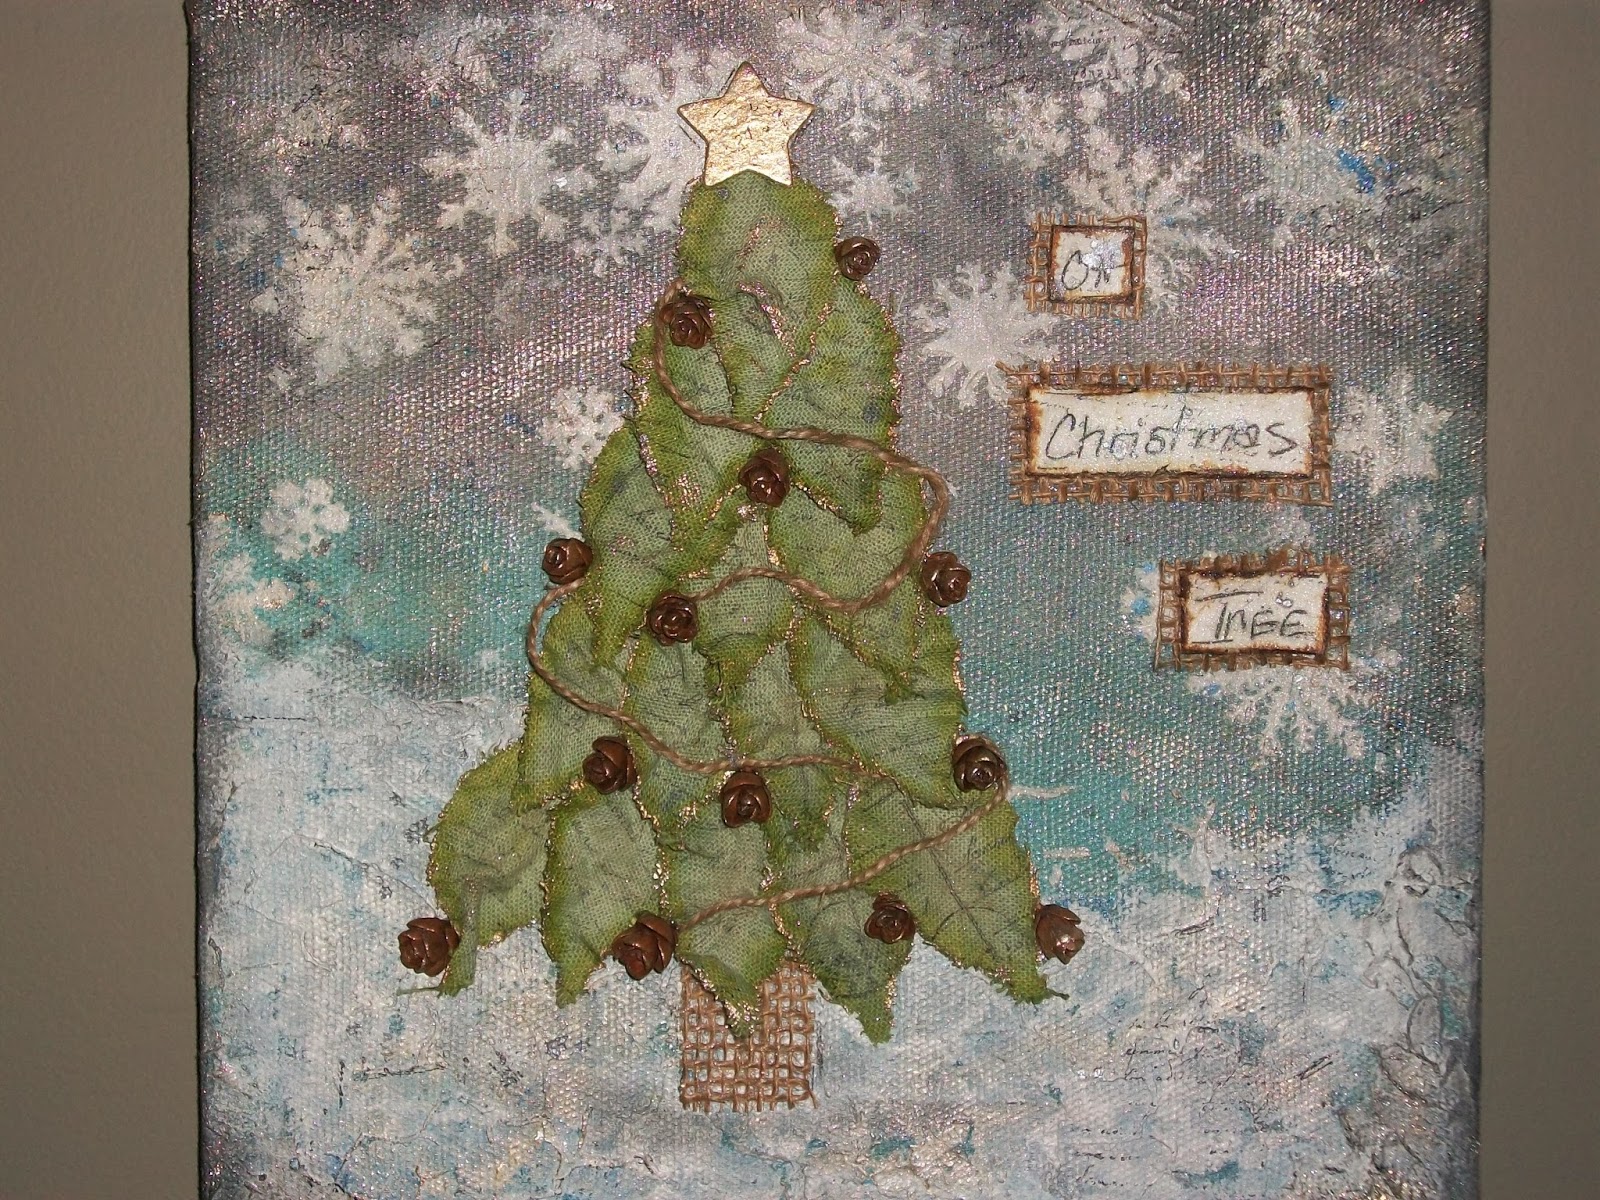
Using a Canvas Corp's canvas
I started by spraying some Heidi Swapp Color Shine
in Tinsel and Teal  and  Perfect Pearls Mists in many colors.
to create the background...adding texture 
with Crafters Workshop stencils 
and stucco/gesso mixture.
To create even more texture-randomly stamp all over canvas
also splatters of Color Shine and Perfect Pearls Mists!!
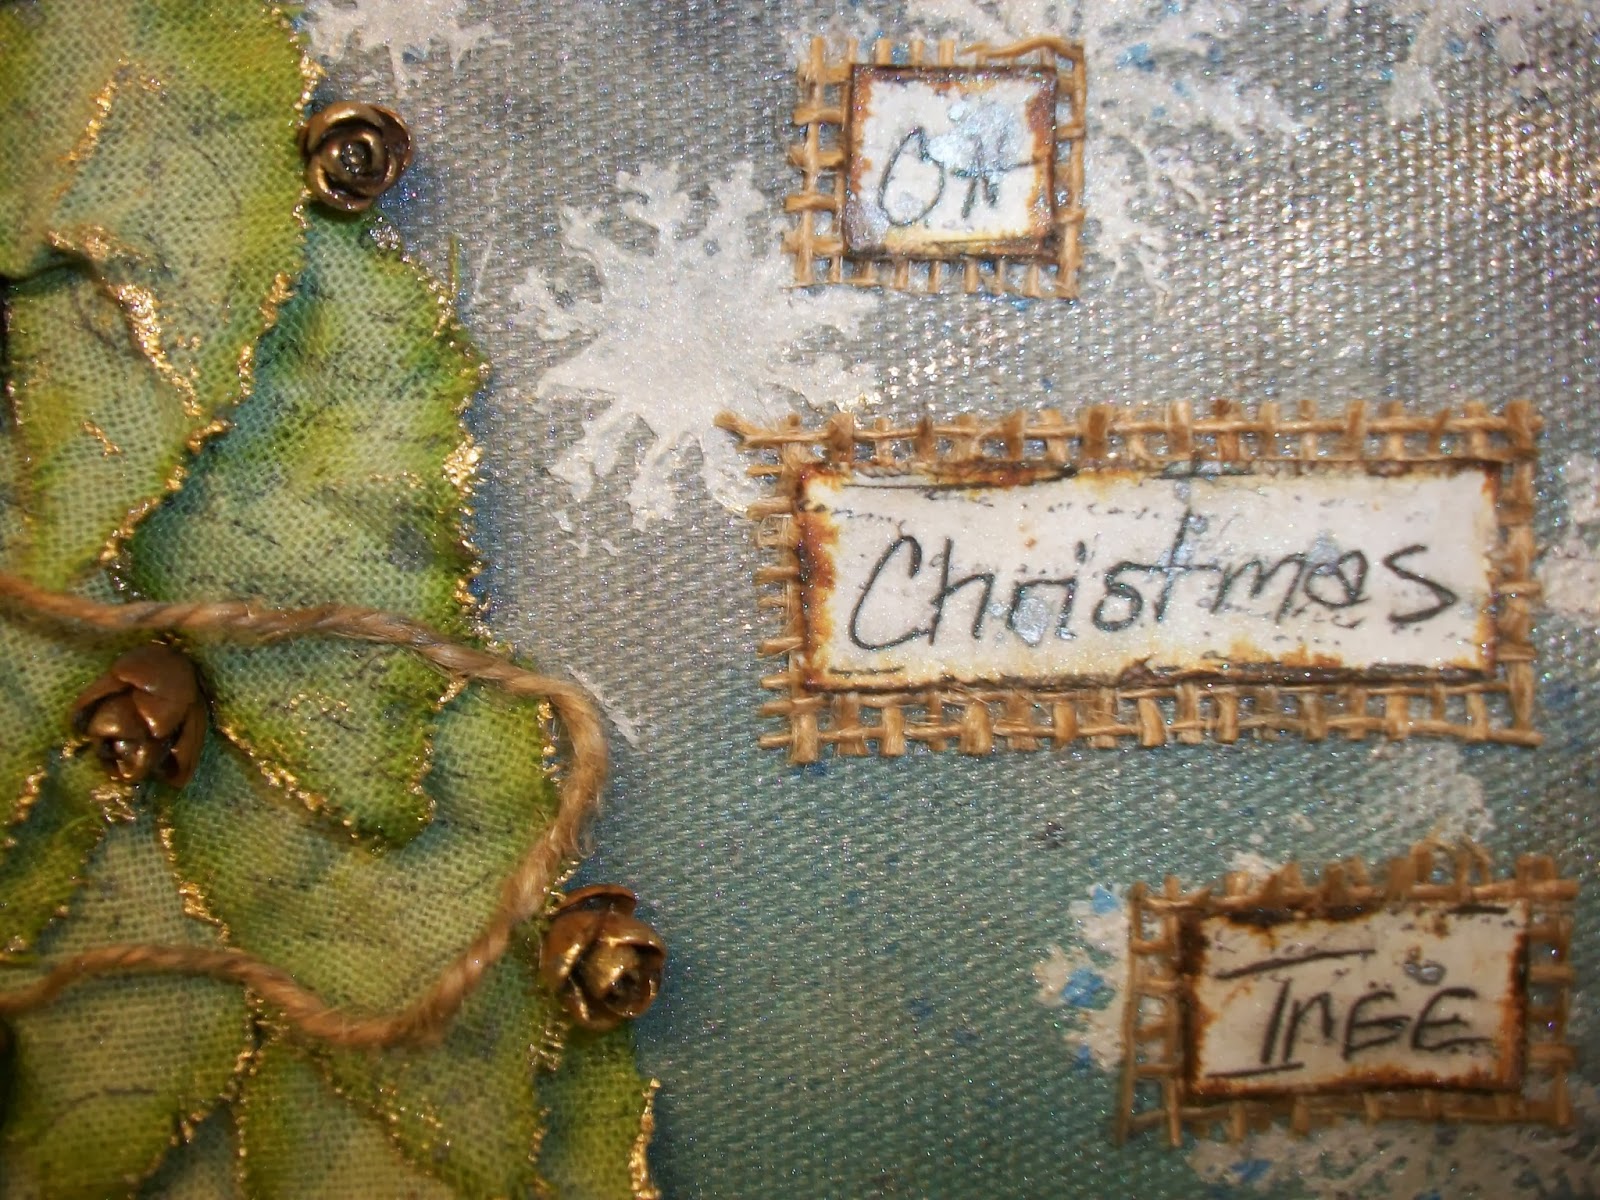
Cut out Tattered Leaves (Tim Holtz die) out of linen fabric...
colored with Distressed Stains in Bundled Sage and Forest moss.
Edged with Viva Precious Metal Effects Paint in Gold!
Covered the colored, stamps leaves with gel medium to give strength.
which helps shape the leaves in place.
Title "Oh Christmas Tree" hand written and backed in burlap mesh...
same burlap mesh became a tree trunk.
Tree leaves adorn with tiny real pine cones glittered with
Precious Metal Effects Paint in Gold
Garland is Canvas Corps jute rope...I love the woodies feel it gives the tree.


Thanks for stopping in today,
Please leave comments for us with what's your favorite Christmas song!!
Like what music do you listen to while creating?

Happy Holidays,
Peggy Lee
http://pegbaker.blogspot.com

Supplies
Canvas Corp: canvas, jute rope
Heidi Swapp: color shine in tinsel, teal
Ranger: Distress ink in black soot
Distress stain in bundled sage, forest moss
Perfect Pearls Mists in blue patina, heirloom gold, biscotti
Tim Holtz tattered leaves die
CTMH: chipboard star
Creative Imaginations: viva precious metal effect paint in gold
Silks acrylic glaze in ice
Beacon: 3 in 1 glue
Stampendous: stamp carte postale
Linen fabric
Crafters Workshops: stencils
Stucco/gesso
Tiny real Pine Cones


Monday, July 29, 2013

Tattered Dress Form Canvas Art

I have been adding texture to this canvas piece for awhile now...every time I used some stucco and gesso with stencil mask I would use up the extra onto this canvas.
I created the dress form for another project that I haven't finished so the inspiration for the background colors came from the dress form.
Dress form I white washed with gesso, grunge it up with Distress Ink Brushed Corduroy with water.
Then started dripping Tattered Angels glimmer mist down the sides of the dress form
and letting it run down and around the body.
Stamped the dress form with a few 7gpysies stamps with archival black ink.
 You can just keep adding layers of mist, ink!!
Oh don't forget to do glimmer splats...
I learned this techqinue from Marion Smith a few years back on grunging a dress form.
I knew I wanted to create some paper cone wing shape wreath..
Cut up an olde scrabble game pages into 2x2 squares
and began to roll into a cone shape, glued down
and tucked behind the dress form.
White washed the cones with a few little sprays of glimmer mist to match the background
and more splats!!
Oh adding a chain with dangles with a Petaloo Color Me Flower..
with glimmer mist and stamping
creates adorable touch.
close up of the stamping
Oh I love how the stamping shows up on the Petaloo flower!!!
Finial touch was adding a Art-i-Cake headpin to the top of
dress form...
Love the texture of the canvas background! I encourage you to grab some Tattered Angels Glimmer mist, paints and start playing....you never know where the art piece will lead you.

Thanks for stopping by today,
Peggy Lee

Supplies:
Tattered Angels: Simply Sheer-Baby Blue
Glimmer Mist-Aquamarine, Graphite, Tattered Leather, Raven and Slate
7gypsies: stamps
Petaloo: Color Me flowers
Canvas Corp: Mixed Media Glue
Prima: Mask-crackle and demask
Tim Holtz-wing/heart die
Ranger: Distress Ink-Brushed Corduroy, Archival ink black
Embossing Folder
Scrabble book pages
Stucco/Gesso
Art-i-Cake: Head Pin
Paper Mache' Dress Form
Chain, gems, buttons, jewelry bits.


Monday, July 1, 2013

4th of July Tri-Fold Mini

Let the 4th of July Celebration begin!
With the 4th among us this week I wanted to create a little tri-fold mini to sit upon the table for all to enjoy. 
Also to inspire you to create  home decor items with your scrapbooking supplies.
To look outside the box!
Like taking this 7gypsies tri-fold journal card to create a little mini.
Here is a little look at front pages of the mini...
back side of little mini...
I started with a tri-fold journal card, gessoed lightly over the card-sprayed with homemade mist with brushed cordrury reinker and water.
Used walnut stain distress ink to ink the edges of the card, papers and embellishments.
Papers are 7gypsies Epicuream 6x6 paper pad cut down to 2.5x3.5 torn the edges and inked.
Die cut stars out of e-fluted kraft cardstock sheet, tied twine and button (also glimmer mist the stars).
Used a chalk marker to write Happy 4th of July on the chalkboard paper.
Fuzzy cut out images from the paper line for embellishments.


4th of July Tri-Fold mini home decor
video

Happy 4th everyone!
Peggy Lee

Supplies
Tattered Angels-Simply Sheer Imperial Blue and Chilli Pepper Red
Canvas Corp-Mixed Media Glue, E-Flute Kraft
7gypsies-Epicuream 6x6 paper pad, Naked Scalloped tag, Naked Tri-fold journal card
Ranger-Distress ink Walnut ink, Brushed Cordrury
Sizzix-Star primitive die
CTMH-Chalk Marker
Gesso
Twine and buttons

Friday, May 24, 2013

Emblishments from Scraps

Last weekend I was in my studio and really not feeling like starting a new project. Can you say brain dead?  Well, when I get like that I always clean.  I just made a mini album, that I will share with you in a future post, and I had a lot of little pieces left on my desk, floor, and scrap box.  I set out to make cards (as I usually do with these little pieces), but I really wasn't in a 'card' making mood. I recently made a large stack of them so I didn't need any at the moment.  Well,  I was hanging out with a friend and piddling around  (pid·dling  To spend time aimlessly; diddle.).   Yes not giving much thought into what I was doing.  The next thing I knew I had stapled a few scraps to a tag, stamped a few images and fussy cut them out, and first scrap embellishment was born.   By the end of the day, I had made 8 of these from various scraps, stamped images, die cuts, and extra ephemera pieces. 


I have a bucket on my desk that includes what I call One Hit Wonders.  These are small pieces that were left overs from recent projects (not worth keeping the packaging) so I toss them in the bucket.  A single flower, a stamped image that wasn't used, an inch of ribbon/lace, a button, a die cut etc... they seem like pieces that you would just toss, but clustered together, they are cute!  


On YouTube a few weeks back I shared a video on making small banners that were sewed together.  One of them is being used in the tag that says fun times above.  Clustered together these itty bitty pieces of nothing form a cute layered embellishment to be included on your scrapbook pages, cards, or in your mini albums.
 
 
I had a variety pack of small papers from 7Gypsies laying on my desk.  I clustered those around this 5x7 photograph on my desk,  placed a few photo reels that I cut from a 6x6 paper pad from Echo Park, a few paper doilies die cut from an MFT doily die out of scrap paper and this layout was born.  Since the photograph had so much negative space in the upper left hand corner, I decided to use one of my embellishment pieces for the journaling to hide the wall.  Then I sprinkled a few sequences to mimic a flash.  I love how this  "Scrap" layout turned out. 
 
Oh btw those are my beautiful children all grown up!
 
I would love to see your scrap embellies - please post them on the Facebook page and make sure you tag me in them.
 
Thanks for stopping in today,
 
Tonya Gibbs

Monday, May 6, 2013

Spread Your Wings Tag

That's exactly how I felt this past weekend, I could have spread my wings and flown away! If I had wings well I could have created some. What a busy time it was you see my youngest daughter had Prom this past weekend and you all know how getting ready for Prom is so busy and sometimes crazy and a little stressful but in the end it's one of the most beautiful times in your teenagers life.
Along with busy weekend with Prom my oldest daughter who is away to college turned 20 years old on Sunday and since her college is only 3 hours away we decided to drive down and surprise her on her special day lets just say she cried and bear hugged us to death...what a blessed weekend.
Let's get to the tag before I start to cry!
"Spread Your Wings" fits so well with this tag it all started with the butterfly stamp from 7gypsies.
I had stamped the butterfly onto Canvas Corps Ivory Chipboard Handmade Paper oh my this paper is amazing and thick! I just randomly ripped a piece off  then stamped the butterfly. Also stamped another butterfly on a separate piece of the same paper to cut out and pop up to give the butterfly some movement and depth.
 Colored with a couple of markers, added some splatters of Tattered Angels Graphite glimmer mist.
And this is the end result-Love It!
Tag Tutorial
Step 1: I stamped randomly on some tissue paper to create my own background.
Step 2: On my craft sheet sprayed different colors of blue mist from Tattered Angels, then dipped the tag repeatedly into mist to give color depths. (this part is really cool because it's always different every time).
also used Graphite glimmer mist in areas for shading...same as above.
Step 3: Using gel medium glued the tissue paper to both sides of tag.
Step 4: This part is one of my faves I laid down a Prima crackle mask and using stucco and gesso smoothed over the mask to give the tag some peaks and depth...let it dry.
Step 5: Burlap Flower and Leaves-using Canvas Corps colored burlap in slate grey and smokey blue perfect colors to match the tag...I cut the burlap to fit over the Tattered Floral die by Tim Holtz. I also used the Tattered Leaves die by Tim Holtz in the natural burlap for the leaves.
Since I used natural burlap I used Army Green Simply Sheer mist.
Amazing color!
Step 6: In order to keep the burlap flower from falling apart I used a nice layer of gel medium over the flowers and leaves to hold it's shape, plus you can mold your flower into shape. Let it dry then glue together.
And there you have your tag!
Also I did color seam binding and cheese cloth to match the blues with the same mist. Did some random stamping on the tag added some splatters with some glimmer mist. Then on Kraft card stock wrote in sharpie marker my title cut apart and outlined the words and adhered down.
I hope you enjoyed this tutorial, I know I did while creating this tag and funny thing is my daughters Prom dress was the same shades of blue. Which gives me inspiration for a scrapbook layout with her Prom pics.
See inspiration is all around us...

Thanks for starting your week with me.

Peggy Lee

Supplies:

Canvas Corp:
Colored Burlap and Natural Burlap
Kraft Card Stock
Ivory Chipboard Handmade paper
Black Cord hemp rope

7gypsies:
Butterfly stamp from Hampton Art

Tattered Angels:
Graphite glimmer mist
Blue Bird Plain Jane baseboard
Imperial Blue Simply Sheer
Army Green Simply Sheer

Prima:
Crackle Mask

Ranger:
Claudine Hellmuth Studio-multi-medium matte
Archival Ink-jet black
Distress Ink-black soot

Stamps:
Tim Holtz Collection-Mixed Media by Stampers Anonymous
Carte Postale by Stampamdous

CTMH Marker-brown bag
Stampin Up Marker-Brocade Blue
Martha Stewart-stucco
Gesso
Cheese Cloth
Seam Binding
Vintage Button
Natural Tissue paper


Monday, April 15, 2013

Mixed Media Monday

I got to have some creative play this week with a friend and knew I wanted to create a mixed media canvas for someone special. That is why there is no title on this art piece yet (I will post after I have mailed this art piece out)! This was a lot of fun to create...
It all started with a plan 6x6 canvas, I glued down some wrinkled natural tissue paper.
I forgot to snap a photo of me trying out my new find which was Martha Stewart Stucco Paint where I used Crafters Workshop stencils with Splash of Color Primary Elements: Majestic Blue-Costa Rica and Dragon Wing powders those are so cool to mixed with molding paste or stucco like I used.
I used my favorite Tim Holtz Sizzix die: Tattered Floral which I cut with Coraline fabric with some of my favorite Tattered Angels glimmer mist. I just love how the Coraline will hold it's shape while being dried. I also used some Petaloo flowers that came in white.
I used some Dusty Attic chipboard pieces, which I cut apart and gesso them with spraying glimmer mist to give a weathered look.
These are Tim Holtz Sizzix die: Gears gesso-glimmer misted!!!
I just love how they came out.
Here is a close up of the handmade flowers with a Prima flower.
The next sets of photos show case the textures of adding layers of:
gesso, stucco, glimmer mist and stamping.
the fibers are cheese cloth covered in glimmer mists....
oops-I was being lazy and used my hand to clean my stamp...lol
and whoola my finished canvas (only needs a title) and will be complete and I hope my friend that someone special will enjoy it.

Don't be afraid of mixed media grab a few supplies and just start playing, it's all about the layers...enjoy!!
Thanks for stopping in today, remember to leave a comment!!
Peggy Lee

Supplies:
Splash of Color: Primary Elements
Martha Stewart: Stucco paint
Gesso
Ranger: Archival Black ink, stamps and Claudine Hellmuth Multi-Medium Matte
and Perfect Pearl Mist: Heirloom Gold, Blue Patina and Sunflower Sparkle and handmade distressed mixture of vintage photo and brushed corduroy.
and Tim Holtz Alternations Dies: Gears and Tattered Florals
Prima: flower
Petaloo: white flowers
Tattered Angels: Glimmer Mist
Turqouise Blue
Graphite
Aquamarine
Coffee shop
Melissa Frances: resin lock
Coraline
gems, cheese clothe
Dusty Attic: chipboard pieces


Related Posts Plugin for WordPress, Blogger...
 
Pin It button on image hover