Showing posts with label tutorial. Show all posts

Friday, June 6, 2014

Featured Artist ReNae Allen

Please welcome Featured Artist ReNae Allen  to the blog today.  She has really been inspiring us on the Artsy Addicts Facebook page lately with gorgeous card designs. I know you guys are going to love her post today. Make sure you visit her blog for more inspiration: www.crabtree-creations.blogspot.com and don't forget to leave her some comment love here.....
 
 
My name is ReNae Allen and I LOVE to create! As a child, I would beg my mother to buy me crayons, watercolor paints, and Play-Doh. I was always happiest if I was making something! I'm a lot older now, but that love has only grown!

About five years ago, my daughter Ashley took me into a stamp store and I immediately caught the paper crafting bug!  The first card I ever made was a Christmas card. I used some paper from Graphic 45, old  buttons, and vintage lace, and my shabby style was born!  I still make cards that same way, using lots of interesting elements to add texture and interest.


My First Card
Whether I'm stamping the focal image myself or using a pre-made image, I always begin making the card with the image first. The next thing I do is find coordinating papers that play well with it. I'll take papers that look good together, and I'll set them on the table along with all the other embellishments and I start playing around, throwing things together to see what looks best. It's not an exact science, and I never know what I'll end up with. I let the paper, buttons and lace do the work.

Just start playing
 
 When I design I've always used the "rule of three" which is having three different areas on my project where the eye can rest before moving to the next place. This makes the card more pleasing to the viewer as it guides the viewer's eye across the page. The other design element I love to use is texture. I use a variety of textures on my projects from shiny gemstones that sparkle and catch the light, to soft or scratchy fabrics. Layering also adds a lot of texture to a project. Popping a focal image up on pop-dots, and layering the paper are two great ways to add texture and dimension.

Love You Card

For today's cards, I used Penny Black stamps, and Tombow and Memento markers to ink them up, then sprayed a water mist on the inked stamp, before stamping them on to watercolor paper. (I have a step by step tutorial on my blog, using this technique: http://crabtree-creations.blogspot.com/2014/05/stamping-with-watercolor-markers.html Once I stamped my images, I built the cards around them using all the goodies I could find, -- I even made stick pins!

Happy Birthday
close up
Orange Tulips

 
Close Up
 
Happy Everything
   
Close up


I hope you like the cards I created today as I had a lot of fun making them! I appreciate Tonya and Peggy's invitation to be a guest designer on Artsy Addicts. It is such a great place to be inspired, and to inspire others, Everyone is so supportive at Artsy Addicts and it's a very positive and creative environment!  

I just want to add that the most important thing about designing any project is that you make something that YOU like. Don't worry too much about what anyone else thinks!
 
Creating  what makes YOU happy is perhaps
the most important design element of all.
 
Supplies Used in Todays Project: ("Embellish" Patterned paper: Darice, Cards and pearls: Recollections, Colored cardstock: Bazzill, Lace: Webster's Pages, Flowers: Wild Orchid Crafts.)

You can see more of ReNae's cards, projects and tutorials on her blog at
 www.crabtree-creations.blogspot.com .


Monday, May 12, 2014

Garden Rose Card by Peggy Lee "Tutorial"

Happy Monday Morning to you all, it's Peggy Lee here
sharing with you all my mixed media card "Garden Rose" Card!
Garden Rose Stamp and Textured Edges Stamp.
Tutorial
I started with watercolor paper.
Using Archival Ink in black stamped the Garden Rose image
several times.
Card Base 4 1/4 x 6 size
Did more stamping on the card base for background texture.
After I stamped the images...I grabbed a few Tattered Angels
Glimmer Mist colors...started water coloring painting..using a small brush.
I painted several parts of the other stamped images..to but cut apart.
To add to the center of rose to give depth.
See the depth of adding layers to your stamped images.
Also added some more texture with gesso and stencils.
LOVE THIS TEXTURE

There you have it a simple mixed media card...just using stamps, ink,
glimmer mist and gesso!!
Give it a try, I know you will love it!!!

Thanks for stopping in,
hugs
Peggy Lee

Supplies:
Marion Smith Designs-Garden Rose & Textured Edges Stamps
Tattered Angels-glimmer mist in Cranberry Zing, Olive Vine & English Ivy
Ranger-Archival ink and liquid pearls in bisque
Stampers Anonymous- Tim Holtz Dot Fade Stencil
water color paper
gesso

Friday, April 18, 2014

Masculine Mixed Media Card by Tonya Gibbs

 
I've been sharing a lot of pretty cards lately, and today thought it would be fun to share with you a masculine card.  Lately I've abandoned my art journal for pieces of 4.25 x 5.5 inch sheets of mixed media paper.  I try out new mediums, play with techniques, and then recycle these panels into card backgrounds.  I find that mixed media techniques make masculine cards come together much easier!  And you could always keep the card 1 layer and display your art rather than lots of layers.
 
Here are the steps I took to create the background
 
 
  1. Apply modeling paste to your card with stencil of choice (I used Heidi Swapps Honeycomb)
  2. Use A Faber-Castell Design Memory Craft Pitt Pen to apply color around the image. 
  3. Use your finger to smooth out the ink.
  4. Select a texture Stamp (I used Marion Smith Designs' Texture Stamp)  Apply ink to the stamp with a contrasting PITT Pen 
 
  1. Apply archival ink around the image to give a distressed look. NOTE: you can use distress inks, but if you add water, they will react with that water.  Archival ink is permanent when dry.) 
  2. Spray a wet medium onto a pallet.  I used Lindy's Stamp Gang Moon Shadow Mist in Gossamer Gold  
  3. Stamp a round object into the ink and apply it to your card
  4. You will see a water ring just like it were left from coffee or tea. 
To finish off the background I added pieces of tissue tape with matt medium.   I added the panel to a piece of black cardstock and created this card for my nephew's birthday.


He loves photography, so I took advantage of using up some scraps to create this photo layers.   The Camera and Polaroid Frame were a Spellbinder's Die.  I then added the Tim Holtz Film Strip Ribbon, and Marion Smith's Washi Tape from her Romance Novel Prima line.   Happy Birthday stamp was from Studio G.  My nephew was turning 13 so I added a few school aged elements like notebook paper, music tape, geometrical shapes, tag and paper clip.  
 
Don't forget about the Sketch Challenge through out the month.  You can get details here!
 
 
Thanks for stopping in today,
 
Tonya Gibbs


Friday, March 14, 2014

Hello Card Tutorial by Tonya Gibbs

 
Happy Friday my crafty peeps,  I hope you have an exciting weekend planned. Last summer the Teresa Collins Memorabilia line was one of the hottest selling Artsy Addicts kits. I still had a few pieces left over, and wanted to finish off the kit.


  First I came up with a design, and decided to share my sketch with you guys...
 
 
My challenge was to have 95% of the card come from the kit and the other 5% from the scrap pile.  NOTHING NEW WAS USED TO MAKE THIS CARD.


Here is a process video of me making the card..


This design is super clean and simple, and will easily transfer to some other collections that I own.  
 
DESTASH TIP:  If  you have a lot of left overs from kits, make a stack of cards using the same sketch design. Then wrap them up and give to a friend as a gift.   I usually place a pop square on the back of a stack of sentiments. This way my friend can choose the appropriate sentiment when she is ready to mail the card.  I recommend keeping the designs flat (no bulky flowers) since the friend will most likely mail the cards.  My friends love gift sets like this, and it is a great way to de-stash a kit!   Another option is to give them to your church to mail for outreach!
 
Thanks for stopping in today,
 
Tonya Gibbs
 
Resources:
  • Ranger Ink - Embossing Powder - Super Fine Detail - Clear
  • Tim Holtz Distress Ink Pads - Embossing Ink Clear
  • Teresa Collins - Memorabilia Collection - 12 x 12 Double Sided Paper - Quatrefoil
  • Teresa Collins - Memorabilia Collection - 6 x 6 Paper Pad
  • Teresa Collins - Memorabilia Collection - 12 x 12 Die Cut Paper
  • Teresa Collins - Memorabilia Collection - Enamel Dots
  • Sizzix - Tim Holtz - Alterations Collection - Movers and Shapers Die - Vintage Telephone and Typewriter Set
  • Baker's Twine
  • Cardstock

Wednesday, March 5, 2014

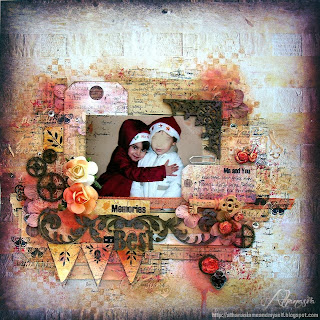
Featured Artist: Athanasia Me and Myself


Hello!

I am very happy to be hosted here, thank you so much for the invitation!

My name is Athanasia, I live in Greece, I have a 5 years old daughter, a 5 months old son and a very supportive and understanding husband. I am a music teacher in elementary school and in my spare time, when I am not playing the piano, I love making handicrafts, felting, altering things and of course scrapbooking.

My love for arts and my cultural worries pushes me constantly into researching and producing new ways of expression and creativeness. My first steps into scrapbooking began with some videos on YouTube. I can't remember exactly what I was looking for, but out of nowhere I run into a 'how-to' video for making a mini album. And that was it! I started searching for more related tutorials (I love watching and learning new techniques) and on the very next day I found myself surrounded by papers and scissors making my first mini album. It has been 3 years since then and although I took a year's brake (due to my pregnancy) now I am back.

I love scrapbooking because it combines such a vast deposit of media types with memories of my life and my family. Inspiration always derives from the photograph I use and the open choice of combination of mixed media techniques. I love to use gesso, mists and stamps and I love tearing papers! Through scraping I think I have found the best way to express myself and exploit my spare time in the best way.

Today I am going to show to you 3 of my favorite techniques that I love doing on my scrapbook pages.

Tearing pages from an old book. I love to create layouts composed by yellowed pages that have been torn from old books. Ι tear them in pieces and place them around my photo in order to create a frame. In my most recent layouts I use pages from an old chemistry book that a good friend of mine found dumped on the street!


2.Stamping and masking with gesso or modeling paste. After I glue the paper chunks, Ι choose the stamps and masks that best fit to the photo's subject. Firstly,I remove the photo from the working area and I stamp randomly around the photo's space with several stamps, then I mask with gesso on the stamps. Sometimes, when the gesso gets dry, I restamp over it to create a connection between the different media. After the stamping, the photo is placed back in position and I choose the embellishments that fits into the theme.


3.Altering embellishments and chipboard pieces. I like altering things, a common practice in my scrapbook projects. I like to cut into pieces all the flowers, stickers and chipboard elements, so as to give them new and unique shape. I then stamp on them, gesso them, or both. In my opinion this gives character and style to my work.


Now it's time to show you a bonus tutorial for you. I have created a simple layout with few embellishments following these three steps!

I place the photo, the torn vintage pages chunks ans the big embellishments that are going to be used in my layout.


I remove the photo and start stamping.


More stamps!

Time for masking with gesso...


I place the painted and stamped chipboard pieces, I do some doodling around the tags and stickers, a little misting at the end and that's it!


I hope you liked my work and my little tips.


For more details and closeups please visit my blog: http://athanasiameandmyself.blogspot.gr/

and don't forget to check on my channel on youtube:
https://www.youtube.com/user/athanasiapap/videos?flow=grid&view=0


Athanasia


Friday, October 18, 2013

Two Cards - Same Design by Tonya Gibbs

I've shared many times that I love to make cards from my scraps.  To make this process move quicker, I find it best to design the first card so that it is easily duplicated.  As you work through your scraps, you will find the cards take on a unique look by using different patterns, and sentiments. Many times I wait until I need the card to add the sentiment.

These two cards are great examples.  The hard part was coming up with the design, after that the workflow becomes easier.


I've prepared video for making the second card.


I hope I have inspired you to use up those scraps.  As I stated in the video, I find it helpful to use them immediately.  You can never have too many cards laying around.
 
Thanks for stopping in today,
 
Tonya A. Gibbs


Saturday, September 28, 2013

Featured Artist - Yvonne Blair


Hi everyone!

My name is Yvonne Blair and I am so excited to be a guest on the Artsy Addict blog! 
 
I have been scrapbooking "officially" since 1997 when I went to work in a store that had a huge scrapbooking, stamping and art department.  I was given a huge opportunity in the family owned store to run all those departments.  I instantly fell in love with this industry and have been hooked ever since.  I have been a buyer, manager, designer and teacher since 1998 and feel so blessed to be involved in this amazing community.  
 
In 2011, I attended Ranger University.  It was an amazing, life changing weekend.  I have also been on the Teresa Collins Design Team since 2011 and love every minute of it! 
 
I live in Florida with my husband of 20 years, my 18 year old daughter and our dog Roxie. 
 
My passion is definitely teaching and sharing the love of this craft.  I love to see others have light bulb moments.  Moments when they realize they can do this! 
 
I believe in embracing life, even the imperfections.  I am thrilled to be able to share some of my art with you.   


And here is a quick little video tutorial I did.  


I also wanted to share with you a little mini album that I recently created for Teresa Collins Designs.


Thank you so much for allowing me to share a little bit of my life! I hope to come back and share more later. Please click here to visit and subscribe to my blog.
 

Yvonne Blair
Ranger Certified Educator
Design Team-Teresa Collins Designs


Saturday, September 21, 2013

Featured Artist - Rita Barakat


I live right outside of Dallas, Texas. I am happily married and  am blessed to be a stay at home mom to five fabulous kids. Two are now adults and the younger ones are 11, 10, and 8. We are a busy bunch so there are always photo opportunities! 

I started scrapbooking ten years ago when we adopted our first child; I was hooked! I have always made crafts and mixed media art (before I knew it had a name), so scrapbooking was a natural transition for me. I love being a part of this industry and being creative on a regular basis. I have had my work published in a variety of magazines and have been honored to work with some really great manufacturers.

In addition to scrapbooking and mixed media art I have a passion for youth. I direct a youth choir and drama team.  My hubby and I are the youth pastors at our church. I also love to sing, I have been performing with song since I was in elementary school.  

Today I made a video of this project because I had so many step by step pictures to show you!


Hope you enjoyed that!
You can find me and more of my work

 photo 30f97b72-4f96-4dea-ae94-1e7248df6f50_zps1fa57618.jpg

Friday, August 16, 2013

Digital Printing 101 - Lesson 2

Last week I gave you a glimpse into printing your digi files.  If you missed the post - make sure you go back and read up before we move to this week's lesson. 

Did you know that you could type on your digital files in Acrobat?

Most of the printables that I download come in the Acrobat format. While you can add text with other graphics programs, I wanted to show you how to do this technique inside Adobe Acrobat.

This card is a great example of a hybrid project. The papers used to create the card are from Marion Smith's Mad Tea Party Collection.  She gave the prototype papers at CHA. Check with your local retailers for availability - the collection is shipping in September.

#Hybrid Birthday card created by Tonya A. Gibbs using #MarionSmithDesigns #MadTeaParty collection and the #Scarlet #Printable #Digi #Digital #Card #Psychomoms

The journal card that has the card sentiment on it, is from Marion's digital collection Scarlet.  The downloads are distributed in Acrobat.  I used the Papyrus font to add the sentiment in Acrobat - then I printed it to add to my card. 

Here is how it is done....

Here is a quick video showing you how to use Adobe Acrobat Reader & Adobe Acrobat Pro to type out your journaling on your  digital files.  


You may need to adjust your computer's volume the software captures my voice "soft".

 
NOTE:   Some conditions set by the author of the document could  prevent you from being able to do this in Reader since Reader was created  for "viewing purposes".

Download the Adobe Reader for free here!


Thank for stopping in today,

Tonya A. Gibbs
http://www.psychomomscrapbooks.blogspot.com


Friday, August 9, 2013

Digital Printing 101

Hi everyone,  I wanted to start a series of blog posts that go into some details about digital projects.   Like it or not we are in a digital world. Between aps on our phones, electronic readers, and computer groups - it is totally unavoidable.  I don't think digital is going to replace paper completely in the next few years. However, by offering some tutorials and answering frequently asked questions, hopefully I can eliminate some of the anxiety associated with this evolution.  I know digital isn't for everyone - I get that - but hopefully you will keep an open mind and let me help you get your feet wet!

I'm often asked these two questions the most, so this seems like a great place to start!

"How do you print your digital files?" 
This really depends on what my final project is, below I have broken this question out into two answers. Let me exit geek talk for a minute and give you a few definitions. These are words I will reference often -

Digital - meaning the entire project was created in a graphics program and printed finished.
Hybrid -   meaning printing out the digital elements that are then mixed with traditional supplies.  
Printing Digital Layouts: Digital layouts are those that are created from start to finish in your graphics editor software, like the layout below. I typically create these in a 240 dpi - 300dpi (resolution) to the largest dimensions that I plan to print. Example if my target is 8x10  then when I start my Photoshop document I begin with an 8x10 at 300 resolution.  The layout below was created 12x12 so when printed on 8x10 photo paper it will have a output of 8x8. Once printed, they can be placed in a traditional album. Another option is to upload the spreads to a service like Shutterfly.com and print them into photobooks. Photobooks make AWESOME Christmas gifts! (I will share a video on my youtube in a few days of a couple of photobooks that I've done in the past).
Here is an example of a digital layout that I created of my daughter Brittany Gibbs. I used the Scarlet collection from MarionSmithDesigns.com.  When I have 20 of these made up - off to Shutterfly they go for binding!

Digital Layout created by #TonyaGibbs  using the #Scarlet Collection by #MarionSmithDesigns.  #Digital #Printable #DigitalScrapbooking #Art #Scrapbooking #12x12 #Teen
To create this paper I used the Scarlet collection by MarionSmithDesigns.com and Photoshop CS6.
 
 
Printing for Hybrid:  Printing for hybrid layouts I usually do on my home printer. I currently have 2 printers  HP4500 deskjet, and a HP Laserjet CP1525. Neither printers are very fancy. Sometimes I like the look of the Inkjet and sometimes I want the perminent printing of a laserjet just depends on the project. Another option - I know that many prefer to take their digital files to an office copy center and print them there.  This is an excellent alternative since they usually have the latest and greatest equipment and the resolution is better than anything you have at home.  The biggest expense obviously is the ink for home printing. 
Here is a short video explaining the "printing" process.  


Since Hybrid is  "printed" here is a sample of a hybrid project that I recently shared in a previous post.


"What type of Paper do you use to print your digital files?"
This is always a fun question - because it really depends on your final project. If you are printing this out on your home system, then explore with papers & stocks that you have around the house. I would say that 90% of mine are printed on Georgia Pacific 110lb cardstock.  If I'm making mini albums I print on all types of things like Grunge Paper, Canvas, cardstock, and fabric. You may want to print interior pages on 65lb cardstock to cut down on the bulk.  It really doesn't matter, just make sure that your printer is capable of handling the material.  Here are some suggested Materials for inkjet printers (but please check with your manufactor for settings and limitations): 
  • 110lb Cardstock - this is a super thick stock that is great for layouts, ephemera and minibooks.
  • Canvas Paper  - this will give you an interesting texture that looks like a painting.
  • Transparencies -  LOVE this idea for filler for my mini books
  • Standard copy paper - (if you are making mini books, planners, you may want this lighter paper for signatures.
  • Fabric like Muslin
  • Ribbon (oh this is really fun!)
I guess one of the reasons I really like the digital papers for hybrid projects is that it isn't my only copy of the pattern if I mess it up - I just print it again. Another is  I love the flexibility to transfer my patterns to different mediums by simply printing.

Hopefully you have learned some things today, and I've answered some of your questions.   Next week we will go a little deeper into the benefits of digital work, and how you can slowly introduce some of the elements into your workflow. 

Thanks for stopping in,

Tonya Gibbs
http://www.psychomomscrapbooks.blogspot.com

Friday, June 7, 2013

Tattered Angels - Opal Paint System

Can you say - LOVE!  For all you shabby chic lovers out there this system is going to be a fav. This is the Tattered Angels Naturally Aged Paint System Precious Stone - Opal.   It is so pretty and soft. Sheer elegance!
 
 
Each kit consists of 4 1oz bottles of a medium from the Tattered Angel's family.  I have had several people ask about larger bottles. Yes, you can buy these in the standard bottles individually if you have a larger project in mind.

 
Here is a close up of the marbled background.

 
I love how soft and delicate it turned out for the backdrop for this card.

 
here is a process video on how to use the system.
 
 
Thanks for stopping in today,
 
Tonya Gibbs
Related Posts Plugin for WordPress, Blogger...
 
Pin It button on image hover