That's exactly how I felt this past weekend, I could have spread my wings and flown away! If I had wings well I could have created some. What a busy time it was you see my youngest daughter had Prom this past weekend and you all know how getting ready for Prom is so busy and sometimes crazy and a little stressful but in the end it's one of the most beautiful times in your teenagers life.
Along with busy weekend with Prom my oldest daughter who is away to college turned 20 years old on Sunday and since her college is only 3 hours away we decided to drive down and surprise her on her special day lets just say she cried and bear hugged us to death...what a blessed weekend.
Let's get to the tag before I start to cry!
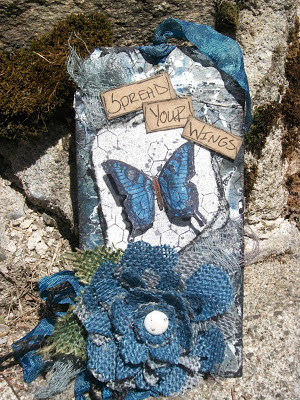
"Spread Your Wings" fits so well with this tag it all started with the butterfly stamp from 7gypsies.
I had stamped the butterfly onto Canvas Corps Ivory Chipboard Handmade Paper oh my this paper is amazing and thick! I just randomly ripped a piece off then stamped the butterfly. Also stamped another butterfly on a separate piece of the same paper to cut out and pop up to give the butterfly some movement and depth.
Colored with a couple of markers, added some splatters of Tattered Angels Graphite glimmer mist.
And this is the end result-Love It!
Tag Tutorial
Step 1: I stamped randomly on some tissue paper to create my own background.
Step 2: On my craft sheet sprayed different colors of blue mist from Tattered Angels, then dipped the tag repeatedly into mist to give color depths. (this part is really cool because it's always different every time).
also used Graphite glimmer mist in areas for shading...same as above.
Step 3: Using gel medium glued the tissue paper to both sides of tag.
Step 4: This part is one of my faves I laid down a Prima crackle mask and using stucco and gesso smoothed over the mask to give the tag some peaks and depth...let it dry.
Step 5: Burlap Flower and Leaves-using Canvas Corps colored burlap in slate grey and smokey blue perfect colors to match the tag...I cut the burlap to fit over the Tattered Floral die by Tim Holtz. I also used the Tattered Leaves die by Tim Holtz in the natural burlap for the leaves.
Since I used natural burlap I used Army Green Simply Sheer mist.
Amazing color!
Step 6: In order to keep the burlap flower from falling apart I used a nice layer of gel medium over the flowers and leaves to hold it's shape, plus you can mold your flower into shape. Let it dry then glue together.
And there you have your tag!
Also I did color seam binding and cheese cloth to match the blues with the same mist. Did some random stamping on the tag added some splatters with some glimmer mist. Then on Kraft card stock wrote in sharpie marker my title cut apart and outlined the words and adhered down.
I hope you enjoyed this tutorial, I know I did while creating this tag and funny thing is my daughters Prom dress was the same shades of blue. Which gives me inspiration for a scrapbook layout with her Prom pics.
See inspiration is all around us...
Thanks for starting your week with me.
Peggy Lee
Supplies:
Canvas Corp:
Colored Burlap and Natural Burlap
Kraft Card Stock
Ivory Chipboard Handmade paper
Black Cord hemp rope
7gypsies:
Butterfly stamp from Hampton Art
Tattered Angels:
Graphite glimmer mist
Blue Bird Plain Jane baseboard
Imperial Blue Simply Sheer
Army Green Simply Sheer
Prima:
Crackle Mask
Ranger:
Claudine Hellmuth Studio-multi-medium matte
Archival Ink-jet black
Distress Ink-black soot
Stamps:
Tim Holtz Collection-Mixed Media by Stampers Anonymous
Carte Postale by Stampamdous
CTMH Marker-brown bag
Stampin Up Marker-Brocade Blue
Martha Stewart-stucco
Gesso
Cheese Cloth
Seam Binding
Vintage Button
Natural Tissue paper


No comments:
Post a Comment