Showing posts with label Holiday. Show all posts

Thursday, May 29, 2014

Memorial Day Inspiration "Flying Flags" by Peggy Lee

This past Monday was our Memorial Day Holiday, our family
always celebrate with watching the Memorial Day Parade.
My hubby marches every year...
My heart is always full of joy, grace and grateful to all who are and have served.
Thank You to them all, even the ones who are left behind will they serve.
I love to take a photo of the flags flying every year!
I wanted a way to gaze upon it's beauty and be reminded everyday...so I created this 
Mixed Media Scrapbook Layout of the Flying Flags!
Love the USA!
I used drywall tape as a stencil, I laid it down and scrapped 
stucco over it, then pulled it up...it leaves great texture!!
I also used some other stencils as well.
I did some random stamping, sprayed and splattered
my favorite mists, color washes...and gesso watered down.
I found some metal letters in my stash...perfect for this layout....I am going to frame this
layout and hang it on our wall to honor my hubby and our family members who have served.
Thanks for stopping in today,
hugs
Peggy Lee


Friday, January 31, 2014

How I Love You - Mini Album by Tonya Gibbs

Hi everyone! My husband and I will be celebrating our 24th wedding anniversary in a few weeks, and I wanted to create an album that shows how much I love him. 
 
 
I love the rich vibrant colors and smooth texture of the Canvas Corp basic papers and wanted to use them for my mini. 


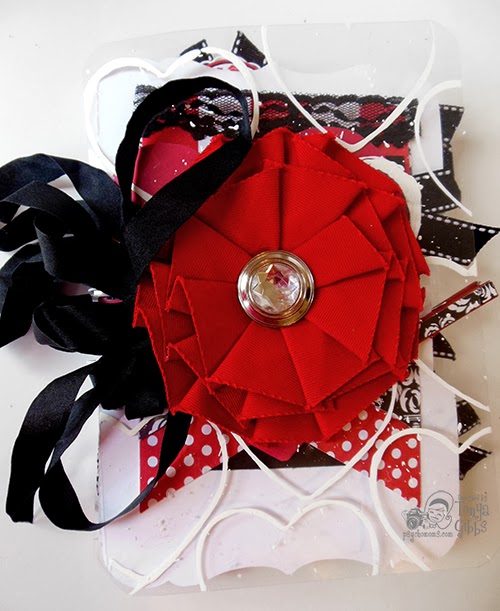
On the cover - I dipped a heart shaped cookie cutter in white paint and stamped the heart pattern on clear book cover stock.   I used my Bind it all and a 1/2 inch ring to bind the book together. To camouflage the rings, I tied a loose loop bow and put it on the side of a Canvas Corp red canvas flower.

 
Here is a look at a few of my favorite pages from the mini.


To keep the book consistent with the theme, I printed all pictures in black and white. Most of the photos used in this book were taken from my Instagram library.   They are the perfect size for a mini album.


The Whimsical patterns from the Canvas Corp papers, make this mini fun, and romantic.   I cut a lot of Polaroid frames from solids to help break up the busy patterns from the papers. I encourage you to also use the solids to cut small accent pieces like this Tim Holtz Mini Vintage Camera die.


For a complete walk through of the album page by page, please watch this  YouTube video.


Thanks for stopping in today,

Tonya Gibbs
http://www.psychomomscrapbooks.blogspot.com

Supply List:

Canvas Corp Papers: Black & White Damask
Red & White Mini Dots Reversed
Count Down to Kisses
Red & White Big Stripes
Red & White Swirls
Lips & Stash

Canvas Corp Misc.
Chalk Stock Tags & Ties
Red Medium Clothes Pin
Red Canvas Flower
Mixed Media Glue

Tattered AngelsValentine Chips

Die Cuts with A View:
Black & White Rose

Sizzix - Tim Holtz Alterations
Movers and Shapers Vintage Camera Die
Movers and Shapers Mini Butterflies Die
Bigs Die Tiny Tags and Tabs

My Favorite Things StampsMini Doilee Dies

EK Succes
Scallop Punch
Zig Zag Chain Punch
Slim Edger Dotted Wave Punch

Martha Stewart
Butterfly Punch
Swirling Lace Around The Page Punch

Provo CraftCuttlebug Embossing Folder - Flourished Frame

We Are Memory KeepersEnvelope Punch Board
Rounded Corner Chomper

Spellbinders
Grand Calibur Labels 4 die

Silhouette AmericaCameo
3 bracket File Folders by Lori Whitlock

Bind - It - All
Bind - It - All 1/2 Inch Rings      

Other:
Crocheted Red Flower
Heart Paper Clip
Button
Rhinestones 16mm
Black Lace
White Lace
Grosgrain Black and White Stitch Ribbon
Black Seam Binding
Red/White Bakers Twine
White Acrylic Paint
Heart Shaped Cookie Cutter
Black Cardstock
Red Cardstock
White Cardstock
White Gel Pen
Black Gel Pen


Friday, January 24, 2014

Secret Crush Card by Tonya Gibbs

Today I wanted to share with you a card from the Pink Paislee's Secret Crush collection. This collection was so hot last year.  I made several projects with it last year, and just have a few pieces left over.  My goal this year is to purge some of these odds and ends pieces. 
 
The card size is 3.5 inches by 8.5 inches so it fits nicely in a standard #10 envelope.  For my card background I used the Endless Love paper as my background. The layered doilies printed on this paper are "hoard vault" quality, but they must be used!  Then I trimmed a piece of scrap from the Polka Dance paper to make a fish tail banner for the base of my layers.
 
 
I used the hearts from the ephemera pack, tissue tape, and flat back pearls to create a banner at the top.  I think the banner offers a romantic feel to the card. Another Doily, and a few tickets from the ephemera pack were used for my layers, and the cluster was finished off with the Harlow Prima Rose.  I used left over chipboard letters to form the XO that is synonymous Valentine's Day. 
 
 
On the inside, I layered scraps from the papers for my signature area. The list of love words from the paper and the Tim Holtz Typewriter at the bottom finished off the right side of the card.   I love when things stick outside of the margins, and the "be mine" tab from the collection added a bit of interest and is seen when the card is closed.  The sticker at the bottom is from the sticker pack, and offered the perfect final touch.


My goal this year is to share with you ways to "destash" your older collections before they are so dated that you don't want to use them.  A lot of scraps and left overs from this collection were used in this card design.  Even though the collection was released last year, it's color pallet and iconic images make it timeless.
 
Thanks for stopping in today,
 
Tonya Gibbs


Resources:
Advantus - Tim Holtz - Idea-ology - Tiny Attacher with 100 Tiny Staples
Advantus - Tim Holtz - Idea-ology Collection - Tissue Tape - Sketchbook
Bazzill Basics - Celebrations - 8.5 x 11 Cardstock - Tiny Diamonds Texture - Frosted Silver
FabScraps - Pearls - Bling - Cream
Pink Paislee - Secret Crush Collection - Photo Tabs
Pink Paislee - Secret Crush Collection - Paper Goods
Pink Paislee - Secret Crush Collection - 12 x 12 Double Sided paper - Polka Dance
Pink Paislee - Secret Crush Collection - 12 x 12 Double Sided paper - Endless Love
Pink Paislee - Secret Crush Collection - Photo Tabs
Pink Paislee - Secret Crush Collection - Cardstock Stickers - Elements
Prima - Harlow Collection - Pleated Fabric Flower Embellishments - Eve
Sizzix - Tim Holtz - Alterations Collection - Movers and Shapers Die - Vintage Telephone and Typewriter Set
We R Memory Keepers - Notable Collection - 12 x 12 Textured Cardstock - Gray

Friday, January 17, 2014

Love Notes - by Tonya Gibbs

Hi everyone, Valentine's day is right around the corner. Today I wanted to share with you a simple technique that will make your cards unique.
 
 
Bubble art -  I saw this technique last year in a Martha Stewart Magazine and wanted to try it immediately, in the magazine article they used paint, but I thought the effect would be better with Glimmer Mists.
 
Here are the steps to create the background
 
Pour bubbles (the kind your kids play with) into a large bowl. 
Fill until the bottom surface is covered. No need to add a lot.

Blow bubbles using a drinking straw
 

Spray your favorite color over the top of the bubbles. I used Tutti Fruity

Gently Lay your card stock over top (water color paper works best).
Don't allow the card to sink to the bottom.

 
Use the paper for your background.  You can dip and re-dip until the desired effect is achieved.

All that is left is to put the background onto your card base, and decorate!

 
Thanks for stopping in today,
 
Tonya Gibbs

Friday, November 29, 2013

December Daily - by Tonya Gibbs

I hope everyone had a fantastic Thanksgiving!  Today starts BLACK FRIDAY and the beginning of the Holiday Season.  Every year, I try to do a December Daily, and it seems that I get started then BOOM life gets crazy, and I totally drop the ball.  This year I want to try a different approach.  I'm going to share my weekly progress here, with you guys.  Each Friday, I will share with you my pages from the week! Hopefully, this will hold me accountable, and encourage me to finish mine, while  inspiring  you to finish yours!

This year I'm using Basic Grey's 25th & Pine.  I love the vintage feel of this collection, and thought the simple patterns allowed for a lot of layering options.  As you can see the collection has lots of Yummy embellies to bring the book to life.


I created the covers during my November Ustream. My December Ustream will be Monday, Dec. 2 at 8:30 pm est,  and I will created the first few days and couple of tags.  If you have time, I hope you join us!  My channel name is:  http://www.ustream.tv/channel/gibbst


I love the ornaments in this collection, so I wanted to use them on the covers. 

 
Chalkboards are very popular this year, so I thought it would be fun to include some in my book. 
 
 
Aren't these ADORABLE and fun? I thought this would be a cute embellishment cluster for a few of the number sets.   I have a video in the playlist showing you how to make them. 
 
 
This was an "Uh Oh" from another project that ended up being an awesome addition to this project. (Never throw away the mistakes - you just never know when they will work for something else.  Basically this is a 6 inch x 9.5 inch  sheet of red cardstock.  With an on the edge die cut from the top and the bottom.  Then I folded the bottom up to form a 6x6 square sewed the edges to make the flap into a pocket.  Then trimmed the edge with washi tape.  Now this mistake will make a great pocket for one of my days.  I may trim it out with paper, when I decided to use it. 
 
 
Follow on YouTube as well as here.
There will be weekly videos with additional tutorials and helpful hints along the way.  I've created a YouTube Play list that includes all of my Ustreams, and individual tutorials that you need to create this project with me.    There are already 8 videos in the list for you to enjoy. 
  1.  November Ustream (this was recorded in 3 parts for some strange reason). Part 1
  2.  November Ustream. Part 2
  3.  November Ustream. Part 3
  4. Coffee Staining Small tags for the books
  5. Organizing yourself, FAQ, and Page 1
  6. Library Pockets
  7. Poinsettia tutorial
  8. Polaroid Shaker frame for a few of the number sets.  
I know several who have already started sharing photos of their projects.  If you create a project inspired by this one, please be sure to share it on the Artsy Addicts Facebook page and be sure to tag me in the post, so I can admire your work. 
 
Now - I must go see if I can find some good Black Friday deals. 
 
Thanks for stopping in today,
 
Tonya Gibbs


Friday, November 15, 2013

Christmas Cards

We are quickly approaching the hustle of the Holiday Season. I don't know about you, but my world is a whirl wind of constant motion this time of year.  I barely have time to sleep, let alone knock out STACKS of Christmas cards.  I'm sure I'm not alone!  Although I don't "mail" out stacks of Christmas Cards, I do like to have a few handy just in case.  This is a great opportunity to pull out last year's paper collections, and use those holiday scraps from this year's projects.

Today, I would like to share with you a few "simple" designs that will encourage you to simplify without compromising elegance. Both of these cards can be made by ANYONE in a matter of seconds.


I just finished a major project, that I will share with you later, and I took this opportunity to quickly knock out  these cards with scraps.  As you know, my philosophy is always USE those scraps immediately, and cards are the perfect way.

For elegance my advice is keep it simple.  A monochromatic color selection will maintain sophistication without a lot of fuss. 


For this card, I decided to use a simple clean white label to break up the busy pattern in the background.   A few simple touches like the punched border, fancy label shape and script stamp make this simple design elegant and fun.
 
Supplies needed for above card:
  • Card base - White Card stock 11 x 4.25inches folded in half to yield a 4.25inches x 5.5 inches.
  • A scrap of paper to use as a base.  I used Teresa Collins' Santa's List - Red Flakes.
  • Border Punch (I used Martha Stewart Crafts Pinking Scallop Edge Punch)
  • Labels Punch (I used Spellbinders Nestabilities Dies, Labels 4)
  • Sentiment Stamp (I used Inkadinkado Merry Christmas)
  • Ranger Archival Ink Vermilion
  • Baker's Twine
  • Gelly Roll pen -  stardust  (I traced around the label with this pen, you could also trace the snowflakes with it).
 
 
The pop of glitter, and one iconic simple image, makes this card pack a powerful statement.  I love that it looks complicated, without much effort! My advice is find a simple iconic image that conveys your message, and remember less is sometimes more!
 
Supplies needed for the above card:
  • Card base - White Card stock 11 x 4.25inches folded in half to yield a 4.25inches x 5.5 inches.
  • 1/2 Inch  Corner Punch (I used the We R Memory Keepers)
  • Cosmo Cricket Glitter Sheets in Starlet (THESE GLITTER SHEETS DO NOT SHED - AMAZING!)
  • Sentiment Stamp (I used Inkadinkado Merry Christmas)
  • Ranger Archival Ink Vermilion
  • Sizzix Tim Holtz Alterations - Embossing Diffuser.
  • Provo Craft - Cuttlebug Swiss Dots Embossing Folder
  • Silver Ribbon
  • Silhouette Cameo (Ornament) from Echo Park

I encourage you to go through Christmas past paper collections and see if you can duplicate a few of these simple designs.   Don't have a Silhouette?  Never fear, lots of companies have similar images available in dies, go through your stash and see if you can substitute another design. Just remember simplicity is key, especially if you want to mail these cards.

I just love that  both card designs can easily be modified to work with any occasion.

Hope I have inspired you to use up your scraps and make some great simple Holiday cards.  Remember to keep it simple, so you have time to make the memories that matter!

Thanks for stopping in today,

Tonya Gibbs
http://www.psychomomscrapbooks.blogspot.com


Monday, November 4, 2013

Grateful for Handmade Home Decor

Happy November to all!!
I am making this month a month filled with 
Grateful, Thankful and Blessings
To start I have decided to create handmade 
home decor
to make our holidays special...
I would love to share with you this adorable
pumpkin candlestick!
Which will be placed on our Thanksgiving table center piece,
I am going for a white decor this year...
(don't get me wrong I love the beautiful bright rusty colors)
I am trying something new and keeping it all
creams, naturals and white color!!
I used a dollar store candle stick, paper doily
and 
a paper mache' pumpkin
gesso for painting it white
Create a junk bow with a rolled muslin flower,
for the topper
is a Christmas ball (tiny) that I pushed down
through the stem of the pumpkin.
Last I sprayed some beautiful glimmer 
with  
Ranger's Perfect Pearls Mists in Biscotti

Thanks for stopping by,
Have a Blessed Day!
Peggy Lee
http://pegbaker.blogspot.com

Supplies:
candle stick
doily
paper mache' pumpkin
gesso
trims and lace
Christmas tiny balls
Ranger's Perfect Pearls Mists in Biscotti
hot glue

Friday, October 25, 2013

Halloween Treat Bags by Tonya Gibbs

Halloween will be here in just a few days.  I know a lot of people love to make "special" treats for some of their friends and loved ones.

Today I wanted to share with you a little treat bag I created using the scraps from my last Ustream class.    Almost everything used to make the bag and the decorations were from the scrap pile! I chose the papers from Marion Smith Designs Nirvana  "Up and Away" paper.


The bag was cut from the Tim Holtz "In the Bag" Die.  Then I used a spellbinders square die to cut a window from one of the panels.   By using scraps each bag will be unique.  Here is a process video on how I made them.


Thanks for stopping in today, and happy haunting!
 
Tonya A. Gibbs

Monday, September 23, 2013

Poster Tidings "JOY" Card

Here as promised I am sharing the other image of the Poster Tidings Stamp image that I shared last Monday using the fall stamp image.
The "joy" stamp image makes a beautiful and classic card...with using some holiday themed papers, stamps and glitter paper!!!
I took the Poster Tidings "joy" stamp dabbed into the slate ink...
over and over to give depth and texture
when stamped!
I love how the stamp image looks like real stone.
Cut out little glitter banners
out of silver glitter paper.

I just love the SPARKLE!!!!
Thanks for stopping by today,
hugs
Peggy Lee

Supplies:
CTMH: Frosted Papers,
September SOTM Stamp-Poster Tidings
Slate Ink
Glitter paper
Sparkles

Monday, June 17, 2013

4th of July Card

 "Let Freedom Ring" is ringing in my ear inspiring me to enjoy this beautiful and amazing holiday we have coming up! A time to celebrate our freedom, to remember those who keep us safe, and to cherish our family and friends.
Every year the 4th of July kreeps up on me and I can never seem to make home decor, cards or  a banner in time to celebrate it....so I am getting a jump start on creating!
This little beauty:
a card to sit upon my table to adore
 and
remind me to breathe and enjoy the small moments in life.
I used Canvas Corps amazing card stock weight papers,
burlap sheets, e-flute cardboard piece.

Love the mini clothespins in red to hold the banner up.

7gypsies numbers steampunk rubbings, and stamps to add texture.
and
of course splats of glimmer mist!!
I just love this holiday and can't wait to create some more home decor items...oh by the way did you get to see Tonya's  "Table Caddy" a few post ago...it's a must see!!

Here is a little video on how I create this card...
What are you creating for the 4th of July?

Thanks,
 Peggy Lee

Supplies:
Canvas Corp: Mixed Media Glue, Burlap Sheet,
E-Flute in white, White & Kraft Mini Dot CS, Red & White Chevron CS,
Navy & Ivory Mini Dot CS and Mini Clothespins in red.
7gypsies: Numbers steampunk rubbings and stamp
Tattered Angels: Graphite glimmer mist
Ranger: Archival ink in jet black
CTMH: word stamp
Button: vintage mother of pearl

Friday, June 14, 2013

4th of July Table Caddy

4th of July is one of my all time favorite holidays - JUST LOVE IT!  The colors, the celebrations, parades, parties, fireworks - who could ask for more fun?
 
I was trying to think of some fun decorative ideas for parties.  A few weeks ago I shared with you an invitation, and today I thought I would alter a six pack box to use as a table caddy.  


Here are the supplies I used to alter the caddy.   In addition to the supplies listed below, you need to upcycle a beverage six pack box.  I used two sheets of each of these papers to complete the box.  Measurements will vary depending on your box.  I started with the bottom and completely cover it wrapping about a half an inch up the sides to keep my utensils from falling out. Then covered the over hang with the side panels. 


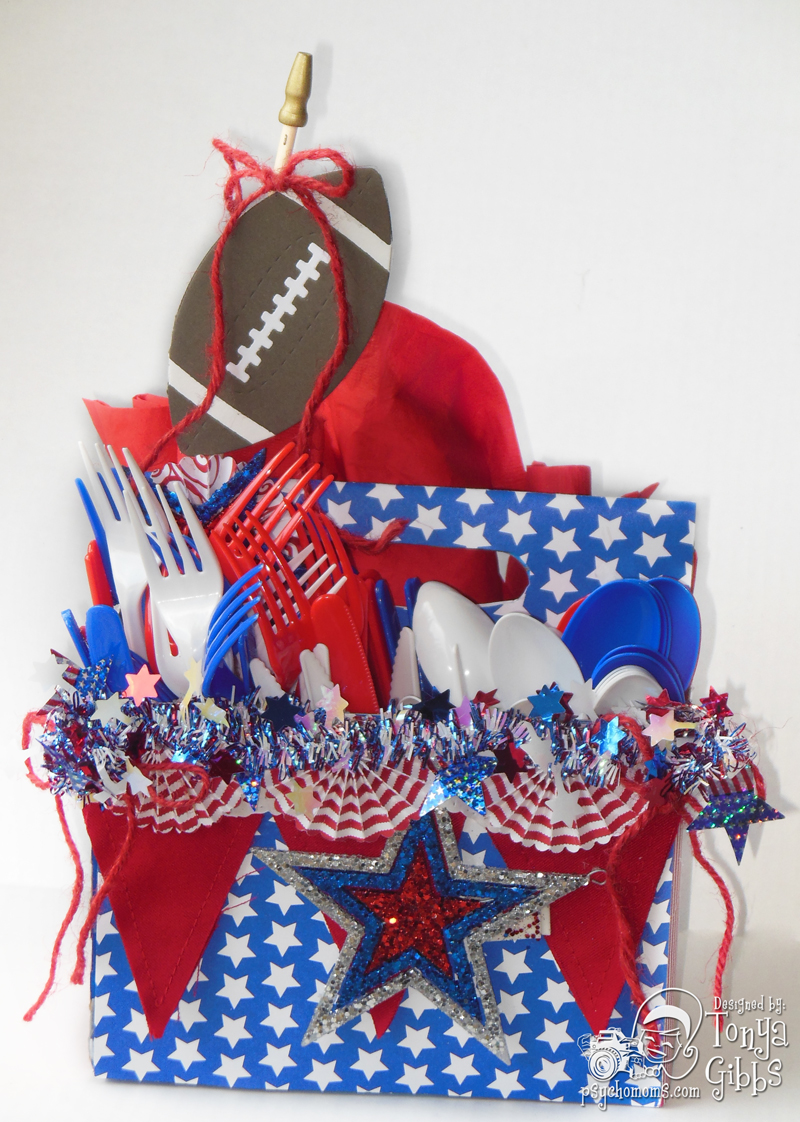
I used Canvas Corps' Royal Blue And White Stars Reverse Paper as my base. Then made pinwheels with the Red & White Ribbon Stripe paper then cut them in half and topped these beautiful Red Canvas Banners.  Tied the banner with the Red Canvas corp Twine bows.  Then add a little sparkle with party garland, cake pick star Tucked in a Small American Flag as a topper,  and this catty turned out FAB!
Our high school team colors are royal blue, white, and red I think I may modify this caddy after the 4th for a tailgate caddy by removing the flag and adding a football!
 
 
**Side note:  Place a water bottle in the back center spot to weigh the box down so it doesn't blow off the table.  You can camouflage the bottle with paper napkins. **
 
 
Here is a second invitation I made with the scraps from this project.


Thanks for stopping in today,
 
Tonya Gibbs


Friday, April 5, 2013

Easter Layout

I hope everyone had a wonderful Easter celebration last weekend.  Today I wanted to share with you a layout I created using a photo of my niece and nephew taken at Easter a few years ago.   Each year our family hosts a HUGE Easter picnic.  I love seeing all of the kids dressed in their new Easter clothes. I take advantage of this moment to capture a picture of them each year. It is fun to look back and see how much they have grown.


I wanted to create a whimsical layout that showed hidden eggs, so I used the banner from the Sampler paper to form a make-make shift basket to hold my eggs.  I trimmed the bunnies and eggs from the Sampler pack then nestled them in the grass.  I used the clothespins to anchor the banner to the layout. Pom Pom trim was added to the bunnies to give them a tail.  I traced around some of the patterns on the eggs with a Geli Roll - Stardust pen to give them a little sparkly.


To create a pocket for my journaling, I decided to use one of the Canvas Corp ATC Envelopes to make a pocket.  I sealed the Envelope then cut a piece off the edge to make it a portrait opening. Then decorated around the opening with a piece of scrap paper, twine and another diecut from the sample sheet.  The journaling is on one of the ATC cards that matches the envelope.  The envelope will also give me space to include additional photos. 


I used one of the border strips from the sampler pack to create little flags and attached them to corsage pins. I love how they seem like little signs.
 
Supplies:

Canvas Corp Products: Mini clothes pin in hot pink, ATC Cards - Ivory,  Easter Sampler - Ivory, Jute Cord, ATC Envelope - Ivory, burlap sheet, Mini blue Polka Dots paper, Kraft Card stock.
Other:  Easter Grass, Pom Pom fringe, Geli Roll pen - stardust, stick pins, flat back pearls, EK Success Mini Egg Punch, Martha Stewart border punch, Tim Holtz distress tool.


Thanks for stopping in today,

Tonya Gibbs

Related Posts Plugin for WordPress, Blogger...
 
Pin It button on image hover