Showing posts with label Christmas. Show all posts

Monday, December 16, 2013

Last Minute Christmas Cards

Happy Monday everyone!
With Christmas just around the corner, do you ever find yourself needing a card at the last minute? I do so here are a couple of last minute cards I whipped up using my scraps and washi tape...
These cards are going to be hand delivery so the size is much bigger and bulky embellishments.
Who doesn't love a tree card...this homespun feel is my favorite.

Tree Card:
Measures 4 x 9 1/4 tall
Randomly stamped the music note for background.
Stamped tree image in green ink cut out.
Glittered up the star along with brushed white paint on in places.
Added a glitter trunk 
and 
Stamped a little tag of 25 Merry Christmas!


Another quick card I created using card stock and washi tape!
That simple!!

Washi Tape Card:
Measures 4 1/4 x 5 1/2
I just layered red and white card stock for the base of the card.
Ripped strips of different washi tape
to create banners.
Stamped Merry Christmas and added a little metal flower!
Easy as that...simply but so pretty!

Hope this little inspiration of last minute Christmas Cards peeks your creative
side to give an handmade card, they really do put a smile on someones face.
Light up someones world with a handmade card done by you!!
Happy Holidays
and
Merry Christmas

hugs, Peggy Lee
http://pegbaker.blogspot.com

Supplies: all CTMH


Friday, November 15, 2013

Christmas Cards

We are quickly approaching the hustle of the Holiday Season. I don't know about you, but my world is a whirl wind of constant motion this time of year.  I barely have time to sleep, let alone knock out STACKS of Christmas cards.  I'm sure I'm not alone!  Although I don't "mail" out stacks of Christmas Cards, I do like to have a few handy just in case.  This is a great opportunity to pull out last year's paper collections, and use those holiday scraps from this year's projects.

Today, I would like to share with you a few "simple" designs that will encourage you to simplify without compromising elegance. Both of these cards can be made by ANYONE in a matter of seconds.


I just finished a major project, that I will share with you later, and I took this opportunity to quickly knock out  these cards with scraps.  As you know, my philosophy is always USE those scraps immediately, and cards are the perfect way.

For elegance my advice is keep it simple.  A monochromatic color selection will maintain sophistication without a lot of fuss. 


For this card, I decided to use a simple clean white label to break up the busy pattern in the background.   A few simple touches like the punched border, fancy label shape and script stamp make this simple design elegant and fun.
 
Supplies needed for above card:
  • Card base - White Card stock 11 x 4.25inches folded in half to yield a 4.25inches x 5.5 inches.
  • A scrap of paper to use as a base.  I used Teresa Collins' Santa's List - Red Flakes.
  • Border Punch (I used Martha Stewart Crafts Pinking Scallop Edge Punch)
  • Labels Punch (I used Spellbinders Nestabilities Dies, Labels 4)
  • Sentiment Stamp (I used Inkadinkado Merry Christmas)
  • Ranger Archival Ink Vermilion
  • Baker's Twine
  • Gelly Roll pen -  stardust  (I traced around the label with this pen, you could also trace the snowflakes with it).
 
 
The pop of glitter, and one iconic simple image, makes this card pack a powerful statement.  I love that it looks complicated, without much effort! My advice is find a simple iconic image that conveys your message, and remember less is sometimes more!
 
Supplies needed for the above card:
  • Card base - White Card stock 11 x 4.25inches folded in half to yield a 4.25inches x 5.5 inches.
  • 1/2 Inch  Corner Punch (I used the We R Memory Keepers)
  • Cosmo Cricket Glitter Sheets in Starlet (THESE GLITTER SHEETS DO NOT SHED - AMAZING!)
  • Sentiment Stamp (I used Inkadinkado Merry Christmas)
  • Ranger Archival Ink Vermilion
  • Sizzix Tim Holtz Alterations - Embossing Diffuser.
  • Provo Craft - Cuttlebug Swiss Dots Embossing Folder
  • Silver Ribbon
  • Silhouette Cameo (Ornament) from Echo Park

I encourage you to go through Christmas past paper collections and see if you can duplicate a few of these simple designs.   Don't have a Silhouette?  Never fear, lots of companies have similar images available in dies, go through your stash and see if you can substitute another design. Just remember simplicity is key, especially if you want to mail these cards.

I just love that  both card designs can easily be modified to work with any occasion.

Hope I have inspired you to use up your scraps and make some great simple Holiday cards.  Remember to keep it simple, so you have time to make the memories that matter!

Thanks for stopping in today,

Tonya Gibbs
http://www.psychomomscrapbooks.blogspot.com


Monday, October 7, 2013

The Christmas Box

Good morning everyone it's Peggy Lee here to share with you a little Christmas Box that I altered a bit ago. I found this cute little wooden box at a thrift store for only pennies.
I knew I wanted to alter it as a little gift giving box for the holidays.
This would be such adorable gift box filled with pretty little ear rings, necklace or even chocolates.
Tutorial
Wooden box
I sanded down the wooden box and covered it with gesso.
Painted the edges with Silks Acrylic Glaze in Emperor's Gold.
Paper I used was KaiserCraft Turtle Dove.
Using a Prima mask (damask) design and stucco/gesso mixture
laid it down over the whole box.
I have boxes of those glittered snowflakes that you can get at
your local Walmart Store/Dollar Stores.
Stacked up to create a tree...
glitter snowflake-button-glitter snowflake
repeat until desired height.
Decorate as desired...I used this angel chipboard piece
from the KaiserCraft Turtle Dove Collection.
Added some Melissa Frances shabby chic frames,
cheese clothe,
string of pearls,
and my favorite little touches of
vintage mother of pearl buttons.
Decorate the inside as well and pretty place
to hold a little gift to share.

Thanks for stopping by today,
hugs,
Peggy Lee

supplies:
wooden box
KaiserCraft papers and chipboard pieces
Melissa Frances frames
Prima damask mask
stucco/gesso
Silks Glaze in Emperor's Gold
cheese clothe
string of pearls
vintage mother of pearl buttons
glitter snowflakes

Thursday, December 20, 2012

Join Marion Smith - Live with Prima Tonight

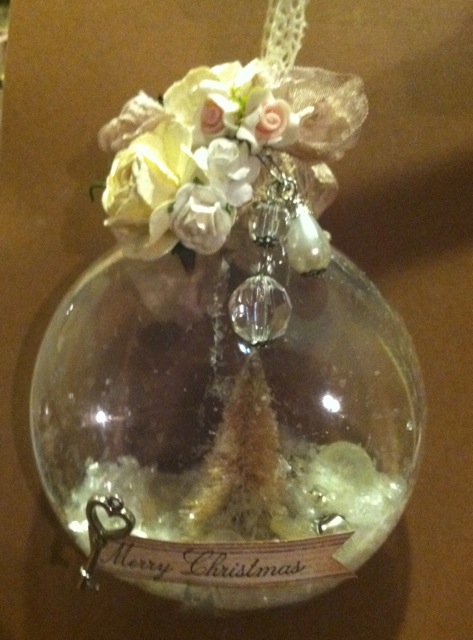
Homemade Ornaments with Marion Smith
Thursday, December 20th at 6:30pm PT/ 9:30pm ET
12/21-2:30am GMT/ 1:30pm Sydney
 

It's finally time to make some truly unique ornaments for our trees! In this class we'll make ornaments using old book pages and Prima flowers and trinkets. There are many ways you can make these your own, they are so fast and easy to make too. I hope you'll join us for this jolly class!
...
Prima Products:
532260-Mulberry Rose Leaves
554224-Trinkets-Fairy Belle
891053-Chalk Edger-Raspberry Pie
930073-Vintage Trinkets
550479-Twill Black
pe-001-05- Classic Roses-Red
PE-002-30P-Classic Roses-Cream Pink
SA-002/1-1- Classic Red Mini Roses
PE-006-9-Classic Rose Cream

Extra Materials:
Old Book
Hot Glue
Sewing Machine (Optional)
Large Jump Rings


Saturday, December 15, 2012

Guest Designer - Alease Roy

Hi, my name is Alease and I am a devoted wife and mother of a teen son and a 20 year old daughter. I have taught elementary school in the past and have been the owner of a very successful preschool business which was closed when our family moved to California. I am currently a SAHM and I am the caregiver of my beautiful mother.
 
I have a passion for crafting and take every opportunity to do so. I first began crafting seriously when a friend asked me to enter a craft fair with her over two years ago and have been crafting ever since. When I am not crafting, I am decorating around the house.
 
 
I found Artsy Addicts through a fellow crafter and was so inspired by the amount of talent that was on display. Marion has provided a wonderful place to go where you can share the same passion that you have for crafting with others and learn so much at the same time.
 
I would like to share with you my altered ornaments that I was inspired to make using scraps and other embellishments that I had in my stash. 


Thank you for this opportunity to share and I hope that it is an inspiration to someone. 
 

Alease
Follow Alease on  YouTube  and her blog for additional crafty ideas.

Monday, December 10, 2012

Grand Mini "Christmas Memories" 2012

I just love this Grand Printable Mini Kit by Marion Smith is so rich and beautiful prints. I had in mind at first that I was going to create a Gratitude Mini with this kit but then decided I just love the sparkle of Christmas with these designs. I knew it was perfect for a special Christmas gift.
 The add ons fit just perfectly with the mini and Prima flowers, doilies and crepe paper tissue, add a little glitz glitter and wow you have such a cute little pocket page.
The digital pages are so beautiful in prints that simple and clean was the way I decided to embellish this mini.
Tip-look around your scrap room in your supplies that you have created but haven't  found it's way onto a project just yet, like this tree tag I had created about a dozen of them for a craft fair and only had a few left. Which I know would go perfect with this blue strip Chevron pattern.

 A jingle bell adorn this little reindeer gazing into the snowflake delight....oh boy I have Christmas on my mind, it's the season!!!
A close up of the snowflake on the cover-simple and easy, paper doily with crepe paper rosette with snowflake ornaments make beautiful embellishments.


Happy Holidays, Peggy Lee
http://pegbaker.blogspot.com


Supplies:
Grand Printable
Tim Holtz-die cuts
Distress Ink-Black Soot
Distress Stain-Brushed Pewter
Silks Acrylic Glaze-Teal Zircon
CTMH Glitz-Silver Glitter Gel
Prima-flowers, leaves and washi tape
Studio-gesso
snowflake ornaments
doilies
crepe paper
Bazzil button bling
punches

Monday, December 3, 2012

Grand Printable-Christmas Card "JOY"

How exciting to create with Marion's new Grand Printable kit and creating a "joy" Christmas Card with it...so in love with the brown tones and the Chevron patterns. Don't you just love the little Chevron deer!!!


Started with a card base that measures 4 1/4 x 6
 brown damask print- cut it down a little smaller than card base to give a boarder
cut a banner pennet out of one of the printable journal spots
added a little piece of paper doily
Joy-letters are grunge board pieces sprayed with Espresso color wash
sprayed the banner with Tattered Angels Patina glimmer mist and distressed ink the edges in walnut stain
Die cut out the pine tree and reindeer using Tim Holtz Alterations Dies
-pine tree was cut out of chipboard then ran through a Snowflake Texture fade
painted white with gesso, inked over raised snowflakes, glimmer mist a little patine on and then glittered with Diamond Dust
added some greenery with Prima rose and vintage lace
lastly created a tiny banner with the Chevron pattern added some silver stickles "what an adorable card" (if I do say so myself)....

I hope this helps you to not just look at the printable for only one style of creating but taking them and think outside the box and create a little gem of your own....this Grand printable kit would make a lovely Christmas journal, cards, banner, etc....

happy creating, Peggy Lee


supplies:
Grand Printable kit
Bazzil card stock brown
Adirondack color wash Espresso
Tattered Angel Patina
Claudine Hellmuth Studio gesso
Diamond Dust Glitter
Prima-Avon rose Romantique
Ranger Stickles silver and Distressed ink walnut stain
Tim Holtz Idea-ology grunge board letters
Tim Holtz Alterations snowflake texture fade, pine tree die cut, reindeer flight die cut
doily
greenery
vintage lace
Adhesives: hot glue, glue dots, Tombo adhesive, Crafts Bond spray


Friday, November 30, 2012

3D Bird House Ornament

While pulling out my Christmas decorations this year, I ran across this cute little bird house that I had made using one of Marion Smith's printables.   They were so much fun to make. I think I made dozens the a few years ago. With everyone preparing to decorate for the holidays, I thought it would be fun to share them with you today.  You can download the pattern here...


I printed my pattern onto a transparency then cut it out.  I then embossed it with a  Sizzix folder, and alcohol inked it green to give it a coke bottle effect. I used  crinkled basket paper in kraft to create a nest on the inside.  The roof was made with aluminum foil that was embossed then inked brown with alcohol ink.   I decorated it with some holly and a few Prima Fairy Tale Roses that were died red.  The sign was a small oval balsa wood shape that was stained with walnut ink and I hand wrote Home with a white gel pen.  I added a little mushroom bird that I'd gotten from the floral section, then sprinkled a little snow here and there for a winter look.
 
This little guy has been living on my tree since 2010. That Christmas my husband and I had bought my daughter a car, and we hid the key in the little house.  Since such a sweet gift was enclosed. I kept this one for myself, and every year we talk about the gift as we drag the ornament out of the box.
 
I love making these, and I've given some away with gift cards tucked inside. If you are careful how you attach the roof, it can be opened and closed.
 
I love having hand made ornaments on my tree. If you make these, I would love to see yours on the Artsy Addicts Facebook wall. Please be sure to tag me.
 
Thanks for stopping in today,
 
Tonya Gibbs


Thursday, December 15, 2011

Store Front Mini

Today I want to share with you a different take on a mini ablum design. Amy Rodriguez, Teddyboo, gave me the storefront mini album kit to design. But instead of a traditional mini album - I decided to turn mine into a christmas Decorative piece. I made the pages into village pieces instead of a traditional mini album. The panels are all free standing with the aid of a Tim Holtz Easle that is adhered with Tissue tape. At the end of the season, photos can be added to the back of the panels and the album can be bound into a mini.

There are lots of details on each panel. I have broken out tutorials on how to make some of the elements. Please visit my YouTube channel for more details on this..


View Youtube Walk through

Thank you for stopping in today. I hope you have enjoyed my project share.

Tonya Gibbs
http://www.psychomoms.com

Thursday, December 1, 2011

Cristmas Cards

I thought I would share with you a card that I created using Graphic 45's Christmas Emporium, and Spellbinder's Poinsettia die.


I rounded the corners of the wreath patterned paper from the collection, and sewed around the edges for a clean looking backdrop. The Santa Clause photo was a panel on the paper and I thought the stamp was a nice touch. The stamp is from Studio G.

I have a YouTube video on how I made the Poinsettias. To me they look so realistic.


I love making Holiday cards for those extra special gifts. I would love to see your card creations on the Artsy Addicts group, please make sure you tag me if you post one.

Thanks for stoppping in today.
Tonya Gibbs
http://www.psychomoms.com
Related Posts Plugin for WordPress, Blogger...
 
Pin It button on image hover