Showing posts with label Box. Show all posts

Monday, October 7, 2013

The Christmas Box

Good morning everyone it's Peggy Lee here to share with you a little Christmas Box that I altered a bit ago. I found this cute little wooden box at a thrift store for only pennies.
I knew I wanted to alter it as a little gift giving box for the holidays.
This would be such adorable gift box filled with pretty little ear rings, necklace or even chocolates.
Tutorial
Wooden box
I sanded down the wooden box and covered it with gesso.
Painted the edges with Silks Acrylic Glaze in Emperor's Gold.
Paper I used was KaiserCraft Turtle Dove.
Using a Prima mask (damask) design and stucco/gesso mixture
laid it down over the whole box.
I have boxes of those glittered snowflakes that you can get at
your local Walmart Store/Dollar Stores.
Stacked up to create a tree...
glitter snowflake-button-glitter snowflake
repeat until desired height.
Decorate as desired...I used this angel chipboard piece
from the KaiserCraft Turtle Dove Collection.
Added some Melissa Frances shabby chic frames,
cheese clothe,
string of pearls,
and my favorite little touches of
vintage mother of pearl buttons.
Decorate the inside as well and pretty place
to hold a little gift to share.

Thanks for stopping by today,
hugs,
Peggy Lee

supplies:
wooden box
KaiserCraft papers and chipboard pieces
Melissa Frances frames
Prima damask mask
stucco/gesso
Silks Glaze in Emperor's Gold
cheese clothe
string of pearls
vintage mother of pearl buttons
glitter snowflakes

Saturday, August 24, 2013

Featured Artist: Tati Scrap

Hi!! my name is Raquel, though I’m known as Tati Scrap in the art world.
 
I´m 38 years old, I was born in Cádiz city, Spain. I started to be a crafter in June 2013, at the beginning I did not have any king of materials only  scissors and many ideas in my mind.  I'm a nurse by profession and scraper by passion.
 
Today, I am sharing an altered box I created called Summer Box. I recycled the box from my Mobile phone to create the base.  It has been a long process of selecting images, trim, decorate and compose. I have converted the box on a desktop object to store small things such as clips, staples, thumbtacks, and similar. I used Graphic 45's On the Boardwalk and Place in Time paper collections.

We Are Artsy Addicts Featured Artist Tati Scraps altered #upcycled Mobile Phone box from #G45 #Graphic45 #OnTheBoardWalk #PlaceInTime
 
We Are Artsy Addicts Featured Artist Tati Scraps altered #upcycled Mobile Phone box from #G45 #Graphic45 #OnTheBoardWalk #PlaceInTime  

I hope you liked it.
My blog is www.tatiscrap.wordpress.com and my facebook is tati scrap " recortando ideas"

Thank you


Friday, June 14, 2013

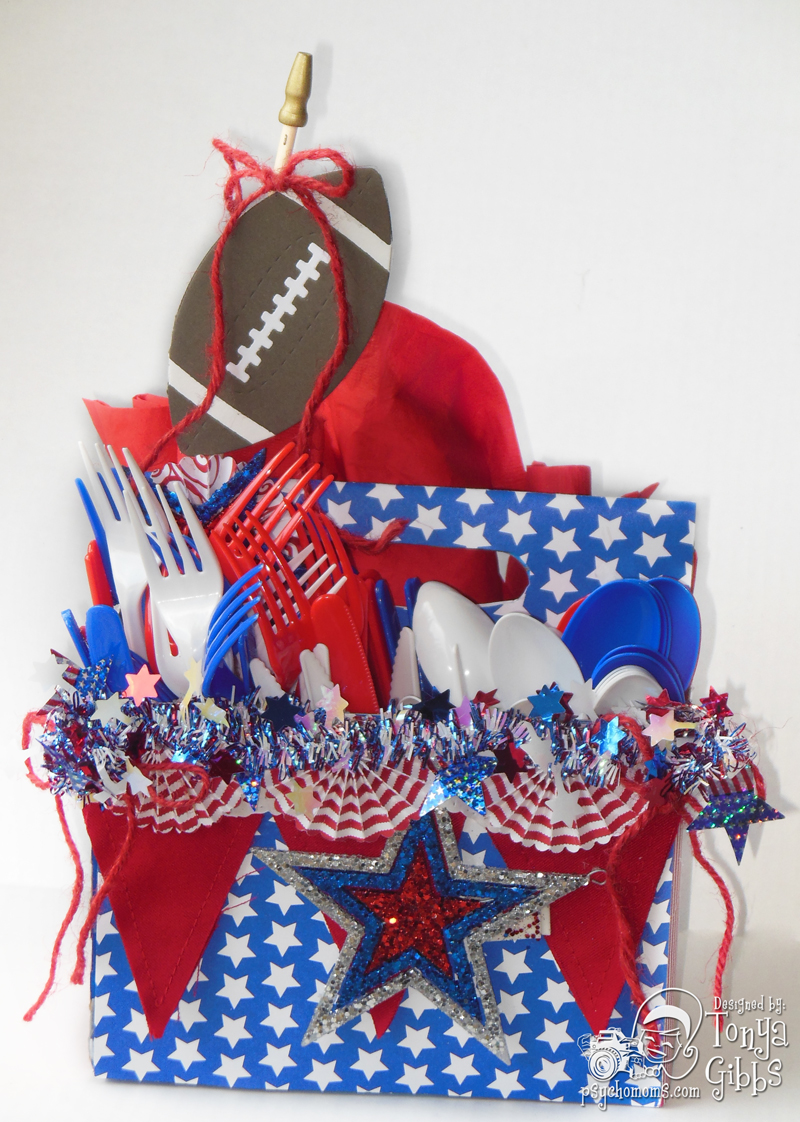
4th of July Table Caddy

4th of July is one of my all time favorite holidays - JUST LOVE IT!  The colors, the celebrations, parades, parties, fireworks - who could ask for more fun?
 
I was trying to think of some fun decorative ideas for parties.  A few weeks ago I shared with you an invitation, and today I thought I would alter a six pack box to use as a table caddy.  


Here are the supplies I used to alter the caddy.   In addition to the supplies listed below, you need to upcycle a beverage six pack box.  I used two sheets of each of these papers to complete the box.  Measurements will vary depending on your box.  I started with the bottom and completely cover it wrapping about a half an inch up the sides to keep my utensils from falling out. Then covered the over hang with the side panels. 


I used Canvas Corps' Royal Blue And White Stars Reverse Paper as my base. Then made pinwheels with the Red & White Ribbon Stripe paper then cut them in half and topped these beautiful Red Canvas Banners.  Tied the banner with the Red Canvas corp Twine bows.  Then add a little sparkle with party garland, cake pick star Tucked in a Small American Flag as a topper,  and this catty turned out FAB!
Our high school team colors are royal blue, white, and red I think I may modify this caddy after the 4th for a tailgate caddy by removing the flag and adding a football!
 
 
**Side note:  Place a water bottle in the back center spot to weigh the box down so it doesn't blow off the table.  You can camouflage the bottle with paper napkins. **
 
 
Here is a second invitation I made with the scraps from this project.


Thanks for stopping in today,
 
Tonya Gibbs


Monday, April 8, 2013

Secret Keepsake Box

I thought I would share with you all one of my little creations I did just recently for the Graphic 45 DT Call they had out. Sadly I didn't make the second round but it was so fun to try out for this team. I created this little secret keepsake box, I painted it black and then distressed all edges of the papers glued them down leaving a 1/4 edge of the painted black box showing.
I used the Olde Curiosity Shoppe paper collection from G45. I fuzzy cut most of the images right from the paper collection, along with some chipboard piece I had left in my stash.
I used the "tattered floral die" by Tim Holtz to create my flowers from the paper collection. Added some Prima bling, purple feather from the department store. The pic below I glued images under the glass top of the box, it's really cool seeing the pig with wings, bottles, butterflies and an eye ball staring up at you!!
love the eye glasses...
for the finishing touches I covered the inside of the box as well...


Thanks for stopping by today,
Peggy Lee

Supplies used all Graphic 45, Prima, Tim Holtz, wooden box and little creative thinking!

Monday, March 11, 2013

Vintage Telegram Keepsake Box

A mini album needs a keepsake box to sit in...while shopping at my local dollar store I found this box and knew right off that I was going to alter it with Marion's new Vintage Telegram printables. I am thrilled with the way it came out so shabby vintage and wow I love pink. Grab a cup of coffee and enjoy reading and gazing at all the photos there is alot but I wanted to make sure you could see every bit of this adorable box and how beautiful the printables are.
The box measures roughly 9x6.5, I had to print out two of each design I used. Which wasn't bad at all and with the scraps I fuzzy cut out images to pop up and give the box some depth.
My daughter found some dollar store frames that were green I painted them white, sprayed patina glimmer mist added cream paint, sanded sprayer tattered leather glimmer mist. Then dry brushed on gesso, sanded a little more and I love how it came out.
I distressed all the edges of the papers and cut a small piece of paper and glued it to the under side of the cover piece of paper to be able to roll the top layer back with having the under piece showing added some gems. This is a fun and creative way to showcase your papers!
Seam binding colored with glimmer mist!!
To give depth I glued a piece of chipboard under the cut outs to pop them up out of the frame. I really like to give height to my creations.
I tucked in tiny flowers and a wood piece along with some of the cut outs from the printables.
I sprayed patina glimmer mist on the eggs and added Stickles to the flowers.
The butterfly is cut out from one of the printable pages!!
This is my fav!!

Handmade stick pin from my stash, every projects needs a paper doily!
I love the little crystal gems peaking out here and there...


These printable pages Marion design are distressed beautifully!


Here is a video to share with you...enjoy!


Thanks for stopping by today!!
Peggy Lee

Supplies:
Vintage Telegram printables
Tattered Angels glimmer mist (patina and tattered leather)
Prima-Shabby Chic Resin (bird) & Say it in Crystals gems
Prima-Romance Novel Wooden Pieces
Kaiser Craft-Paper Blooms roses (dusty pink)
Folk Art Paint (black and cream)
Gesso
Ranger-Claudine Hellmuth Studio-Mulit Medium Matte
Ranger: Distressed inks (black soot and vintage photo)
Ranger: Stickles (Icicles)
Dollar Frame
Seam Binding, Lace, Doily and vintage button


Related Posts Plugin for WordPress, Blogger...
 
Pin It button on image hover