Showing posts with label Love. Show all posts

Friday, February 7, 2014

Love Note by Tonya Gibbs

Last week I shared with you my little "How I Love You Mini Album".  When I was clearing off my desk for my next project, I realized I had enough scraps to make a few more items.  So today I'm sharing with you a card and treat bag that I made with the scraps.

 
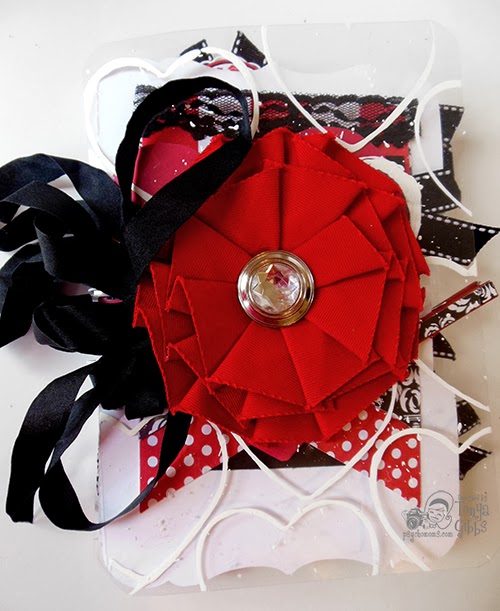
This card came together quickly and I love how it matches the gift that will accompany it. (My little mini).   The sentiment is from a Studio G stamp and was heat embossed with Ranger's Red Glitter embossing powder.  The flags and heart were left over from the Count Down to Kisses Sampler paper.  To give the card some depth between layers,  I added a Cheery Lynn Designs Polynesian Sails Oval Die cut in black cardstock between the background and overlaying banner cluster.   The banner is the b-side of the swirls paper.


For the candy treat bag, I used a couple of  'Mini' candy bars and wrapped the 'Lips and Stash' paper around them, Then placed them into a clear zip bag, and topped it with more of the paper. A little seam binding finished off the top of the bag.  These make super simple Valentines for the little ones  in my world.
 
 
As you know, I love using my scraps.  But I find it super rewarding to use them immediately after a project is complete. 
 
Thanks for stopping in today. 
 
Tonya Gibbs
 
Resources:
  • Canvas Corp Papers - Red & White Swirls
  • Canvas Corp Papers - Count Down to Kisses
  • Canvas Corp Papers - Lips and Stash
  • Cheery Lynn Designs - Polynesian Sails Oval Die
  • EK Success - Scallop Circle Punch
  • Clear Bags - Zip Bag
  • Twix Miniature Candy
  • Seam Binding Black
  • American Crafts - Jute Twine
  • Spellbinders - Square labels die
  • Studio G - Love you stamp
  • Ranger Ink - Red Glitter Embossing Powder
  • Ranger Ink - Distress Embossing Pad
  • Cardstock - Red & Black
  • Sizzix - Swiss Dot Embossing Folder


Friday, January 31, 2014

How I Love You - Mini Album by Tonya Gibbs

Hi everyone! My husband and I will be celebrating our 24th wedding anniversary in a few weeks, and I wanted to create an album that shows how much I love him. 
 
 
I love the rich vibrant colors and smooth texture of the Canvas Corp basic papers and wanted to use them for my mini. 


On the cover - I dipped a heart shaped cookie cutter in white paint and stamped the heart pattern on clear book cover stock.   I used my Bind it all and a 1/2 inch ring to bind the book together. To camouflage the rings, I tied a loose loop bow and put it on the side of a Canvas Corp red canvas flower.

 
Here is a look at a few of my favorite pages from the mini.


To keep the book consistent with the theme, I printed all pictures in black and white. Most of the photos used in this book were taken from my Instagram library.   They are the perfect size for a mini album.


The Whimsical patterns from the Canvas Corp papers, make this mini fun, and romantic.   I cut a lot of Polaroid frames from solids to help break up the busy patterns from the papers. I encourage you to also use the solids to cut small accent pieces like this Tim Holtz Mini Vintage Camera die.


For a complete walk through of the album page by page, please watch this  YouTube video.


Thanks for stopping in today,

Tonya Gibbs
http://www.psychomomscrapbooks.blogspot.com

Supply List:

Canvas Corp Papers: Black & White Damask
Red & White Mini Dots Reversed
Count Down to Kisses
Red & White Big Stripes
Red & White Swirls
Lips & Stash

Canvas Corp Misc.
Chalk Stock Tags & Ties
Red Medium Clothes Pin
Red Canvas Flower
Mixed Media Glue

Tattered AngelsValentine Chips

Die Cuts with A View:
Black & White Rose

Sizzix - Tim Holtz Alterations
Movers and Shapers Vintage Camera Die
Movers and Shapers Mini Butterflies Die
Bigs Die Tiny Tags and Tabs

My Favorite Things StampsMini Doilee Dies

EK Succes
Scallop Punch
Zig Zag Chain Punch
Slim Edger Dotted Wave Punch

Martha Stewart
Butterfly Punch
Swirling Lace Around The Page Punch

Provo CraftCuttlebug Embossing Folder - Flourished Frame

We Are Memory KeepersEnvelope Punch Board
Rounded Corner Chomper

Spellbinders
Grand Calibur Labels 4 die

Silhouette AmericaCameo
3 bracket File Folders by Lori Whitlock

Bind - It - All
Bind - It - All 1/2 Inch Rings      

Other:
Crocheted Red Flower
Heart Paper Clip
Button
Rhinestones 16mm
Black Lace
White Lace
Grosgrain Black and White Stitch Ribbon
Black Seam Binding
Red/White Bakers Twine
White Acrylic Paint
Heart Shaped Cookie Cutter
Black Cardstock
Red Cardstock
White Cardstock
White Gel Pen
Black Gel Pen


Monday, May 7, 2012

ATC cards: for my Journals

 Aren't these just the cutest ATC cards, I created them using Marion Smith's digital designs. I wanted to make something pretty to use in my Primrose journal. I've been seeing a lot about ATC cards lately, even in my scrapbooking kit that I purchased last month came the beautiful Prima new paper line which got me thinking...why not make some ATC cards to use in my journals.
 

ATC cards measure 2.5 X 3.5
I used chip board cut down.
Picked out what digital papers.
Adhered down with 450 Helmar glue.
Inked edges with Distress ink Vintage Photo.
Embellishments:
Prima flowers, Ranger-stick pins, vintage lace, buttons, twine and tulle.
Cut outs from the digital pages.

 Here are the digital pages that I used, from the April Monthly Journal digital and petal rose page from Journey Mini Book Kit. Let your imagination run with the many possibilities with using the digital pages..

I have a challenge for you Artsy Addicts followers: Pick out your favorite Marion Smith digital pages and create a ATC card, post it on our facebook page...We would love to see what you come up with.

Thank you for reading and leaving comments.
Peggy Lee
/http://pegbaker.blogspot.com//

Thursday, February 16, 2012

My Valentine

So I'm sitting in my craft room the other day finishing a project and my Son walks in, puts his arms around me and says "Mommy will you be my Valentine?" without blinking or even the slightest hesitation I said "YES - OF COURSE - FOREVER!" About 10 mins later, I get a notification of a note on my Facebook wall - He had posted the sweetest note about me being the only true love of his life! HELLO - I don't need to tell any of you how I felt, but after I quit crying all over my keyboard - I was floating on air!

The next day - Valentine's Day - he walks in with this paper heart that he had written in Spanish class. Before the details of the past few days escaped me - I wanted to create a layout.

Bazzil Cardstock: maroon; My Mind's Eye: patterned paper; Glimmer Mist: Poppy Seed & Antique Brass; Marion Smith Designs: Dital Paper - Jan day 29 & Envelope - February Day 7; Webster's Pages: Pink Bloomers; Maya Road: Love & Heart chipboard pieces; Karls001: Butterfly Kisses Flowers (Crystal), wheat flowers in pink; Prima: Mask - Floral Frenzy, Cabbage Rosebuds, and Miniature Roses; Crocheted Lace, Pearls.


The background paper says I Love You all over it and is vintage My Mind's Eye. I decided to dress it up a bit with my Glimmer sprays and the Floral Frenzy screen from Prima.

A closer look shows that I used Marion's digital downloads on my layout. In Spot 1, I used the January Day 29 download to mat the image, and in Spot 2, I used February's Day 7 envelope to house the note off my Facebook Wall.


Here is a closer look at the collage of embellies flanking the bottom of the picture. I love how the crystal flowers fill the space, but still allow the pattern of the paper and sprays to filter through.


I know one thing - this boy sure has my heart in the palm of his hand. No matter how old you get - your Momma will always be your Valentine!

I don't know about you - but I think you can never have too many paper hearts!

Thanks for stopping in today,
Tonya Gibbs
http://www.psychomoms.com
Related Posts Plugin for WordPress, Blogger...
 
Pin It button on image hover