Friday, April 26, 2013

Tarnished Silver - Tattered Angels


This week has been so fun, I've been trying out some new products and getting my fingers stained with inks.  Today I wanted to share with you one of the cards that I made using the Tattered Angels' Naturally Aged Paint System Bare Metal Tarnished Silver.   This paint system adds so much texture and shine to your dull card stock, that you have to touch it to see if it is metal.


Canvas Corp Mini Red Clothes Pins, 7 Gypsies Washi Tapes, Tattered Angels Naturally Aged Paint System Bare Metal Tarnished Silver. Other: Nesting Labels Punches EK Success and Stamping Up, Studio G Make A Wish Stamp, Ranger:
Archival Ink Jet Black, Tim Holtz Sizzix Alterations Texture Fade Patchwork, Distress Ink Pumice Stone.


For my card base I used a Tim Holtz Alterations Texture Fade Patchwork on the bare card stock, then added my paint mediums.   I love how the paints bring out the texture from the embossing and make this look like embossed metal. 


I have a few videos demonstrating how this card was made. 

The first is a step by step for the paint system


This video shows how I made the card


Thanks for stopping in today, I hope you have a great weekend.  If you are using these paint systems, I would love to see your creations, please share them with me on Facebook. 
 
 
Tonya Gibbs


Thursday, April 25, 2013

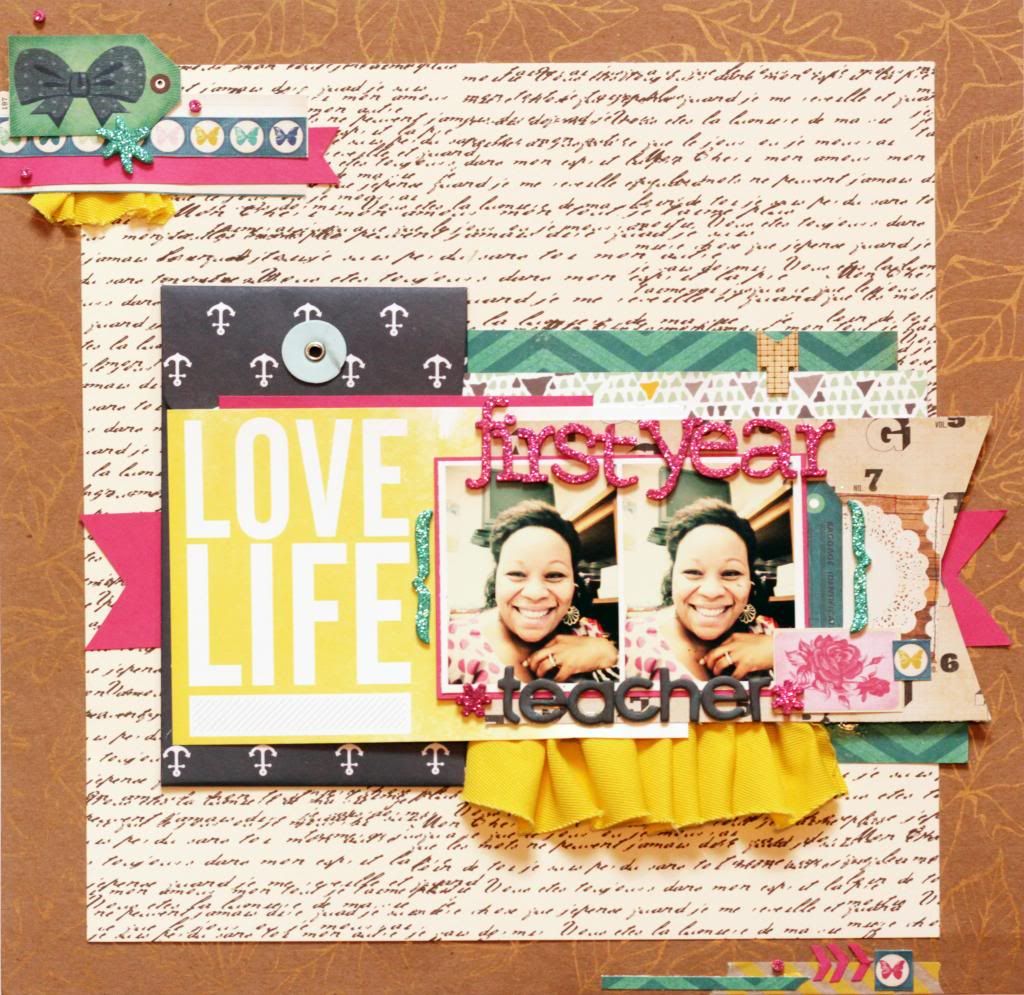
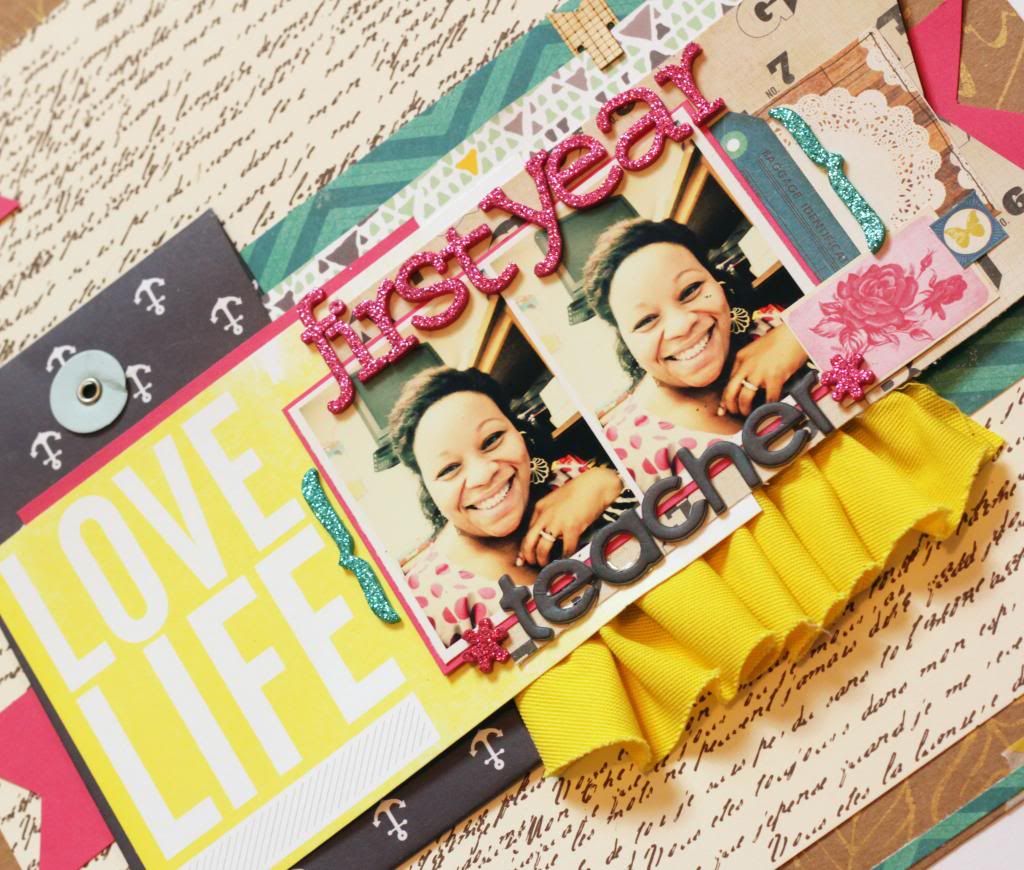
Layout | First Year Teacher

Candid shots. They're my favorite. Especially when they have a great story behind them. These pics were from my very first year as a teacher. I was in my classroom and wanted to get an early morning pic to show just how excited I was to start teaching.

I decided to scrapbook these photos this week because it's been about 3 years since I took this photo and these pics had been sitting on my scrap table just as long. Time to give them a home...don't you think??


I started knowing I wanted to use these pictures and that I absolutely love pink. I recently subscribed to Citrus Twist Project Life kit and my first kit came with the Maggie Holmes collection from Crate Paper.  Everything else was a fill in from scraps around my scrap table.

The alpha number banner was a scrap from Crate Paper's on trend collection. Since the background paper is kraft and the inner script paper is off white I decided to use this paper as a transition between the two colors and a base to break up all the other colors added to the layout.


The layout turned out just as I like it.....A few pops of color with a mostly neutral background. I tend to make fashion choices this way too. Ha!!!

Thanks for stopping by everyone.

Have a great week.

Always,

Angela


The Deets: 

Background "Gold & Kraft Leaves patterned paper CP2690, "Tan & Ivory French Script patterned paper CP2693, and yellow fabric "Yellow Canvas Flower" CVS3377 are from Canvas Corp. Yellow "Love Life" card, Triangle 6x4 card and Anchor envelope came in my Studio Calico PL kit for April. Teal Chevron PP, Tag, Butterfly border strip, Doily pp, Flower pp, teal luggage tag from Maggie Holmes for Crate Paper.  Thickers by Basic Grey "teacher" and American Crafts "First Year."


Friday, April 19, 2013

Butterfly Tag


Pink Paislee's new Hope Chest collection has inspired today's post.  I'm working on a  project with the papers for my next Ustream, May 6 at 8:30 p.m. EST, and wanted to try some techniques out on a tag before the class. Today, I would like to share with you the techniques used to create the background and blue flowers.


Here is a glimpse at the products that I used  when making the tag. 


Ranger: Archival Ink in Black & Vermillion, Distress ink Evergreen Bough, Rusty Hinge, Glue & Seal, Tag;  Prima: Distress Tool; Hampton Arts: Remember This Background stamp, Tattered Angels: Wheatfields Glimmer Mist, True Turquoise (optional substitute more blue than green), Island Spring Glimmer Glam, Vintage Pattern Paper, Paint Brush.


Cover the tag with Glue & Seal or Matt Medium, then cut interesting pattern strips from the pattern paper, and use the glue and seal over the top to adhere it to the tag's service.  Let the tag dry completely then trim the extra paper from the edges. 


Shake up the bottle of Island Spring Glimmer Glam really well, then splatter it around the tag.   Let it dry completely before going to the next step. The Glam is like a glaze and will leave glossy splatters.   You can use a heat tool to speed up this process.  Using a heat gun will also cause the glam to bubble offering a different texture.

 Make sure the tag is completely dry.  Then use the Prima distress tool to distress the edges.  If you do not have this tool, use scissors to scrape down the sides.


Use the Gathered Twigs Distress Ink to darken the edges and the creases on the top of the tag.  Really work the distress ink into the tag.  Use your heat tool to set the distress ink into the tag, as it will take longer to dry on its own due to the glue & seal. 


Completely saturate the top of the tag with the Rusty Hinge Distress ink, then use a baby wipe or paper towel to gently wipe down the surface.  The Rusty Hinge will give the tag an aged color. Again, use your heat tool to set the distress ink.


Use a butterfly stamp with Jet Black Archival Ink to stamp the images around the tag. be sure to rotate your stamp so that your butterflies are coming from different directions.  Leaving some white space is important - Don't over do it.


Use a text based stamp like this one from Hampton Arts with some Vermillion Archival Ink. Again be sure to rotate your stamp to add interest.  I love how this stamp says "LOVE TODAY!"  So I wanted to make sure it was stamped in the upper right hand corner so that I didn't cover those words up.


For the flower, I used a white Prima Flower that had pointed leaves to mimic the flower found in the paper collection.  Since the flowers in the paper collection were also a teal color, I decided to cover them with Evergreen Bouge Distress Ink.   dont' worry if white areas are exposed, you will fix those with the next step.

Since distress is reactive with water, and Glimmer Mist is water based, I used the Wheatfields Glimmer Mist to fill in the white spaces tone down the brightness of the blue/green. Dry the flower with a heat gun until it is completely dry.  Using your heat gun, will also singe the edges making them appear more natural.


Fold the flower in half and apply hot glue to the inside to hold it in place as demonstrated above.

Now, fold the from left to right in half again, adding glue between these two layers.


Fold in half from left to right one more time, applying glue to the inside of this fold and pinch together at the bottom.  These flowers will be tucked into the floral spray on the right of the tag.


To finish the tag off, I used scrap parts from a Prima Valentine Spray, Metal Trinkets, and a clock from Prima.  The floral spray was white so I used the Wheatfield Glimmer Mist to color the heart and flowers.   The charm quote at the top is from the Girl's Paperie.  The butterfly I showed you guys how to make a few weeks ago in a previous post.

Thanks for stopping in today,

Tonya Gibbs
http://www.psychomomscrapbooks.blogspot.com


Thursday, April 18, 2013

Meow Baby Layout :: Mr Binx is my Meow Baby

Hello all,

Today I'm sharing a layout featuring my foster cat, Mr. Binx. He lived with us for 2 weeks and he was just a little cuddle bear. He also was my first cat that I'd ever lived with. As a frequent allergy sufferer I was a bit concerned about his fur but it wasn't a problem at all. We snuggled and played and he was just a joy to have around.


 photo MeowBabyWeb_zps05ff05e3.jpg


For this layout I used Canvas Corp's About A Cat sampler papers. Perfect to document my time with Mr. Binx. 


 photo DSC05882_zps003b4189.jpg

Our local Petco has adoptions every Saturday. One saturday I happened into Petco....which is odd because I don't have any pets right now....and my husband and I ended up by the cats. I was playing with them and just getting over my fear of temperamental cats that I've seen online and television. A few hours later we were fostering Mr. Binx. He stayed with us for just a few weeks but he definitely made an impression. Cats are so much easier than dogs. How is it that I didn't know this??

Binx reminded me of my dear friend Jessica's cat Moose. He's a maine coon and he's the biggest cat I'd ever seen. I mean big. My husband calls him a panther, because he's really big. Ha!! Moose is also the calmest, nicest, most cuddly cat I'd ever met before Binx. These two totally made a cat lover out of me.


 photo MeowBabyWeb_zps05ff05e3.jpg


The Deets: 

All pattern papers are from Canvas Corp. Wood veneer from Studio Calico. Enamel dots from My Mind's Eye. Thickers from American Crafts. Glitter ribbon from Studio Calico. Flair buttons were made by me using the Canvas Corp patterned papers.


Thank you so much for stopping by. 

Always, 

Angela

Monday, April 15, 2013

Mixed Media Monday

I got to have some creative play this week with a friend and knew I wanted to create a mixed media canvas for someone special. That is why there is no title on this art piece yet (I will post after I have mailed this art piece out)! This was a lot of fun to create...
It all started with a plan 6x6 canvas, I glued down some wrinkled natural tissue paper.
I forgot to snap a photo of me trying out my new find which was Martha Stewart Stucco Paint where I used Crafters Workshop stencils with Splash of Color Primary Elements: Majestic Blue-Costa Rica and Dragon Wing powders those are so cool to mixed with molding paste or stucco like I used.
I used my favorite Tim Holtz Sizzix die: Tattered Floral which I cut with Coraline fabric with some of my favorite Tattered Angels glimmer mist. I just love how the Coraline will hold it's shape while being dried. I also used some Petaloo flowers that came in white.
I used some Dusty Attic chipboard pieces, which I cut apart and gesso them with spraying glimmer mist to give a weathered look.
These are Tim Holtz Sizzix die: Gears gesso-glimmer misted!!!
I just love how they came out.
Here is a close up of the handmade flowers with a Prima flower.
The next sets of photos show case the textures of adding layers of:
gesso, stucco, glimmer mist and stamping.
the fibers are cheese cloth covered in glimmer mists....
oops-I was being lazy and used my hand to clean my stamp...lol
and whoola my finished canvas (only needs a title) and will be complete and I hope my friend that someone special will enjoy it.

Don't be afraid of mixed media grab a few supplies and just start playing, it's all about the layers...enjoy!!
Thanks for stopping in today, remember to leave a comment!!
Peggy Lee

Supplies:
Splash of Color: Primary Elements
Martha Stewart: Stucco paint
Gesso
Ranger: Archival Black ink, stamps and Claudine Hellmuth Multi-Medium Matte
and Perfect Pearl Mist: Heirloom Gold, Blue Patina and Sunflower Sparkle and handmade distressed mixture of vintage photo and brushed corduroy.
and Tim Holtz Alternations Dies: Gears and Tattered Florals
Prima: flower
Petaloo: white flowers
Tattered Angels: Glimmer Mist
Turqouise Blue
Graphite
Aquamarine
Coffee shop
Melissa Frances: resin lock
Coraline
gems, cheese clothe
Dusty Attic: chipboard pieces


Friday, April 12, 2013

Washi Cards

Have you ever had one of those weeks where you just can't think creatively no matter what you do?  This week has been that way for me.  I've been really sick and NOT motivated to do anything.  My studio is A MESS.  So instead of creating I decided to clean.  I was putting away some new Washi tapes and the inspiration hit me square in the face.  Make some cards and use washi tapes as your backgrounds.  Why not?  I own lots of tapes, they are so beautiful, colorful, cheery and fun. It makes me happy to collect them, so perhaps it will make me happy to use them.


So my mission was to make five cards using only washi tape, scraps, or ephemera pieces (as I have tons of these too).  I'm a total scrap collector - I buy ephemera packs even when I don't buy the entire collection, then I never use them!  Those days are over!
 
I pulled out my punches, Spellbinder's dies, MFT dies, scraps, tapes, and card stamps  and started trimming, sorting, and stamping.


My first card was inspired by a school days theme.  I have several nieces and nephews who are elementary aged children and I thought this collection of scraps would make a cute birthday card.  I used the ruler washi tape on this card as a border, and the dictionary tissue tape as tape on the notebook page. 


Keeping with the monochromatic theme, gave a degree of sophistication to this card. I cut the washi into arrows for a soft simple background. The hints of silver and pearls gave it life.  I just love this the simple elegance of this card.


I loved the look of the grey card so much, I decided to use it with teal and blue washi tape. This time I kept the edges of the tape torn to give a more masculine feel to the card.  I love how simple, yet whimsical this card is designed. 


A few of my nephews will be graduating to middle school this year, and I thought this card was a fun end of year graduation card.  The Tissue tape was used as a background here, and pieces of ephemera and wooden clocks border a metallic embossed tag.  I also embossed the card with  gears to give it a little texture.  
 
 
For my final card today.  I covered a piece of scrap paper with green and blue washi tapes and cut it into a giant banner.  I continued my banner theme, my sewing together scallop ovals that I cut in half and a MFT tiny banner die with some scraps of coordinating card stock.  I sprinkled the giant cupcake with Rock Candy Stickles and used it for my birthday focal point.  This card screams birthday party, and I love all the celebration layers.  
 
I encourage you to spend an afternoon thinking about your scrap pile and "overstock" and make some cards.  This is a great way to breathe new life into your scrap, and eliminate them from your room.  Most of the time, I lose my inspiration because my room becomes messy and over crowded.  Simply spend the day die cutting your scraps into small pieces and you will be amazed at how fast you find your inspiration again.
 
Thanks for stopping in today,
 
Tonya Gibbs


Thursday, April 11, 2013

Canvas Corp :: Baby Love Canvas

BabyLoveCanvas photo BabyLoveCanvas_zps3c2bdefc.jpg

I've been watching Marion alter canvases thinking, "That's so awesome and something I could never do." I mean this is a project that goes on display. It's not tucked away in a album or sent off as a gift for someone. Canvases were made to be displayed and that meant my perfectionism has always whispered, "Don't even try it, girlfriend."
Well, Perfectionism. You can just SHUT IT because I DID IT and I LOVE IT!!! That flaw of perfectionism has just be beaten. Oh Yeah!! Toot Toot!!! <INSERT HAPPY DANCE>
I started this project off knowing only two things: I wanted to use these two pictures of me and I wanted to use the new Tattered Angels Chalkboard mist that I'd just received. That was it. Little did I know how special this project was going to turn out for me.

BabyLoveCanvas2 photo BabyLoveCanvasBannerClose_zps0cfa3268.jpg


The Prep & Background :: The first thing I did was to gesso my canvas. This turned it from a natural canvas color to bright white. This also meant the fabric wouldn't soak up the Tattered Angels charcoal chalkboard glimmer mist so I didn't have to use too much product to produce the color I wanted.
I used the Ampersand mask from Studio Calico to create a mask image while I sprayed the background. I should have waited until the canvas was dry to remove the mask but I'm an impatient crafter and I removed it too soon and mist got into places I did not want. So I had to think of a solution. The Fix: I took the same mask and traced it onto a piece of pink card stock from PapertreyInk. I cut around the traced image leaving a 1/4 inch border. Leaving the mask on I inked the entire cut out with versamark in and embossed it with pirate gold embossing power from Stampendous.
For the top of the canvas I used a piece of a Canvas Corp burlap diamond. I cut it in half then removed the seam and only used one side to add the large pennant shape behind the photos.

BabyLoveCanvas3 photo BabyLoveCanvasJarClose_zpse6aefd8c.jpg

The Embellishment :: 7Gypsies Dome Apothecary Jars, Martha Stewart smoky quartz glitter, Canvas Corp diamond burlap shapes, Canvas Corp hemp cord, 7Gypsies antique brass mini keys, 7Gypsies school rulers display trim, Dear Lizzy white and gold letter stickers, Black and White sail away sampler, Ranger candy pink embossing powder.


This project is near and dear to my heart for a couple of reasons......

  • It really helped me channel my feelings of loss about my recent miscarriage.
  • I'm able to display it without having to frequently explain or talk about the loss.
  • It's a great subtle reminder of my little angel baby.


BabyLoveCanvas photo BabyLoveCanvas_zps3c2bdefc.jpg


Thank you so much for stopping by. Have a great weekend.

Always,
Angela
Related Posts Plugin for WordPress, Blogger...
 
Pin It button on image hover