Showing posts with label studio calico. Show all posts

Thursday, April 25, 2013

Layout | First Year Teacher

Candid shots. They're my favorite. Especially when they have a great story behind them. These pics were from my very first year as a teacher. I was in my classroom and wanted to get an early morning pic to show just how excited I was to start teaching.

I decided to scrapbook these photos this week because it's been about 3 years since I took this photo and these pics had been sitting on my scrap table just as long. Time to give them a home...don't you think??


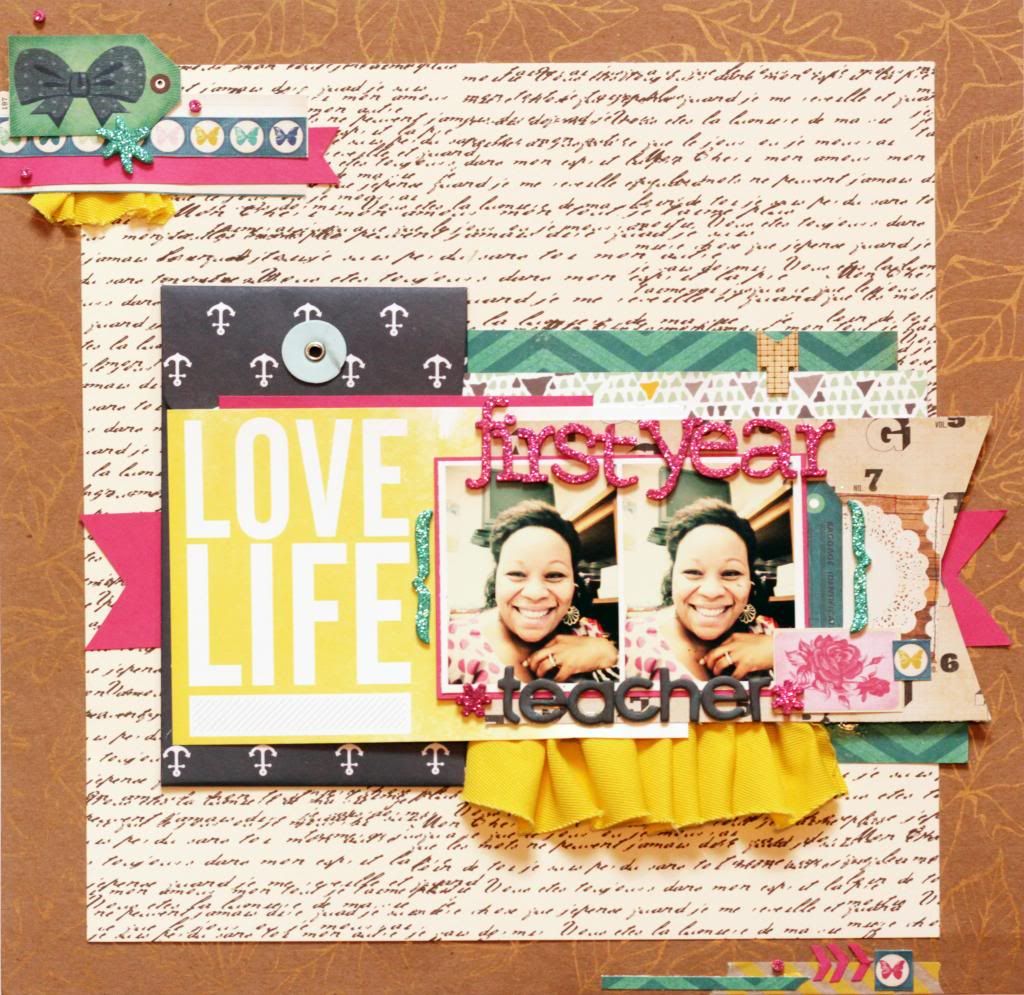
I started knowing I wanted to use these pictures and that I absolutely love pink. I recently subscribed to Citrus Twist Project Life kit and my first kit came with the Maggie Holmes collection from Crate Paper.  Everything else was a fill in from scraps around my scrap table.

The alpha number banner was a scrap from Crate Paper's on trend collection. Since the background paper is kraft and the inner script paper is off white I decided to use this paper as a transition between the two colors and a base to break up all the other colors added to the layout.


The layout turned out just as I like it.....A few pops of color with a mostly neutral background. I tend to make fashion choices this way too. Ha!!!

Thanks for stopping by everyone.

Have a great week.

Always,

Angela


The Deets: 

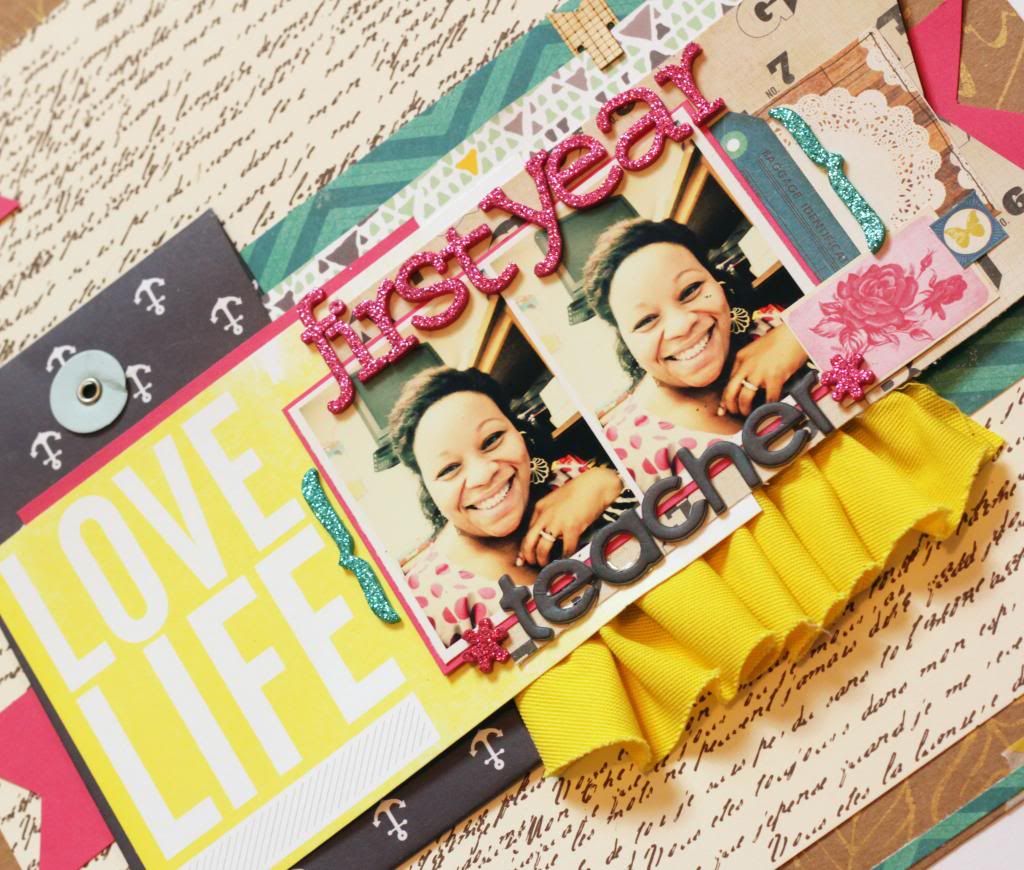
Background "Gold & Kraft Leaves patterned paper CP2690, "Tan & Ivory French Script patterned paper CP2693, and yellow fabric "Yellow Canvas Flower" CVS3377 are from Canvas Corp. Yellow "Love Life" card, Triangle 6x4 card and Anchor envelope came in my Studio Calico PL kit for April. Teal Chevron PP, Tag, Butterfly border strip, Doily pp, Flower pp, teal luggage tag from Maggie Holmes for Crate Paper.  Thickers by Basic Grey "teacher" and American Crafts "First Year."


Thursday, April 18, 2013

Meow Baby Layout :: Mr Binx is my Meow Baby

Hello all,

Today I'm sharing a layout featuring my foster cat, Mr. Binx. He lived with us for 2 weeks and he was just a little cuddle bear. He also was my first cat that I'd ever lived with. As a frequent allergy sufferer I was a bit concerned about his fur but it wasn't a problem at all. We snuggled and played and he was just a joy to have around.


 photo MeowBabyWeb_zps05ff05e3.jpg


For this layout I used Canvas Corp's About A Cat sampler papers. Perfect to document my time with Mr. Binx. 


 photo DSC05882_zps003b4189.jpg

Our local Petco has adoptions every Saturday. One saturday I happened into Petco....which is odd because I don't have any pets right now....and my husband and I ended up by the cats. I was playing with them and just getting over my fear of temperamental cats that I've seen online and television. A few hours later we were fostering Mr. Binx. He stayed with us for just a few weeks but he definitely made an impression. Cats are so much easier than dogs. How is it that I didn't know this??

Binx reminded me of my dear friend Jessica's cat Moose. He's a maine coon and he's the biggest cat I'd ever seen. I mean big. My husband calls him a panther, because he's really big. Ha!! Moose is also the calmest, nicest, most cuddly cat I'd ever met before Binx. These two totally made a cat lover out of me.


 photo MeowBabyWeb_zps05ff05e3.jpg


The Deets: 

All pattern papers are from Canvas Corp. Wood veneer from Studio Calico. Enamel dots from My Mind's Eye. Thickers from American Crafts. Glitter ribbon from Studio Calico. Flair buttons were made by me using the Canvas Corp patterned papers.


Thank you so much for stopping by. 

Always, 

Angela

Thursday, September 6, 2012

You & Me Layout

You & Me Layout


 School is back in session that means I'm back at work full time after spending 3 months off for the summer. Love my summer breaks!!

This year there have been so many changes at work, new team members, new class schedule, shorter class periods, and combining English & Reading into one class = Lots of prep work for me. 

I also started gradate school 2 weeks ago. That means reading the text, peer reviews, journal articles,  and papers galore. This is my 3rd time starting graduate school and this time there's no turning back. 

All of this means that I'm super busy, a little overwhelmed, and utterly chasing my backside. I know that I'm well on my way to "figuring out" how to manage this new life that I've created for myself and my DH is certainly doing his part to help me out. 

But the other day everything seemed to come to a head and it left me a frustrated mess. No tears this time just utter anxiety about my growing to-do list, etc. 

My husband was trying his best to cheer me up but by that time I was just in a bad mood. Then he said, "Why don't you go into your office and get crafty?" Why that didn't occur to me, I have no idea but it was exactly what I needed, and this layout was the result. 


Now I'm not much of a scrapbooker but I had this photo on my desk and I just went with the flow. What I love about this layout is that it came out of an emotional space. I didn't think about it too much. I pulled out my Studio Calico August kit and just used what I had nearby. 


Peggy said it best in this post from last month, "Art Heals." It really does. It removed my crappy mood, it put things back into perspective, and I have a layout I love to remind me the next time I'm in a "bad mood" to appreciate the good things.

Angela
Enhanced by Zemanta

Thursday, April 12, 2012

12 X 12 Layout | Girly Girl: Who Me | The Reveal

Hi there. 

I finally finished the layout and here it is.

Girly Girl: Who Me?


This is my second layout this month. That's like a record for me. I can't believe I'm scrapbooking. I never thought I would get into it until after I had kids but It's so fulfilling to be able to tell that story, chronicle that moment, cement that memory into a place that it wouldn't have been before. I look at my one scrapbook I have with all of my 5-6 layouts I have in it from the past 4-5 years that I've been a crafter and I'm very proud of what I've done, and motivated to do more. 


I had so much fun with this and I think these colors reflect that. 


This layout was inspired by a sketch from Kelly Purkey's "Sketchbook 4" class that's going on right now at Studio Calico. It's been a fantastic class and it's really gotten me inspired to scrapbook more. I'm probably going to purchase the previous "Sketchbook" classes just so I will have a plethora of sketches at my disposal. They take a lot of the guess work out if it for me and really inspire me to be more creative. I've found having a jumping-off point or a set of rules gives me great motivation and inspiration. It also temps me to break the rules also. (*In A Whisper......I'm a little bit of a rebel that way.......but not really)

Hope you all like it. 

Journaling: 

I don't know when it happened. It seems like just yesterday I was wrestling all my guy friend from middle school. Now I'm a full fledge member of TEAM GIRLY GIRL. I love all thinks pink, Girl, and most of all FAB!!!


Supplies: 


Let me know what you think. 

Sweet Hugs. 

Angela BC

Sneak Peek | Girly Glam Girl: Who Me?

Got scrappy this week using the new Studio Calico kit. Absolutely love their kits. Can't believe I made another layout. I'm becoming a scrapbooker. Lol. Still putting the finishing touches on this layout for today's post.

Here's an insta-SneakPeek...

I'll be back for the full reveal later this evening.

Sweet Hugs,

Angela

Blog | Facebook | Twitter


Monday, January 9, 2012

2012 Calendar + Bookbinding

Hi there.

Angee Butler-Carter here with another project for you.

I'm a planner. Well, I often attempt to plan but usually I end up "going with the flow" whatever that means, however I love planners and I buy one every year. With the new year upon us I decided to make my own planner this year. A few months back I happened across Kyla Roma's tutorial on how she made her own planner. She even provided the pages she designed for download. Of course I promptly downloaded them and.........forgot about them. That is until today.

Today I was inspired, motivated, and moved to action.......crafty action!

I had the pages, I had 11x14" paper, chipboard, and loads of Studio Calico kits to draw from so.......I made a planner.

Let me back up for a moment. I actually started off by watching Kyla's assembly tutorial. It's a cute fun video and it got me started and showed me how I wanted to assemble my cover.

Next I remembered a ustream that Marion filmed where she showed a bookbinding technique. A quick google search took me to the right video. M, you rock! Seriously!
Marion's video taught me how to bind my pages and attach my cover.

Being the thorough researcher that I am, here's another bookbinding tutorial for you that I found on youtube.

Now after all of that was done and watched I, finally, made a planner.


Here is the cover. It's about 99.9% finished. I just need to add the year 2012 somewhere. Suggestions?

Here are a few more pics. 

 Here is the back cover showing another picture of the binding. 

I reinforced my top and bottom stitches with extra embroidery floss (As you can see in the pics the extra knots). I used an entire skein of embroidery floss to coptic stitch my planner. I also used a large needle with an extra large eye that could accommodate the embroidery floss. 

I didn't even have to go buy supplies. I happened to have everything I needed for this project already on-hand in my craft room. The only thing I added were the printed planner sheets. Score!

In total this project took me about 2 hours to complete. That included time to watch the videos (a couple of time) and time to stitch the album in front of my computer. I just paused the videos while I stitched. I'm a slow stitcher. My first try at coptic stitching. Will definitely do more of it in the future.

I would definitely say this was an easy project. I won't be buying my yearly planners anymore. I'll be making my own. 

*All papers and embellishments were from Studio Calico monthly kits. 

Sweet Hugs. 

ABC

Enhanced by Zemanta
Related Posts Plugin for WordPress, Blogger...
 
Pin It button on image hover