Friday, June 28, 2013

Parade - Loot Bag / Clutch Purse

Hi everyone, I think I've shared in previous posts that the 4th of July is one of my favorite Holidays that we celebrate here in the US.  Our little town throws a celebration that literally lasts for days.   The fourth is a full day that includes a parade, craft festival, parties, and ends with a huge firework demonstration.  Our typical "parade loot bags" are recycled plastic bags from the grocery store - (Super classy - right).  Well, not this year....
 
 Canvas Corps Saggy Baggy, Denim Flower, and Red Twine.

When I saw this little Saggy Baggy from Canvas Corp my mind immediately went to Loot bags for the little girls in my life. At the parade they collect flags, beaded necklaces, candy, gum, stickers and all sorts of other fun trinkets when walking around downtown. This bag offers a chic way to store their bounty.


This is also a great project for the kids to help you make.
 
You need to either stich your embellises to your bag or use a fabric glue (I don't recommend hot glue for this project).  I trimmed the flap of the bag with some pretty lace, and layered metallic Ric Rac trim over the top to mask the glue.  I also trimmed around the center of the  Canvas Corp denim flower center with the same Ric Rac trim and added a button and twine to finish off the flower.  Star buttons were glued diagonally across the bag to add a little more sparkle and shine. I finished the bag off with red grosgrain ribbon for handles. 
 
This little bag would also be a cute clutch for a small cellphone and camera at the downtown festivities.  A small piece of white Velcro could also be added to the inside of the bag, if you decide to use this as a clutch purse.
 
Thanks for stopping in today, I hope you guys have a fantastic weekend.
 
Tonya Gibbs


Tuesday, June 25, 2013

Featured Artist - Einat Kessler

Hi Artsy addicts fans, my name is Einat Kessler and I'm so happy to be here!
 
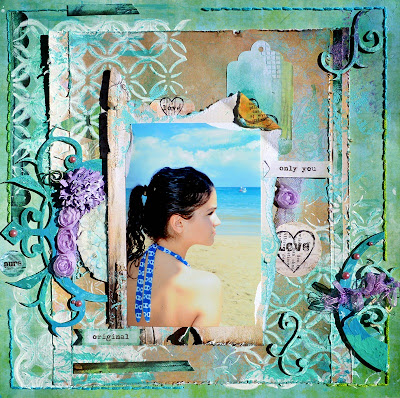
I started scrapbooking about 7 years ago after my grandfather, who has been creating scrapbooks himself, suggested I make a scrapbook for my boy. I started then and haven't stopped since!
 Today I am a CHA designer member, workshop teacher, writer and designer. I design scrapbooks, mini albums, paper crafts, mixed media, canvases, cards, 3D and interactive designs.  

I design original projects with paper, wire, canvas, paint, wood, beads, fabric and bring a unique twist to my designs by incorporating traditional materials in unconventional ways. I have taught a variety of scrapbooking and paper crafts classes and on line workshops.


I don't just like to create, I love to create! Creating doesn't only makes me happy,it keeps me calm and sane. Sitting in my studio, flying on the wings of imagination fills me with so much energy and vitality that I don't think I can live without it. In fact if a few days go by and I haven't created something for whatever reason, I become restless and my hands start yearning for some action. It's my Passion and my being. One of my passions is to "infect" others with the bug of creation, that's why I love sharing my work in my blog and my workshops.


My style can be described as eclectic and versatile. I love to mix different kinds of materials and techniques in my projects and to always stretch my supplies as much as possible. I usually create projects in a vintage, shabby chic look and I love using embellishments, lots of embellishments.


I just launched my new You Tube channel with a fantastic video tutorial series called Saturday MIXTRAVAGANZA. You're welcome to stop by:  http://www.youtube.com/channel/UCPdD0ifkS1vKYPs3zgDx3YQ


You can also visit my blog: http://scrapinit.blogspot.co.il/


Thank you so much for having me!

Have fun creating!

Einat


Monday, June 24, 2013

Canvas Pocket Home Decor

I am really enjoying creating little home decor projects to adorn my home for the 4th of July celebration that is just around the corner...and I love grunge primitive wall pockets!
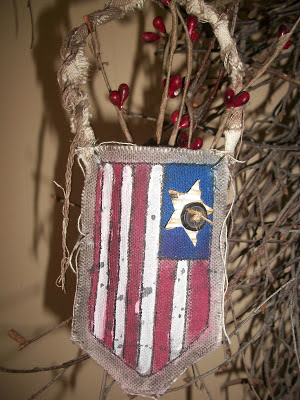
I had to create a little flag wall pocket using Canvas Corp's mini canvas shape pocket (which are great for creating mini banners). But a light turned on and I said ohhh a mini wall pocket with a glimmer mist painted flag would be adorable.

Here it is....
Mini Canvas Flag Wall Pocket!
The mini canvas pocket comes sewed up.
I carefully inserted my sharp scissors into the back of the pocket.
Being sure to only cut through one layer of the canvas.
Punched two tiny wholes on the corners to add wire through.
Tore a 1/4 inch canvas sheet strip.
 Sprayed with tattered leather glimmer mist to grunge it up.
Hot glued to wire wrap, then wrapped canvas strip around the wire hanger.
Flag:
I freehand a flag in pencil.
Started to paint with Tattered Angels mist.
Blue: Imperial Blue Simply Sheer
Red: Chilli Pepper Red Simply Sheer
Grunge: Tattered Leather Glimmer Mist
Splats: Graphite Glimmer Mist
White: gesso
Star:
I traced on the back of E-Flute in White, cut out the star.
Grunged it up with Distress Ink-Brushed Corduroy.
Button from my stash.
Burlap twine to finish it off.
To finish this little prim wall pocket I added some cranberry pipe berries.
I love all the canvas strings hanging!

Thanks for stopping in,
Peggy Lee

Supplies:
Canvas Corp:
Canvas Minis-canvas shape pockets
E-Flute in White
Burlap strings from Canvas Corp burlap sheet
Canvas Sheet
Tattered Angels:
Imperial Blue Simply Sheer
Chilli Pepper Red Simply Sheer
Tattered Leather Glimmer Mist
Graphite Glimmer Mist
Ranger:
Distress Ink-brushed corduroy
Gesso
Wire
Button
Cranberry pipe berries.

Friday, June 21, 2013

Happy Day - Layout

 
Today I want to feature a layout that I created using the May Artsy Addicts Kit.  The kit included: My Mind's Eye - Find Your Wings and Fly designed by Rhonna Farrer. The kits are a monthly subscription for around $40.  For more information about the kits and subscribe please visit:  http://www.marionsmithdesigns.com/kit-club.html


Last weekend we attended a birthday party for my Niece Emily who turned one (A layout of Miss Emily is forthcoming - I had to find some supplies first!)  Of course Aunt Tonya took hundreds of photos.  Among some of my favs were these of my Husband, Kenny, being silly with Averie and Addie.  I swear all I hear is "Tickle me Uncle Kenny" when they are around. I wasn't surprised to walk into the living room and see him being attacked by two giggling girls.  They were all so happy I needed the layout to have a fun happy theme, so I chose bright bold colors, but toned them down with a muted blue background.


 **GASP** Is that Glitter I see  on the page?  Yes, Yes it is.  Those of you who have followed me for a while know that I HATE GLITTER WITH A PASSION. However, my goal for this layout was to try some different things.
  1. I wanted to use a glittered title (it was after all a celebration) and silver/gold glittered titles are trendy now.
  2. Use bold colors (again, I tend to migrate to vintage muted colors)
  3. Keep it flat -  I wanted to try my hand at clusters of flat embellishments - (NO FLOWERS allowed!). 
  4. NO sprays/mixed media techniques. (this was really hard for me).
  5. Use multiple photos (I normally only use one)
I know what your thinking -  what alien has taken over her brain?  Sometimes trying things outside your comfort zone will help stimulate your creativity.  I must say as simple as this layout looks IT TOOK ME ALL DAY to complete.  


I am pleased with the result.  I think the colors give a "circus" type feel to the layout and who isn't happy at the circus? I used lots of cuts from my Silhouette Cameo as accents on the right.  I love that pictures really pop off the page against the bright yellow background.  What are your thoughts?
 
I encourage you to try something different - whether it is a style or a product that you don't normal use.  You may stimulate the creative juices and find a "new" you!  Not that I'm going to totally embrace glitter with every project, but hey, I found a way to keep it from shedding so you may see it more often.
 
Thanks for stopping in today,
 
Tonya Gibbs


Monday, June 17, 2013

4th of July Card

 "Let Freedom Ring" is ringing in my ear inspiring me to enjoy this beautiful and amazing holiday we have coming up! A time to celebrate our freedom, to remember those who keep us safe, and to cherish our family and friends.
Every year the 4th of July kreeps up on me and I can never seem to make home decor, cards or  a banner in time to celebrate it....so I am getting a jump start on creating!
This little beauty:
a card to sit upon my table to adore
 and
remind me to breathe and enjoy the small moments in life.
I used Canvas Corps amazing card stock weight papers,
burlap sheets, e-flute cardboard piece.

Love the mini clothespins in red to hold the banner up.

7gypsies numbers steampunk rubbings, and stamps to add texture.
and
of course splats of glimmer mist!!
I just love this holiday and can't wait to create some more home decor items...oh by the way did you get to see Tonya's  "Table Caddy" a few post ago...it's a must see!!

Here is a little video on how I create this card...
What are you creating for the 4th of July?

Thanks,
 Peggy Lee

Supplies:
Canvas Corp: Mixed Media Glue, Burlap Sheet,
E-Flute in white, White & Kraft Mini Dot CS, Red & White Chevron CS,
Navy & Ivory Mini Dot CS and Mini Clothespins in red.
7gypsies: Numbers steampunk rubbings and stamp
Tattered Angels: Graphite glimmer mist
Ranger: Archival ink in jet black
CTMH: word stamp
Button: vintage mother of pearl

Saturday, June 15, 2013

Featured artist - Kimberly

I'm so honored to be asked to be a Featured Artist.  I've been a member of the Artsy Addicts group for almost a year and have been inspired by so many wonderfully talented people. 

Where to start?   I'm married to my jr high school sweetheart for 29 yrs. We have three amazing boys,  two beautiful daughters in-laws, a grandson and a granddaughter.  My family is my world! 


I've been crafting for six years.  I started out with a cricut then expanded myself from there.
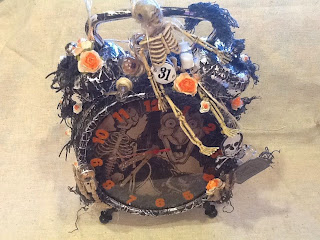
I love to alter the unexpected. The things that people toss, I see as art!  Example is the Turkey Mesh bag used on the hot air balloon below.  One man's trash is definately my treasure!


I would consider myself a Grungy girl.   I love the vintage, and steampunk.  The dirtier the better!

If I had to pick one color out of the crayon box and say it was me,  I'd pick red, because I have a firecracker personality. I love to make others happy and engergized. If I were a scrappy embellishment I'd be a paper clip, because I tend to hold everything together for the people in my world.
 
Here are a few of my other projects I wanted to share with you today.


Talk about the unexpected.  The base of this steampunk dressform was created using mouse traps.


As you can see Halloween is one of my favorite holidays.  I think it is an excellent opportunity for me to show off my grungy techniques.


Thank you for asking me to be a featured artist. 
 

Friday, June 14, 2013

4th of July Table Caddy

4th of July is one of my all time favorite holidays - JUST LOVE IT!  The colors, the celebrations, parades, parties, fireworks - who could ask for more fun?
 
I was trying to think of some fun decorative ideas for parties.  A few weeks ago I shared with you an invitation, and today I thought I would alter a six pack box to use as a table caddy.  


Here are the supplies I used to alter the caddy.   In addition to the supplies listed below, you need to upcycle a beverage six pack box.  I used two sheets of each of these papers to complete the box.  Measurements will vary depending on your box.  I started with the bottom and completely cover it wrapping about a half an inch up the sides to keep my utensils from falling out. Then covered the over hang with the side panels. 


I used Canvas Corps' Royal Blue And White Stars Reverse Paper as my base. Then made pinwheels with the Red & White Ribbon Stripe paper then cut them in half and topped these beautiful Red Canvas Banners.  Tied the banner with the Red Canvas corp Twine bows.  Then add a little sparkle with party garland, cake pick star Tucked in a Small American Flag as a topper,  and this catty turned out FAB!
Our high school team colors are royal blue, white, and red I think I may modify this caddy after the 4th for a tailgate caddy by removing the flag and adding a football!
 
 
**Side note:  Place a water bottle in the back center spot to weigh the box down so it doesn't blow off the table.  You can camouflage the bottle with paper napkins. **
 
 
Here is a second invitation I made with the scraps from this project.


Thanks for stopping in today,
 
Tonya Gibbs


Thursday, June 13, 2013

I Love the UK Altered Frame // Altered Photo Tray

I have an obsession with the UK. I love the culture, atmosphere, and oh the accents make me swoon!! I just love the UK and I can't wait to go visit. I've been obsessed with the UK ever since I was a little girl and I wore my first beret...I bet I'm saying all the cliche' touristy things right now but I don't even care.

I wanted to commemorate my love of all things european with a home decor item. Something that I could look at everyday and just be inspired to make my dream of living in London come true.

I had this Photo Frame tray from 7 Gypsies. The portrait frames left lots of room to stack things up and that's just what I did.


I went more simple for this piece because my home decor is quite simple but I went bold with the color choices. Red, Black, White, Kraft, and Gold. Some of my favorite colors all wrapped up in one.


The patterned papers are all from Canvas Corp and they are such great patterned paper to work with because it's so thick it cuts like butter and it covered up the white background of the frame without having to be painted. All of the paper embellishments came from a couple different sheets of that wonderful Canvas Corp patterened paper that I simply cut out, matted and added with pop dots. Easy peasy.


I used a few die cuts from the silhouette america store that I sprayed and painted with Glimmer Mist & Glimmer Glam and Mr. Hueys. They were a bit of a challenge to handle because all the pieces were tiny. They were flying all over my scrap room when I was spraying them and again when I was drying them with my heat tool. Ha!!

All in All I have the perfect home decor item to commemorate my love of the UK!!

I'm in such the travel mode right now probably because I know my hubby and I want to expand our family soon. Where do you think we should go before the baby planning starts??  We really want to travel abroad.

What are your favorite international travel destinations?


Thanks for stopping by everyone and Happy Crafting.

Angela B. Carter
www.alwaysangella.com

Tuesday, June 11, 2013

Featured Artist: Agnieszka Bellaidea

Hi!
My name is Agnieszka, but in the scrapbooking world I go by Bellaidea.  Today I would like to show you several of my project I created in 2013.

Together with my husband - I'm still dating him - we're taking care of our two treasures - a Girl and a Boy.


I love traveling, taking photos, oranges and African bush aroma, old; books, pictures and houses, doilies, trips with friends to Italy, evenings by the fireplace, mystery perfumes, reading books to my children (no matter that they can read by themselves), audiobooks during long distance drives, praising people for their talent and creativity and meeting with other nice ladies for a cup of coffee. My favorite place to spend time is Kruger Park and Zimbali in South Africa.


I scrapbook for many reasons: to preserve memories, to make my kids remember I always care about them, to have MY time when I need it, to keep in touch with all my scrap-friend all over the work.


My style is eclectic, part of romantic, touch of whimsy, influenced by mixed media a lot. You will find on my projects; lace, chipboards, doilies, torn corners, fussy cutting,  but I never forget the most important is the photo and a story. Sometimes I hide my journaling when it's very personal...
 
The last few years I have had the pleasure to design for many blog challenges and producers like Papercraft Scandinavia/Inkido, Scrap FX, Berry 71 Bleu, Scraps of Elegance, 13 arts, studio 75,   and Magenta.


I cordially invite you to visit my blog, where you can find out what I'm doing late nights when my family members are sleeping: Bellaideascrapology


Thanks for letting my share with you today,
Agnieszka
Bellaideascrapology

Monday, June 10, 2013

Father's Day Card

 With "Father's Day" coming upon us soon, I decided to share with you one of my cards I created to celebrate this special day for the men in our lives. I knew I wanted a grunge feel with warm colors, I started with kraft card stock 6x12 folded in half. Distressed all the paper edges and used Distress ink-walnut stain to give the worn and weather look..one of my favs!  So love the tiny clothespin from Canvas Corp (which comes in a rainbow of colors perfect for your projects).
Here is a look at the papers I used from 7gypsies two paper collections.
"Travel and Epicurean"
it's great to mix and match
I know every man needs some gears on their cards, so I used Tim Holtz Gears Die cut from chip board and papers, glued together and embossed with a embossing folder, inked all edges.
The gears needed something more
 so I grabbed my 7gypsies
 awesome Time Steampunk Rubons!
I was thirlled with the way it came out....
I've been playing with this adorable
CTMH stamp-Perfect Fit Dad-Holiday set.

To finish off the card I couldn't create a project without "glimmer mist"!
Grabbed my Graphite glimmer mist from Tattered Angels and started
to splatter the whole card.
"super cool effect"
What are you creating for your special men in your life?

Thanks for stopping by,
 Peggy Lee

Supplies:
Canvas Corp: kraft cardstock, mixed media glue, clothespins in black
Tattered Angels: graphite glimmer mist
7Gypsies: Hampton Art Script stamp, 6x6 paper pad in Travel and Epicurean, Time Steampunk Rubons
Colorbok: black and red cardstock
Tim Holtz: gears die, distress ink in walnut stain, archival ink black
CTMH: Perfect Fit Day-Holiday stamp, black and vineyard berry ink
and Cricut Artiste and Art Philosophy Cartridges.

Related Posts Plugin for WordPress, Blogger...
 
Pin It button on image hover