Showing posts with label My Minds Eye. Show all posts

Friday, April 11, 2014

Washi Inspired Layout by Tonya Gibbs


Last week I issued a sketch challenge, and shared with you guys a card that I made using washi tapes.   My card was inspired by this roll of  tape!
 
 
Here is the sketch & card from last week...


Today I wanted to show you a layout that I created using the same washi tapes and the sketch as a layout guide. I  had a 6x6 pad of My Mind's Eye, Spread Your Wings and Fly, paper collection.  It coordinated so well with the washi selection that I decided it would be perfect for my layout. Since the 3D Embellishment that I used as my title reads "You Are My Sunshine, My Only Sunshine", I found a playful photo of my daughter, Brittany.  Side note:  Her Daddy calls her Sunshine!
 
 
Like last week, I sprayed the doilies with the Dylusions Ink Spray in Lemon Zest. Then Spritzed it with Heidi Swapp's Gold Lume color shine.  I thought the sunny pop of yellow, went well with my "You Are My Sunshine" title.
 
 
The 3D embellishment came with the sticker set, but it had a mustard yellow background. I peeled it apart, and placed it onto a piece of blue polka dot scrap from the collection.  I love how it pops against the yellow doily now. 
 
It was a lot of fun working with these vibrant bright colors.  This color pallet is way out of my norm, so it totally stimulated my creative juices.  I hope you try this challenge, along with the bright colors.  Don't forget to link up your blog post to last week's post if you decide to play along. Everyone who links up - will be featured in a May Artsy Addicts Showcase post.  I look forward to seeing how you use the sketch.

Tonya Gibbs
http://www.psychomoms.com

Resources:

My Mind's Eye - Spread Your Wings & Fly 6x6 pad
My Mind's Eye - Spread Your Wings & Fly Brads
My Mind's Eye - Spread Your Wings & Fly 3D embellishments
My Mind's Eye - Spread Your Wings & Fly Stamps
My Mind's Eye - Spread Your Wings & Fly Buttons
Marion Smith Designs - Mad Tea Party 12x12 Paper -
Doily
Dylusions Ink Spray in Lemon Zest
Heidi Swapp - Gold Lume Color Shine
Heidi Swapp - Archival Ink Pink
Heidi Swapp - Archival Ink Teal
Tattered Angels - Tutti Fruity
Tattered Angels - Frozen Lake
Yellow Baker's Twine
Teressa Collins Memorabilia Line Washi Tape (yellow)
Recollections - Random Washi Tape
Maya Road - Heart Shape Chipboard
Sizzix - Tim Holtz Alterations Rosette Strip Die
Faber-Castell Design Memory Craft - Pitt Pen Cadmium Yellow no. 107


Monday, November 25, 2013

Holiday Sunshine Tags!!!

Good morning everyone..
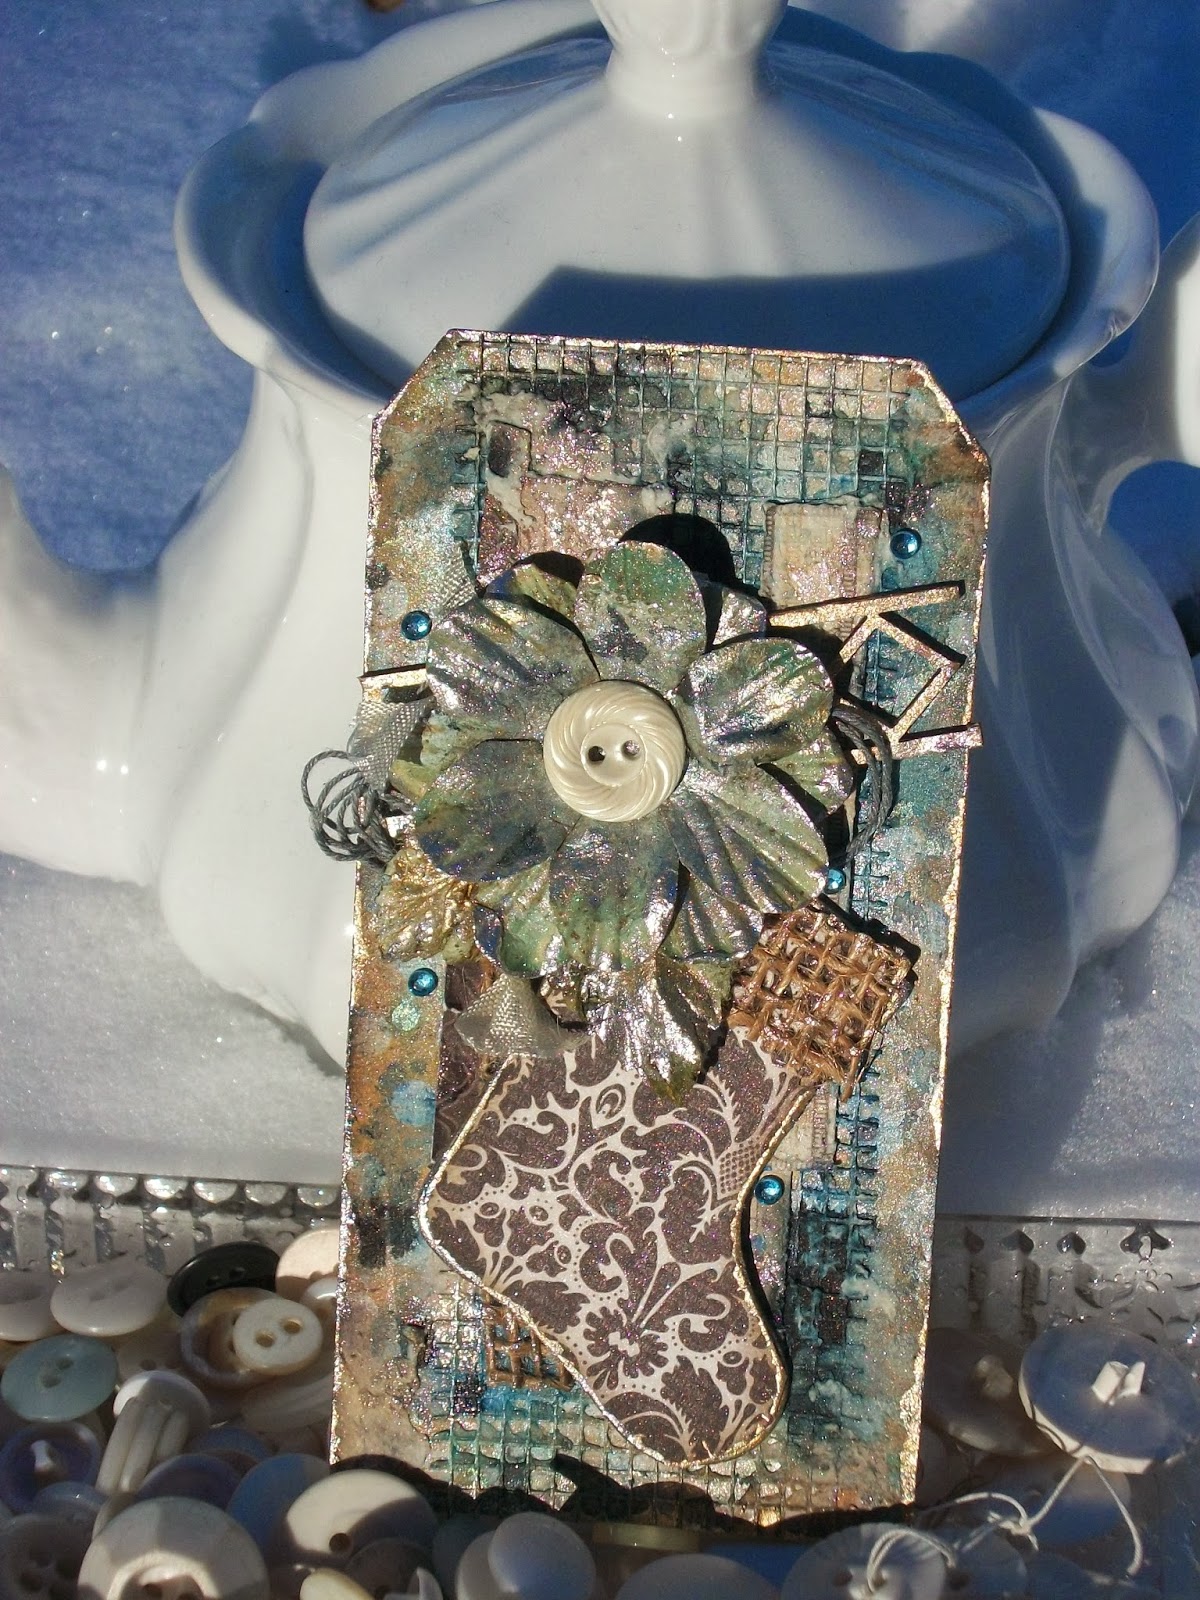
Peggy Lee here bringing you a little "Holiday Sunshine" cheer in tags!
With the holidays right around the corner from us, I knew creating my own holiday tags was a must!!
It warms the heart of someone special to receive a beautiful 
handmade tag on a gift, or as a gift to adorn their gifts, trees etc.
"Holiday Sunshine Tags"
using the Sunshine My Mind's Eye paper collection.
With no direction I just sat down and started creating...covering shipping tags.
Adding texture with drywall tape, gesso and stucco...
Sprays and splatters of different mists
chipboard pieces, twines, burlap, flowers and buttons...
**do you see the fresh fallen snow**
that's right I went outside this morning in 10 degrees bitter cold temps
to capture the photos in the beautiful sunshine. :)
every tag needs a little glimmer of gold...
Viva-Precious Metal Effect Paints in Gold!
I just love taking a color flower and adding different 
sprays of glimmer mists, color shine, perfect pearls
plus precious metal effect paints...
make your own flowers
to match your projects.....love them!

Happy Holidays
hugs,
Peggy Lee

Supplies:
My Mind's Eye-Sunshine Lost & Found two
Viva-Precious Metal Effects Paint in gold
Ranger-Perfect Pearls Mists in blue patina, heirloom gold and biscotti
Distress ink-walnut stain
Distress stain-forest moss and bundled sage
Tattered Angels-glimmer mist raven 
plain jane glimmer mist in blue bird baseboard
Heidi Swapp-color shine in teal and tinsel
Prima-flowers
stucco/gesso
gems, twine, burlap, buttons
chipboard pieces
drywall tape


Friday, July 12, 2013

Soar Layout

Hi everyone.  Today I wanted to show you a layout that I created with the May Artsy Addicts Kit  featuring MME - Find Your Wings & Fly by Rhonna Farrer.
 
Soar Layout by Tonya Gibbs http://www.psychomomscrapbooks.blogspot.com
 
 
The kits are a monthly subscription for around $40. For more information about the kits and to subscribe please visit: http://www.marionsmithdesigns.com/kit-club.html
 
At the end of  Addie's Birthday party last year she picked up this stack of helium balloons and starting spinning around in a circle.  The photo gives such a good glimpse into her whimsical free spirited approach to life.  I've been holding this photo for a while in hopes of the perfect paper to tell the story. Since this collection has a lot of  hot air balloons, soft pastel colors and girly girl images, I thought it would be perfect.
 
 
Soar Layout by Tonya Gibbs http://www.psychomomscrapbooks.blogspot.com
 
 
Soar Layout by Tonya Gibbs http://www.psychomomscrapbooks.blogspot.comThe layered look printed on one of the papers, allowed me to give the feel of lots of small layers with little effort and no bulk.  I continued the look by layering a few of the pages from the 6x6 pad to form a clustered frame around the photograph. I left the border that has the hole for the paper pad on the paper and distressed it. This technique allowed me to build on the other office supply themes found in the paper.

The arrows were cut from my Silhouette Cameo, and the cut file can be purchased from the Silhouette store. I used both the positive and the negative of the cut on the layout.   The arrows help to give direction and movement to the embellishments.  

I added a little of the washi tape and half a doily to soften up the harsh overlapping lines from the paper.  The Hot Air balloon and Soar Title were the 3D stickers from the collection and offer great dimension to the layout.  To hide a white vase in the background of the photograph, I used one of the brad embellishments next to the title.

I love the new trend of office supplies on layouts.  So I bought a package of reinforced holes and used my Prima Chalk Inks in pastel green to make them match my layout. I also included a small shipping tag.  To give a more organic whimsical look to the layout I sewed some of the elements down and left the strings hanging from the edges, and let the twine free fall around the photo at a diagonal.
 
**DESIGN TIP  I used the negative from a notebook paper punch scrap as one of my layers too.  When punching out borders, or cuts from diecuts, pay attention to the negatives, you may find a hidden treasure.
 
I love all the small details that make up this layout. It was a lot of fun challenging myself to use 6x6 papers to create a 12x12 layout. I would love to see what you guys are doing with your Artsy Addict Kits.  I challenge you to stop hoarding these beautiful papers, and post a project with them on the Artsy Addicts Facebook Wall.  
 
Thanks for stopping in today,
 
Tonya Gibbs
 
 
Resources:
  • My Mind's Eye - Rhonna Farrer  Find Your Wings & Fly:  6x6 paper, brads, Alpha Stickers, 3D Stickers, Washi Tape
  • Prima Chalk Ink
  • Recollections - Washi Tape
  • Paper Source - Flat Back Pearls
  • Prima Fluid Chalk Ink - Pastel Green
  • EK Success - Notebook Paper Border Punch
  • Paper Doily
  • Studio Calico - Speech Bubble Wood Veneer
  • Twinnery - Pink Twine
  • Silhouette - Arrow die cuts
  •  


Friday, June 21, 2013

Happy Day - Layout

 
Today I want to feature a layout that I created using the May Artsy Addicts Kit.  The kit included: My Mind's Eye - Find Your Wings and Fly designed by Rhonna Farrer. The kits are a monthly subscription for around $40.  For more information about the kits and subscribe please visit:  http://www.marionsmithdesigns.com/kit-club.html


Last weekend we attended a birthday party for my Niece Emily who turned one (A layout of Miss Emily is forthcoming - I had to find some supplies first!)  Of course Aunt Tonya took hundreds of photos.  Among some of my favs were these of my Husband, Kenny, being silly with Averie and Addie.  I swear all I hear is "Tickle me Uncle Kenny" when they are around. I wasn't surprised to walk into the living room and see him being attacked by two giggling girls.  They were all so happy I needed the layout to have a fun happy theme, so I chose bright bold colors, but toned them down with a muted blue background.


 **GASP** Is that Glitter I see  on the page?  Yes, Yes it is.  Those of you who have followed me for a while know that I HATE GLITTER WITH A PASSION. However, my goal for this layout was to try some different things.
  1. I wanted to use a glittered title (it was after all a celebration) and silver/gold glittered titles are trendy now.
  2. Use bold colors (again, I tend to migrate to vintage muted colors)
  3. Keep it flat -  I wanted to try my hand at clusters of flat embellishments - (NO FLOWERS allowed!). 
  4. NO sprays/mixed media techniques. (this was really hard for me).
  5. Use multiple photos (I normally only use one)
I know what your thinking -  what alien has taken over her brain?  Sometimes trying things outside your comfort zone will help stimulate your creativity.  I must say as simple as this layout looks IT TOOK ME ALL DAY to complete.  


I am pleased with the result.  I think the colors give a "circus" type feel to the layout and who isn't happy at the circus? I used lots of cuts from my Silhouette Cameo as accents on the right.  I love that pictures really pop off the page against the bright yellow background.  What are your thoughts?
 
I encourage you to try something different - whether it is a style or a product that you don't normal use.  You may stimulate the creative juices and find a "new" you!  Not that I'm going to totally embrace glitter with every project, but hey, I found a way to keep it from shedding so you may see it more often.
 
Thanks for stopping in today,
 
Tonya Gibbs


Monday, April 23, 2012

Girly Girl Scrapping

A few post back I created this Girly Girl Album as promised I am sharing my scrapping journey with you. Here are my girly girls Olivia and Emilee, even though they are grown up two beautiful young ladies. I knew my first few pages would be of them when they were young, both my girls love wearing hats what little girl doesn't!
One the first page is of my oldest Olivia wearing her favorite Mini Mouse pink hat, she wore it every wheres. On the second page is of my youngest Emilee and she found this vintage treasure in my friends closet..Vintage Satin Yellow hat with all that lace trim, she wore it all day. I just love how both my girls have such personality and style. Even today they still love to style it up (they just won't let mom help, ah ah).
 I kept all my scraps of paper from creating the album to use for the inside pages-I cut 1" strips and snip off the ends to create little banners. Yes these are Prima flowers-my cool find of the week, I was out shopping at a hardware store were they  have a gift section and there sitting on the shelf was Prima goodness...Oh I was so excited!! I added this yellow flower to match with the vintage hat and help off set all the pink and brown that is going on in the album.
From the same Prima flower collection these little blue flowers popped out-helping to bring both pages together, in Emilee's photo there is a little bit of blue showing in the curtain.
I have enjoyed creating these pages, digging through all my boxes of photos to find different stages of my girls growing up.
Enjoy your children while they are young build memories, capture even the simple little things to cherish and admire with them.
Creative Scraps by Peggy Lee

Supplies:
My Minds Eye "Madison Avenue" paper line
My Minds Eye (Lost & Found-Madison Avenue "Pretty" Stamps)
Distress inks (brushed corduroy, walnut stain)
Distress Stickles (vintage photo)
Helmar 450 glue
Prima: lace
Prima: flowers (Essentials: Lucid)
Recollections Boutique Fleur trims and gems
trims and lace
McGill flower punch
Bind in all-binding

Monday, April 16, 2012

Girly Girl Album


 Awhile back I had bought the paper collection of My Minds Eye "Madison Avenue". I fell in love with all the pink and brown tones and the tower, birds and such.  I hated to cut up the paper, I didn't want to lose the images on paper, so I decided to create a girly girl album size 6x9. Used black chip board for the covers, adhered with the amazing Helmar 450 glue so love that glue. Gave the book a vintage feel with using Distress Inks (brushed corduroy and walnut stain) added some Distress Stickles (vintage photo).  Used a flower punch to create the flowers using the paper scraps, added some bling gems.

 The pretty lace trim was white to start I used Distress stain (warm lipstick) and Tattered Angels glimmer mist (tutti fruitti and coffee shop) to create the pink shades that where throughout the paper line to match. I couldn't believe how well it matched the paper. That's why I love glimmer mist so much, you can take plain lace and trims and create your own.

I just love the Eiffel tower and the book text this collection is beautiful.
I will be working in this girly girl album scrappin some pics of my girls, I will be sharing with you all.
happy creating, Peggy Lee

Supplies:
My Minds Eye "Madison Avenue" paper line
Distress inks (brushed corduroy, walnut stain)
Distress Stickles (vintage photo)
Helmar 450 glue
Prima: lace
Recollections Boutique Fleur trims and gems
trims and lace
McGill flower punch
Bind in all-binding
                                                                                    
Related Posts Plugin for WordPress, Blogger...
 
Pin It button on image hover