Friday, March 21, 2014

Sun Kiss Cards by Tonya Gibbs

Happy Friday everyone, I hope you are set for a super fab crafty weekend.  I am still on a card making mission.  Today I wanted to share with you another card sketch, and two versions of the same sketch.  
 
 
Confessions of a Paper Addict -  Prima's Sun Kiss collection was one of my all time favorites, and I bought several 6x6 pads.  I was planning to fussy cut and die cut one pad, and then create with the second.  Truth is, I ended up hoarding them both!   So I reached into my sketch arsenal and went to work.


Here is the first version of my card.  
 
Tip: The doily behind the butterfly was cut from the paper, I flipped it upside down and used the white side on my card!)  This is a great way to use up unwanted patterns.
 
I decided to recreate the same card, but rotate the orientation for the second version.  I didn't want to cover up the smaller butterflies on the right, so  I also changed up the location of the sentiment.    


I hope I've given you a few things to think about when using up those extra 6x6 pads.  If you decided to use my sketch, please share it with me on the Artsy Addicts Facebook Page.
 
Thanks for stopping in today,
 
Tonya Gibbs
 

Monday, March 17, 2014

3 Leaf Clover-Jumbo Tag

Good morning everyone, it's Peggy Lee here to wish you all a
Happy St. Patrick's Day!!!
I decided to try my hand at creating a clover....and this is what I came up with (my daughter thought it was a palm tree...lol). I wanted to use the Graphic 45 Tropical Travelogue Collection, I used the paper with beautiful vine leaves on it, I cut them out of the paper inked the edges and glue the centers together. It helped give the leaf some lift and depth, the stem is actually the leftovers from the embellishment sheet with the chipboard pieces...I cut it out, inked and glued down...I also used G45 Staples for the clover center and tag....I just love those metal brads.
Close up of the 3 leaf clover!
This mixed media jumbo tag was a little hard for me (mojo stuck) since we just moved into a new place and my life is all in boxes...ugh...but we started to settle in and I caught a very bad head/chest cold....and in my heart I want to create but in my mind was to sick....so I took a small window of feeling a little better and played....and to be truthful it was just what I needed....I am happy now!!

Thanks for stopping in today.
Wish me luck in finding my crafty supplies in all those boxes!!

hugs, Peggy Lee


Friday, March 14, 2014

Hello Card Tutorial by Tonya Gibbs

 
Happy Friday my crafty peeps,  I hope you have an exciting weekend planned. Last summer the Teresa Collins Memorabilia line was one of the hottest selling Artsy Addicts kits. I still had a few pieces left over, and wanted to finish off the kit.


  First I came up with a design, and decided to share my sketch with you guys...
 
 
My challenge was to have 95% of the card come from the kit and the other 5% from the scrap pile.  NOTHING NEW WAS USED TO MAKE THIS CARD.


Here is a process video of me making the card..


This design is super clean and simple, and will easily transfer to some other collections that I own.  
 
DESTASH TIP:  If  you have a lot of left overs from kits, make a stack of cards using the same sketch design. Then wrap them up and give to a friend as a gift.   I usually place a pop square on the back of a stack of sentiments. This way my friend can choose the appropriate sentiment when she is ready to mail the card.  I recommend keeping the designs flat (no bulky flowers) since the friend will most likely mail the cards.  My friends love gift sets like this, and it is a great way to de-stash a kit!   Another option is to give them to your church to mail for outreach!
 
Thanks for stopping in today,
 
Tonya Gibbs
 
Resources:
  • Ranger Ink - Embossing Powder - Super Fine Detail - Clear
  • Tim Holtz Distress Ink Pads - Embossing Ink Clear
  • Teresa Collins - Memorabilia Collection - 12 x 12 Double Sided Paper - Quatrefoil
  • Teresa Collins - Memorabilia Collection - 6 x 6 Paper Pad
  • Teresa Collins - Memorabilia Collection - 12 x 12 Die Cut Paper
  • Teresa Collins - Memorabilia Collection - Enamel Dots
  • Sizzix - Tim Holtz - Alterations Collection - Movers and Shapers Die - Vintage Telephone and Typewriter Set
  • Baker's Twine
  • Cardstock

Friday, March 7, 2014

Watercolor Card by Tonya Gibbs

 
Hi everyone, today I have a simple little card to share. I decided to create my own background using various Tattered Angels sprays.   I thought it gave an impressionistic effect.  


To create the background I removed the nozzle from the sprays and splattered them all around the page.  Then  I took a paper napkin to dab up the extra. I used a soft lavender colored cardstock as my base to give a nice soft base to the splatters.  
 
I love the effect of the watercolor background. The Flowers were cut from the Tattered Flower Garland Decorative strip die.  I then painted them all with the Tutti Fruity Glimmer Mist.  This was such a fun card to make. 
 
Thanks for stopping in today,
Tonya Gibbs
 
Resources:
  • American Crafts - Ribbon Value Pack - Jute - 24 Spools
  • FabScraps - Pearls - Bling - Cream
  • Martha Stewart Crafts - Punch Around the Page - Craft Punch Set - Swirling Lace
  • Sizzix - Tim Holtz - Alterations Collection - Sizzlits Decorative Strip Die - Tattered Flower Garland
  • Tattered Angels - Glimmer Mist Spray - 2 Ounce Bottle - Honey Dew Mist
  • Tattered Angels - Glimmer Mist Spray - Limited Edition - 2 Ounce Bottle - Peppermint Stick
  • Tattered Angels - Glimmer Mist Spray - 2 Ounce Bottle - SWAK
  • Tattered Angels - Glimmer Mist Spray - 2 Ounce Bottle - Cherub Pink,
 

Wednesday, March 5, 2014

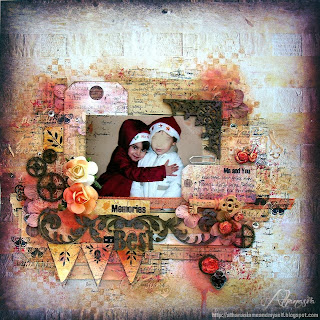
Featured Artist: Athanasia Me and Myself


Hello!

I am very happy to be hosted here, thank you so much for the invitation!

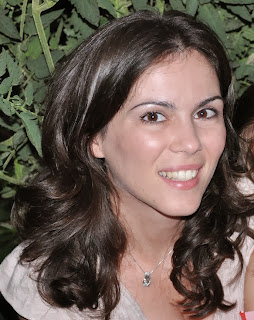
My name is Athanasia, I live in Greece, I have a 5 years old daughter, a 5 months old son and a very supportive and understanding husband. I am a music teacher in elementary school and in my spare time, when I am not playing the piano, I love making handicrafts, felting, altering things and of course scrapbooking.

My love for arts and my cultural worries pushes me constantly into researching and producing new ways of expression and creativeness. My first steps into scrapbooking began with some videos on YouTube. I can't remember exactly what I was looking for, but out of nowhere I run into a 'how-to' video for making a mini album. And that was it! I started searching for more related tutorials (I love watching and learning new techniques) and on the very next day I found myself surrounded by papers and scissors making my first mini album. It has been 3 years since then and although I took a year's brake (due to my pregnancy) now I am back.

I love scrapbooking because it combines such a vast deposit of media types with memories of my life and my family. Inspiration always derives from the photograph I use and the open choice of combination of mixed media techniques. I love to use gesso, mists and stamps and I love tearing papers! Through scraping I think I have found the best way to express myself and exploit my spare time in the best way.

Today I am going to show to you 3 of my favorite techniques that I love doing on my scrapbook pages.

Tearing pages from an old book. I love to create layouts composed by yellowed pages that have been torn from old books. Ι tear them in pieces and place them around my photo in order to create a frame. In my most recent layouts I use pages from an old chemistry book that a good friend of mine found dumped on the street!


2.Stamping and masking with gesso or modeling paste. After I glue the paper chunks, Ι choose the stamps and masks that best fit to the photo's subject. Firstly,I remove the photo from the working area and I stamp randomly around the photo's space with several stamps, then I mask with gesso on the stamps. Sometimes, when the gesso gets dry, I restamp over it to create a connection between the different media. After the stamping, the photo is placed back in position and I choose the embellishments that fits into the theme.


3.Altering embellishments and chipboard pieces. I like altering things, a common practice in my scrapbook projects. I like to cut into pieces all the flowers, stickers and chipboard elements, so as to give them new and unique shape. I then stamp on them, gesso them, or both. In my opinion this gives character and style to my work.


Now it's time to show you a bonus tutorial for you. I have created a simple layout with few embellishments following these three steps!

I place the photo, the torn vintage pages chunks ans the big embellishments that are going to be used in my layout.


I remove the photo and start stamping.


More stamps!

Time for masking with gesso...


I place the painted and stamped chipboard pieces, I do some doodling around the tags and stickers, a little misting at the end and that's it!


I hope you liked my work and my little tips.


For more details and closeups please visit my blog: http://athanasiameandmyself.blogspot.gr/

and don't forget to check on my channel on youtube:
https://www.youtube.com/user/athanasiapap/videos?flow=grid&view=0


Athanasia



Saturday, March 1, 2014

Featured Artist Pepi Valderrama

 
My name is Pepi and I love mixed media art. I started drawing when I was in high school, but I stopped in Uni. Then I took it again while living in Japan. Since living in Japan my style and the color palette I usually use has changed considerably. I got lots of influences from the Japanese culture as well from northern European countries. I also write, create decks and amigurumi (crochetted puppets). I guess that one of the reasons to become crafty has been the will to create cute things. In Japan I was in contact with very talented people who created really cute stuff (drawings, puppets, great art, etc). Since my hands cannot really be still, it was just a matter of discovering which was my favorite medium. And I found it, mixed media. I can mix anything and everything! And it makes me feel free and complete. I just love it!

My blog & store:
blog:
http://depepi.com
store: http://store.depepi.com
tv channel: https://www.youtube.com/user/depepitv/videos (here I upload a video with a whimsy each week)

I like to create whimsies: little funny dolls with big eyes and tiny bodies. This time I created a white bunny whimsy Alice. One of my favorite tales is Alice in Wonderland. I have created a Lenormand deck just for Alice, and today I decided to turn her into a funny white bunny. One of the symbols for March are bunnies! And since they also welcome Spring, I thought it would be awesome if we followed a cute white bunny. Are you up for it?

 
To create your own Whimsy Alice you need the following:
  • Caran d'Ache Watersoluble Neocolors II. You can use the colors you like the most. I used skin color, salmon, orange, raspberry red, light blue, turquoise blue, and turquoise.
  • Acrylics: snow white
  • Faber Castell: black B pen.
  • Scrapbooking paper
  • White glue
  • Stencils
  • Dylusions Spray Ink: dirty martiny (green)
  • Sakura Stamp
  • Versa Magic, cloud white (chalk ink pad)
  • Cretacolor monolith 9B pencil
  • Pilot parallel pens: 2.4mm and 3.8mm
  • Brushes of different sizes (0, 4, 6) to paint the different parts in the drawing.
You don't need to use exactly the same things that I used. You can change them for different art supplies that you love. I highly recommend you to use Pilot parallel pens for the writing. They are awesome and fun to use. (But, again, you don't really need to if you don't want to).


 Whimsies have big heads, big eyes, tiny fatty bodies and funny poses. You can create your whimsies with different attributes, but in general, features are exaggerated. They are meant to be fun and appealing for children. They awaken the inner child in adults, while make children giggle. They live in a dreamworld of colors and bizarre objects. This time, the target is to draw a bunny Alice in Dreamland.


Drawing whimsies also helps you to recover your inner child. If you create your art, or your crafty items while listening to cute or relaxing music, your artwork becomes astounding. Let your hand be guided by your heart when choosing the colors you like the most for your artwork. I tend to use bright colors more than darker ones. There are no mistakes, really. Whimsies are fun and easy to make. In the whimsy world everything is whimsical. Let yourself be guided and you'll find the mojo to create awesome art.


You can use the whimsies to create personalized postcards for your friends, or create wonderful little presents with paper. Awesome for birthdays and ATC swaps, or funny when found in your art journal. 
 
Thanks for stopping in today!
Pepi Valderrama
 

Friday, February 28, 2014

March Challenge by Tonya Gibbs


Pantone has announced that its 2014 color of the year is Radiant Orchid.  Well I have to admit, purple is not usually my first choice, but I do think the color makes a powerful statement when used properly.  So I thought I would use this opportunity to challenge myself, and the other members in the Artsy Addicts Facebook group.  Let's use this color tone in March!
 
Just for a little fun - I would like to purpose a challenge for March 2014. We will feature the work of those who participate before the deadline on the We Are Artsy Addicts blog.  This is a personal challenge and not a contest, so there are no winners or prizes. 
 
Here is what you need to do....
 
**RULES**
  1. Post a photo of your project in the Artsy Addicts Facebook Group (Only 1 project per participant will be included in the blog post. However, feel free to post as many projects as you like with the challenge).
  2. Give a description to your project (this will be used as the caption for the post on the blog)
  3. Hash tag the post ‪#‎AAMarchChallenge‬ (this is so I can find them later)
  4. Deadline for posting is March 24 (you can still post after this date, but it may not be featured on this blog).
So for inspiration I have created a little card.


Can't wait to see what you guys create!

Tonya
http://www.psychomomscrapbooks.blogspot.com

Resources:

Tattered Angels - Glimmer Mist Spray - Timeless Lilac
Tattered Angels - Glimmer Mist Spray - Popsicle
Die-Namite Dies - Flowering Tree
Prima Chalk - Teal Damask
Prima Chalk - Pastel Blue
Prima Chalk - Olive Vine
Prima 6x6 paper pad - Alla Prima
Prima Flowers - Wildflowers Pillar Pack Collection
Prima 6x6 paper pad - Almanac
Fiskars Simple Stick Cling Rubber Stamp Sheet - All Year Cheer
Heidi Swapp -  Color Shine - Gold Lame
Faber-Castell Design Memory Craft Whipped Spackle
Stampers Anonymous - Tim Holtz - Cling Mounted Rubber Stamp Set - Ultimate Grunge
Ranger Ink - Tim Holtz - Distress Marker - Shaded Lilac
Ranger Ink - Tim Holtz - Distress Marker - Shabby Shutters
Ranger Ink - Utee
Black Sharpie Marker
Burlap scrap
Clear Gold Glitter Nail Polish
Martha Stewart Crafts - Crafter's Clay Collection - White Clay
Cameo Setting Frame Silicone Mold


Related Posts Plugin for WordPress, Blogger...
 
Pin It button on image hover