I've been married to my best friend and soul mate for nearly 17 years. Between the two of us we have 7 grown children, 17 grandchildren and 1 great grandchild.We are also pet parents to Annie our 7 year old Scottish Terrier. I've lived in Oklahoma most of my life until 1995 when we moved to Wichita.
I'm a full time cake decorator with Walmart and part time amateur photographer. I've had my photos in a couple of gallery shows here in Wichita and even sold some prints. My husband and I have participated in a few craft fairs, even had some things in a local mall when we lived in Oklahoma. I hoard paper, stamps and embellishments like they're somehow going to be a shortage, and if I only had a dollar in my pocket I would much rather spend it on a crafty sale than eat...seriously!
Crafting has never made me "rich" but it "enriches" my life everyday.
About 6 years ago I discovered Youtube. I know, I'm a late bloomer, lol! Who knew you could find crafting tutorials 24-7! I was in haven. It didn't take me long to find Susi Blu, Marion Smith, Kathryn at the Scrap beach and Stephanie Miller just to name a few. When I got into a rut they were always there (virtually) to cheer me on....and it worked. It's given more confidence to try new things and discover what my true niche is. Crafty Sistas are the BEST!
Fast forward to the present...Domino Pendents.
It was one of those days... just out surfing the net and BAM!... there it was, RachO113. This girl is an amazing mixed media artist! The tutorial was on altered dominoes using alcohol inks. I had to try it. My heart started racing and my head started buzzing with ideas and possibilities. Before I knew it I had created one, then another then another and I haven't stopped since! I've only scratched the surface with this technique and I can't wait to see how far it will take me.
I'm so happy to share with you this process and perhaps you too will make an unique and one of a kind piece of jewelry of your own.
Things you will need:
Domino
Alcohol ink - 3 or 4 colors
Blending solution
Dabber with felt squares
Liquid floor wax
Modge Podge or something to seal the ink
White tissue paper
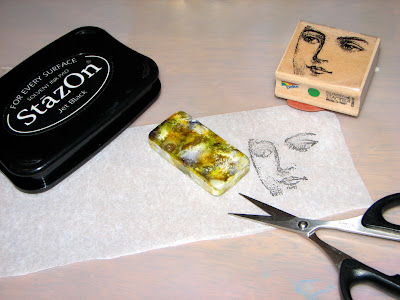
Stamps and Permanent ink pad (I used StazOn)
E6000
Charms for embellishing
Jewelry bail (to hang your chain by)
Chain
Small paint brush (I used a square brush)
Scissors
Paper towel...spills, clean up.
This project will take 1 to 2 days to complete depending on the embellishments you use and the drying time for the adhesive.
Lets begin...
Cover the surface you'll be working on. Ink stains!
Put a felt square on your dabber and add a few drops of ink, add another color and a third if you wish. This really all depends on how you want it to look so you'll have to experiment. Add a drop of blending solution. This breaks up the colors.
Dab and pounce the ink onto your domino, front, back and sides. Set aside to dry.
Stamp the image you want to use on white tissue paper and size it up with the domino so you'll know where the placement of the image will be.
Cut the image to fit the domino.
Pour a small amount of floor wax in a dish and using your brush gently brush across the top and sides of your image. be gentle as the tissue will become fragile when wet. Let this dry.
Apply Modge Podge over the whole domino to seal the image and the ink. Let dry.
Using E6000 to attach assorted charms, words or beads to the top of your image. Let this dry.
Attach the bail for your chain to the back of the domino. Let this dry.
Add chain of your choice.
Options...
Add Glossy Accents to the top to give it some dimension
Ink around the edge to frame your piece.
Use flat back stones and crystals to add sparkle and bling.
This is only one of many ways to approach this project. Remember...there are no mistakes only opportunities so just have fun!
Big Thanks to Artsy Addicts for giving us all a place to share our artsy creations ~:)
~~~A big thank you to Catherine for sharing her Altered Domino Art with us.~~~
*Interested in being featured on the blog? Just Facebook message Tonya or Angee for the opportunity.


Great post and I love your jewelry. Your work is very inspiring. Congrats on being featured.
ReplyDeleteThis is an awesome project! You ROCK!!!!
ReplyDeleteyou do amazing domino pieces, i love them. this one is stunning, tfs
ReplyDeleteAwesome! Thank you so much for the tutorial. I think I have everything but the floor wax and that's no biggie to get. I've got to give this a try!
ReplyDeleteI see the key step......DRY! LOL
Smiles~
Marilyn